Category: Core Techniques & Principles

  • What Is Aikido? The Art and Its Basics Explained for New Students

    What Is Aikido? The Art and Its Basics Explained for New Students

    Core Techniques & Principles

    A plain-language tour of the Japanese martial art that redirects force instead of meeting it head-on, plus the basic stances and the first grabs and strikes every beginner meets on the mat.

    Updated October 2026 · 13 min read

    Walk into almost any aikido dojo in the US or Canada on a weeknight and you’ll see something that doesn’t look much like a fight. Two people bow to each other on a padded mat. One reaches out and takes the other’s wrist, slow and deliberate, the way you’d hand someone a fragile package. The second person turns, the first person’s arm floats up as if pulled by a string, and within a second or two somebody is lying on the mat looking mildly surprised. Nobody got hit hard. Nobody seemed to muscle anything. If you’ve signed up for a beginner class, this is roughly what your first hour will look like, and I’d guess your first reaction will be a mix of curiosity and mild suspicion that the uke, the partner doing the falling, is being polite. Some of it is politeness. Most of it is physics, and the physics takes a while to make sense.

    That’s what this article is for. Before the stances and the Japanese vocabulary, it helps to know the single idea the whole art is built around, because every basic technique you’ll learn in your first year is just that idea wearing different clothes.

    A Short History, Told Quickly

    Aikido is a Japanese martial art founded by Morihei Ueshiba, who was born in 1883 in a small town in Wakayama prefecture and spent most of his long life becoming the kind of person students write books about. In his younger years he trained hard in several arts, most importantly Daito-ryu aiki-jujutsu under a famously demanding teacher named Takeda Sokaku. The core material of early aikido comes straight from that Daito-ryu curriculum, and you can trace the connection in any overview of aikido’s history.

    What Ueshiba did over the following decades was reshape that older jujutsu around a different intention. He’d had religious experiences, studied a spiritual movement called Omoto-kyo, and come to believe that a martial art should neutralize an attacker without destroying them, that the highest victory is the one nobody has to win out loud. He called the result aikido, and the name became official around 1942. After the Second World War his students carried the art well beyond Japan, and today the headquarters organization, the Aikikai Foundation in Tokyo, affiliates dojos on every continent. A fuller account of the founder’s own path, from frail small-town boy to teacher with students on five continents, is in any biography of Morihei Ueshiba.

    One honest caveat. Ueshiba himself was a complicated man, and the art he taught changed noticeably over his lifetime, softer in his later years than his earlier. Two dojos teaching “aikido” can look quite different from each other, and that’s normal.

    The One Idea Underneath Everything

    Blending first. Everything else is footwork.

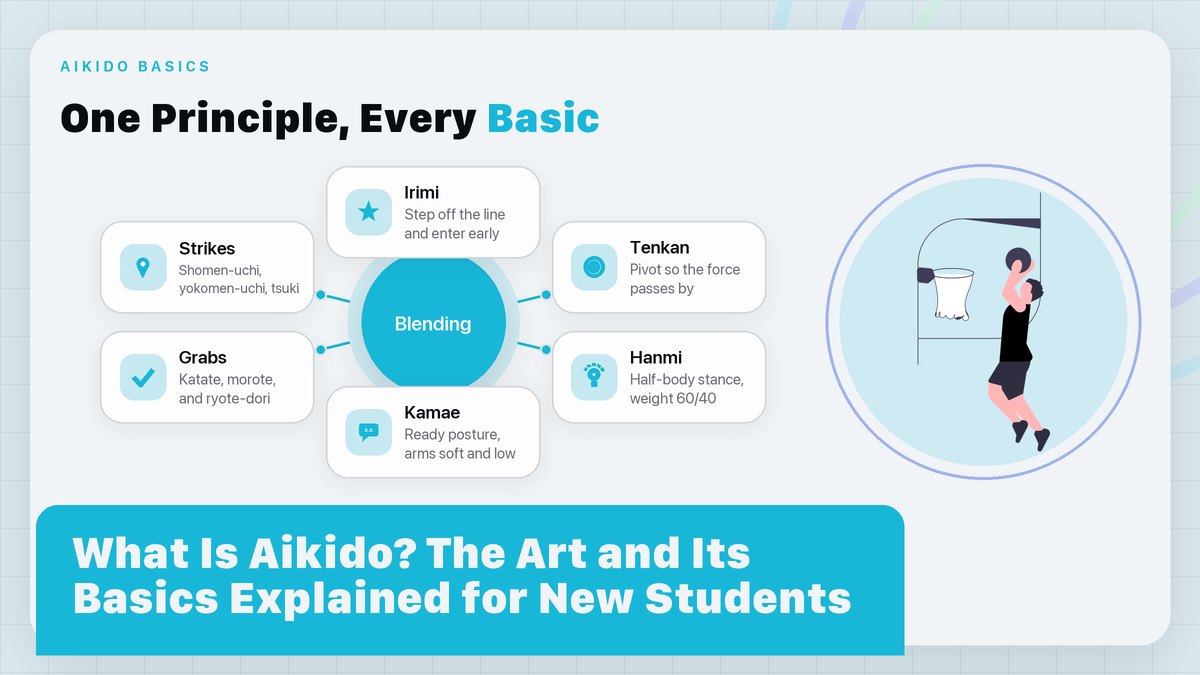
    Every martial art answers the question of what to do when someone uses force against you. Aikido’s answer is unusual. You meet the force early, join with it for a moment, and redirect it somewhere harmless, usually past you and down into the mat. The Japanese words you’ll hear for the pieces are irimi, the entering step that takes you off the attack’s line and puts you beside it, and tenkan, the pivoting turn that completes the redirect. Between them sits the idea the art is named for. Ai means joining or harmony, ki means energy or intent. Harmony with the incoming thing.

    My first teacher explained it with a door. If somebody leans their shoulder into a door you’re holding, yanking the door shut against them means a shoving match you’ll eventually lose to somebody bigger. Aikido is the option where you stop holding the door shut, step to the hinge side, and let their own lean carry them through the space where the door used to be. Their momentum does the work. You just stopped being where they were pushing.

    Two words for the same skill exist in most dojos, and students mix them up for years. Awase is the blending itself, the act of moving together with the attack so early that it never becomes a collision, and musubi is the connection you keep once you’ve made contact. A wrist grab in aikido class is never just a wrist being held. It’s a line of communication, and the whole game is who reads it better.

    None of this means the art is passive. Walk into a committed attack too late and you’ll get a strike to the head for your trouble, because timing is the entire technique. The softness people notice from the door is what good structure looks like when it arrives at exactly the right moment.

    Aikido doesn’t ask you to be stronger than the person grabbing you. It asks you to stop standing where their strength is pointed.

    The First Thing You Learn Is How to Stand

    Beginners are sometimes disappointed to spend their first several classes mostly standing still. There’s a reason. Aikido techniques all come out of a balanced, mobile position called hanmi, which means “half-body.” One foot sits ahead of the other at roughly shoulder width, your hips turn so your torso presents itself at an angle rather than square-on, and your weight splits something like 60/40 between the back leg and the front. Picture a fencer’s stance and you’re close, though aikido’s version is lower and calmer. From hanmi you can step, turn, or drop without first reorganizing your whole body, and that readiness matters more than any single move.

    On top of the stance comes kamae, your ready posture. Kamae covers more than feet. The arms stay in front with a soft bend, hands open, head up, weight settled down through your legs instead of floating in your chest. In many dojos you’ll learn a specific arm shape early called tegatana, the “hand blade,” where the fingers stay together and the whole hand acts like a small wooden sword. A surprising number of aikido techniques are just tegatana placed accurately on somebody’s arm or shoulder at the right moment.

    Two details teachers watch for in a new student’s stance. The first is the back foot, which newcomers turn outward like a duck; it should stay closer to parallel so the pivot is already loaded. The second is the shoulders, which creep up toward the ears the moment a grab lands. Drop them. Every instructor I’ve met has said some version of “relax” at least once per class, and after a while you realize it’s the single instruction that never stops applying.

    You’ll also kneel a lot. Seiza, sitting on your heels with a tall back, is how classes in most traditional dojos begin and end, and some techniques are even practiced from the knees to isolate the upper body. Give your ankles a few weeks to adjust. Mine complained for about a month before quietly giving up.

    The Three Grabs Every Beginner Meets

    Before anyone throws a punch at you in an aikido class, they’ll grab you. Grabs are the training wheels of the art, and there’s a logic to starting there. A held wrist slows everything down and gives both partners time to feel what’s happening, and it forces the person being grabbed to actually move their body instead of swatting at a hand. The standard curriculum opens with three of them.

    Katate-dori is one hand taking one wrist. It comes in two flavors depending on which side it lands on. Ai hanmi katate-dori happens when your partner’s front hand grabs the wrist on the same side, and gyaku hanmi katate-dori is the cross-hand version, their front hand taking your opposite wrist. They feel completely different once techniques start, so teachers drill both. Morote-dori tightens the puzzle. Two of your partner’s hands grip your single wrist, which teaches you to move from your center because one arm against two is arithmetic you won’t win. Ryote-dori finishes the set with both of your wrists held at once, a grab that pins your arms apart and forces the whole response to happen through footwork and posture rather than hands.

    The three grabs, side by side:

    Grab Japanese name What it looks like What it teaches you
    One wrist, one hand Katate-dori (ai hanmi / gyaku hanmi) A single hand closes around your wrist, same side or cross hand Extension, entering off the line, not pulling back
    One wrist, two hands Morote-dori Your partner’s both hands clamp your leading wrist Moving from your center instead of your arms
    Both wrists Ryote-dori Each of your wrists held, arms pinned apart Footwork first, since your hands are busy

    Notice what’s absent from that list. Any reason to yank your arm away is missing, and pulling straight back against a grab is the first habit every aikido teacher spends months unteaching, because it loads up your partner’s grip and plants your weight on your back foot, handing them the line they wanted. The response runs forward or around, almost never backward.

    The Three Strikes You’ll Practice Against

    Once the grabs feel familiar, attacks start arriving as strikes. Aikido has a short canonical list, and beginners meet three of them early. Shomen-uchi is a vertical downward strike aimed at the top of the head, delivered with tegatana, the hand blade, swinging up and then cutting down like a sword. Yokomen-uchi is its diagonal cousin, a rising-then-slicing arc that targets the side of the head or neck. Tsuki is a straight punch, usually aimed at the midsection, and it arrives on time rather than on a cue, which makes it the most honest of the three by a wide margin.

    That honesty matters, because the strikes in a beginner class are pre-agreed drills. Your partner, in the role of uke, gives you an attack of a known shape and speed so you can practice the response, called the waza. As you improve, the attacks get faster and less announced. But at every level, aikido practice is a conversation with assigned parts. Uke provides something real enough to work with, nage (the person doing the technique) answers it, and both partners reset and go again. The long-running magazine Aikido Journal has published decades of writing on exactly this partnership, and the forums at AikiWeb are where students argue about it at length, which they do with great enthusiasm.

    One thing that surprises newcomers is how much time you’ll spend being thrown. That’s by design. Being uke well, attacking honestly and taking the fall safely, is half the art, and it’s the half that makes you safe to train with for the next twenty years.

    Training noteAll of this assumes a cooperative partner in a supervised class. Aikido techniques involve joint control and throws, so learn them with an instructor watching, tap early and clearly the moment anything hurts, and say so out loud. Communication is part of the drill, and a good partner is grateful for it.

    The Words You’ll Hear in Your First Month

    Japanese vocabulary floats around an aikido dojo constantly, and nobody translates it in real time. A handful of terms covers most of what a beginner overhears. The mat itself is the tatami. Partner practice starts when you bow and say onegai shimasu, a phrase that means roughly “please train with me,” and it ends with a second bow and arigato gozaimashita, thanking your partner for the practice they just gave you. The teacher is the sensei, though plenty of dojos in the US and Canada are relaxed about the word and some instructors prefer their first name. And the spacing between you and your partner, the distance that makes the next attack possible or impossible, is called ma-ai.

    None of this vocabulary is ever tested. But I’d learn the two bowing phrases before anything else, because saying them out loud to someone you’re about to grab is a small skill of its own, and it changes how the whole hour feels.

    How the Basics Fit Together in a Real Class

    A typical beginner class runs about an hour, and the pieces you’ve just read about show up in a fixed rhythm. Classes usually open with a brief seated bow toward the front of the dojo, where a picture of the founder hangs, followed by warm-ups. Light stretching, some wrist and shoulder rotations, a few minutes of rolling practice, because falling safely, called ukemi, gets trained from day one rather than left for later.

    The middle of class is partner work. The instructor demonstrates a technique against one of the grabs or strikes above. Pairs form, and you take turns as nage and uke for ten or so minutes before the teacher calls “change” and shows the next variation. Between technique rounds you’ll usually drill footwork on your own, walking irimi and tenkan steps up and down the mat until the pivot stops feeling like choreography and starts feeling like walking. Many dojos finish with a short weapons segment, a few suburi cuts with a wooden sword or wrist-spinning drills with the jo staff, because the weapon movements are the empty-handed movements with the details made visible. Everyone lines up and bows out. Which is also when the senior students stay to sweep the mat.

    That’s the whole shape of it. And honestly, the hardest part for most adults isn’t physical at all. It’s accepting that for the first six months you’ll feel like you’re moving through wet concrete while the person next to you glides. They’re gliding because their hundredth class is somewhere behind them. Yours is ahead. The stance, the grabs, the strikes described above are more or less the entire vocabulary of your first year, and there’s enough depth in just those to keep anyone busy.

    What to Take From All This

    Aikido is a young martial art by the standards of the genre, barely a century old, and it wears its philosophy on its sleeve more than most. I’d call the practical skill it builds redirection. It means seeing force arrive early enough to join it instead of blocking it, then ending the exchange with both people able to stand up and bow. The basics are deliberately plain. Stand in hanmi, hold kamae, meet katate-dori without pulling back, let shomen-uchi slide past on your tenkan, and trust that the tenth repetition of a thing is where it starts to live in your body rather than your head.

    So if this sounds like something worth trying, the best next step is unglamorous. Find a dojo near you, watch a beginner class, and notice whether the senior students move like people who enjoy being grabbed. That tells you most of what you need to know about the place.

    Sources and notes. This guide reflects common practice in Aikikai-affiliated and independent dojos across the US and Canada; the exact vocabulary and class structure vary between styles and organizations. External links were checked and working as of October 2026. This is training guidance for a supervised martial-arts class, not medical advice; for any injury or health concern, see a qualified professional.
  • Ikkyo: Why the First Aikido Technique You Learn Matters So Much

    Ikkyo: Why the First Aikido Technique You Learn Matters So Much

    Core Techniques & Principles

    Every aikido student meets ikkyo in their first month on the mat, and most of them underestimate it for the next ten years. A step-by-step look at what the “first teaching” is actually teaching you.

    Updated October 2026 · 13 min read

    Ask a room full of aikido students what they worked on in their very first class, and you’ll hear the same answer almost every time: somebody grabbed my wrist, my teacher put a hand on my elbow, and suddenly I was looking at the ceiling. That’s ikkyo. It looks like nothing from across the room, a gentle folding of an arm that a bigger, stronger person could surely resist with raw muscle. Except they can’t, or at least they can’t once you stop doing it with your arms. The technique is the first one taught in the traditional curriculum for a reason that has very little to do with the wrist grab and everything to do with the shape underneath it, because that shape reappears in almost everything that comes after.

    I remember watching a fifth-degree black belt run a class on ikkyo, and honestly, a few of us were annoyed about it because we wanted the flashy throws. Then he took one of the largest students in the dojo, moved him around the mat for a full three minutes without ever looking like he was trying, and told us afterward that he still practices this one technique every single morning. I stopped being annoyed.

    What Ikkyo Is, and Where It Comes From

    Ikkyo means, more or less, “first teaching.” The name is a shortened version of ikkajo, the heading under which the founder Morihei Ueshiba organized the earliest material he inherited from Takeda Sokaku’s Daito-ryu aiki-jujutsu. In that older catalog, ikkajo headed a whole group of responses to specific attacks rather than naming one move. Ueshiba spent years boiling that catalog down, and what survived as ikkyo was the response to a very common situation: someone has hold of your wrist and intends to keep hold of it. You can read the broader story of how Ueshiba reshaped Daito-ryu into aikido in the overview of aikido, and his own winding path from a small town in Wakayama to a famous Tokyo dojo in any biography of Ueshiba.

    The standard version most dojos teach first works from a cross-hand wrist grab called gyaku hanmi katate-dori. Your partner reaches across to take the wrist on the opposite side. Simple to describe. Hard to do. The response has a beginning, a middle, and an end. You enter in, you turn, you cut your partner down to the mat and pin the arm beside their head, ideally before they’ve decided what to do about any of it.

    What makes the technique worth studying for years is that every stage of it is a miniature of a larger principle. The entry is irimi, the entering step. The turn is tenkan, the pivoting movement. The cut down is the same shape as several throws. The pin is where you learn what it means to control someone with your whole body weight instead of your grip. Strip the wrist grab away and you still have the skeleton of half the art. Most styles recognize this today, which is why the largest aikido organization in the world, the Aikikai Foundation in Tokyo, treats ikkyo as a core examination requirement at essentially every rank.

    The Four Parts, Broken Down

    The shape you learn in week one is the shape you’ll be refining in year ten.

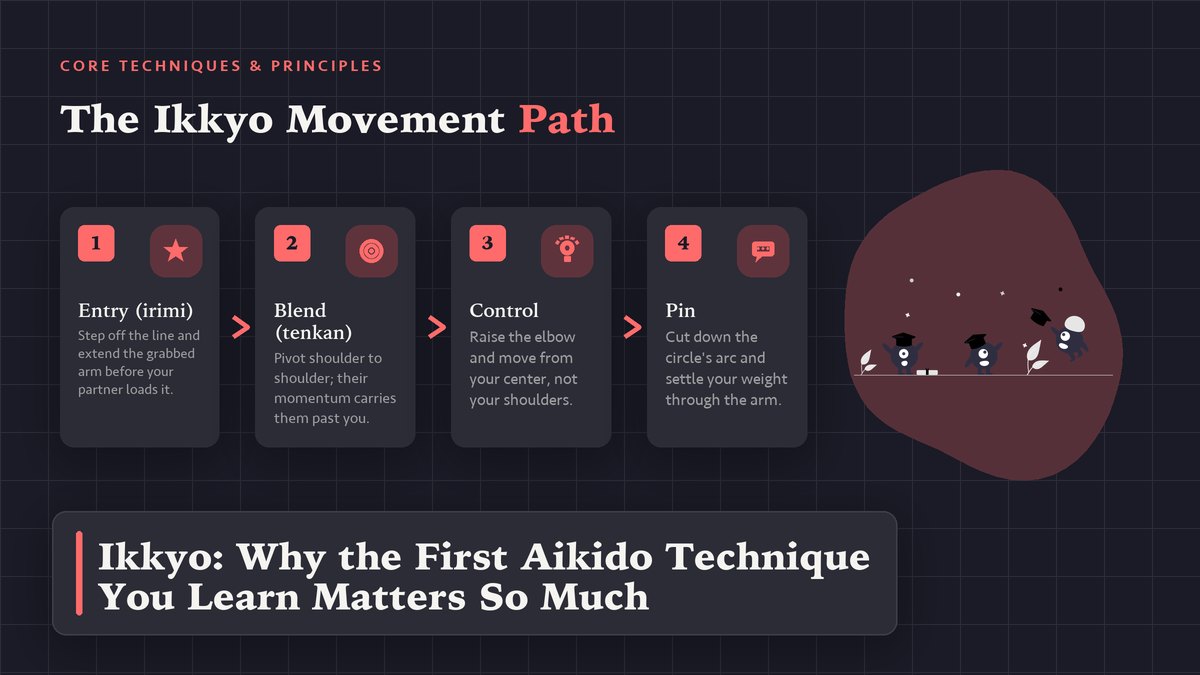
    Watch a slow demonstration and ikkyo appears to happen all at once. It doesn’t. Break it into its four stages and each one has a job, a common failure mode, and a reason your teacher keeps stopping the class to talk about it.

    The entry: take the space and break the balance

    The grab itself isn’t the problem. A held wrist only matters because your partner intends to use it as a handle, so the entry starts before that handle gets loaded. You step slightly off the line of the grab, usually at an angle that puts your body beside your partner rather than in front of them, and you extend the grabbed arm forward as if you’re handing them something they can’t quite reach. Done at the right moment, this puts them just far enough onto their front foot that pushing back at you becomes their whole plan. That off-balancing is called kuzushi, and the concept of kuzushi runs through every Japanese grappling art worth the name; aikido just tends to arrive at it earlier in the encounter than most.

    On day one, the almost universal mistake is pulling the grabbed arm back toward your own chest, which gives the grabber exactly what they wanted. The arm goes forward. It’s a strange feeling the first few dozen times.

    The blend: the turn that isn’t a retreat

    From the entry you pivot, and this is the moment people describe as blending. Your free hand rises to contact the underside of your partner’s elbow while your feet turn you to face roughly the same direction they do, like two people standing shoulder to shoulder looking at the same view. You are no longer in front of them where they can push you. Their own forward energy, the momentum they committed to the grab, is now carrying them past the place where they expected you to be. I think this pivot, tenkan, is the single most copied movement in all of aikido, because it shows up in some form in almost everything you’ll learn in your first few years.

    The elbow and the center line

    The elbow is the steering wheel. Your upper hand drives it up and across in an arc that traces the outside of a big circle, and because the shoulder has to follow the elbow, the rest of your partner comes along for the ride. Done well, you’re not pulling or pushing with that hand at all. You’re moving your own center, your hips and torso, and the arm connected to your partner is just the delivery mechanism. A strong person can resist your arm muscles for a long time. Nobody in the dojo is strong enough to stop your whole body from rotating when their balance is already broken.

    One more thing about the elbow: keep your own arms in front of your body. But the moment either arm drifts out to the side, you’re feeding your partner a lever they can use to turn the whole thing around on you.

    The pin: the part everyone rushes

    The cut down happens as you both reach the end of the turn. Your partner’s arm extends, their balance drops, and they end up on the mat with you beside them, ideally one knee near their head and both hands controlling the arm at the elbow and the wrist. The finish matters. You’re pressing the arm toward the mat in line with the shoulder, never twisting it up behind the back, and your weight settles down through your posture rather than pushing across with your shoulders. I said the pin comes at the end, but on a bad day it actually comes at the beginning, because if your entry never broke their balance, you’re just kneeling on the floor wrestling an arm while your partner stands up.

    As a training checklist, the whole sequence looks something like this:

    • Enter early. Step off the line and extend the grabbed arm before your partner loads it up.
    • Turn together. Pivot so you end up shoulder to shoulder, facing their back rather than their front.
    • Raise the elbow. Drive the underside of their elbow up and across with your free hand, moving from your center rather than your shoulder.
    • Cut and follow. Let the arc drop them as your knees lower, staying connected all the way down.
    • Finish the pin with structure. Weight settles, arm is straight and in line with the shoulder, and you keep your own posture tall.

    The wrist is the handle and the elbow is the lever, but your hips are the part doing the work.

    Why Your Teacher Will Drill It for Years

    It can feel insulting, honestly. You’ve been training for two years, you can fall reasonably well, you’ve seen a dozen techniques, and there you are again in suwari-waza, both partners kneeling, doing ikkyo up and down the mat until your knees ache. There’s a reason for it that goes beyond tradition for tradition’s sake.

    Ikkyo is where aikido’s timing lives. The technique only works comfortably if the entry happens during the half-second when your partner’s weight is committed to the grab, which means you can’t run it on autopilot and you can’t run it on strength. Every repetition forces you to feel where your partner’s balance is, right now, this time, with this person. Say a heavier training partner grabs you a little lower and pulls instead of pushes. The arm does the same shape, but the moment you enter shifts by a beat. You don’t learn that from a book or a video, you learn it from roughly the ten-thousandth repetition when something clicks and the person twice your size folds like a deck chair.

    There’s also a teaching-tradition reason. Because ikkyo is forgiving, partners can attack each other sincerely without much risk, so it carries a double load in most dojos. It’s the first technique a newcomer learns as nage, the one doing the technique, and usually the first position they learn to fall out of as uke, the one receiving it. One movement trains both sides of the exchange. My own practice has been built around it for years, and I still find pieces of it I’d swear weren’t there last month.

    Quick tipWhen the pin won’t settle and you feel yourself pushing harder, stop pushing entirely and check your feet instead. Nine times out of ten one foot has crept behind the other or your knees have drifted too far from your partner’s head, and no amount of arm effort will fix a posture problem. Lower your hips, square your stance, and let your weight do the job your shoulders were trying to do.

    The Mistakes Nearly Every Beginner Makes

    Watch any intro class and you’ll see the same three or four errors cycle through the room, because they’re what untrained instincts tell you to do. Your instincts are wrong about this art almost everywhere, which is sort of the point of training.

    • Pushing with arm strength. The most common one by far. The arms do hold on, but the force comes from your center, and muscling it only teaches your partner to muscle back. You’ll know you’re guilty when your shoulders burn after three repetitions.
    • Crossing your feet during the turn. Feet cross, balance goes, and the person who was supposed to fall is suddenly holding you up. Walk the pivot without a partner a few times at home; it fixes itself faster than you’d expect.
    • Looking down at the arm. Your eyes drop, your posture folds forward, and you hand your partner your balance along with your full attention, which is exactly backwards from what the entry is supposed to do to them. Look at your partner’s center rather than their hand. Their face works too, though some teachers will tell you that’s impolite in a different way.
    • Gripping the wrist like a handle. The pin controls the elbow and the line of the arm; the wrist hand mostly guides. White-knuckling the wrist tenses your whole frame and telegraphs every move you’re about to make.

    One more, quieter mistake: rushing to the ground. Beginners often yank the arm down as soon as the turn completes, which lets an experienced uke simply ride the pull and stand back up. The cut down is the end of the circle your center drew, so if the circle was never drawn, the ending has nothing to ride on. Slow is correct, and correct eventually becomes fast on its own.

    Where Ikkyo Keeps Showing Up

    The sneaky thing about ikkyo is that it never really leaves. Learn its shape properly and you’ll start recognizing it inside techniques that look nothing like it on the surface. This is why old-timers sometimes describe aikido as one technique with several hundred costumes (a bit grand, maybe, but you see what they mean).

    What ikkyo teaches Where you meet it again
    Off-balancing at first contact (kuzushi) Every throw and every pin in the syllabus; if the entry doesn’t break balance, nothing downstream works
    Entering off the line (irimi) Iriminage, the “entering throw,” and the entry to shihonage
    Turning with the attack (tenkan) All the pivoting entries, plus kokyunage where the blend is the whole throw
    Controlling the elbow and center line Nikyo, sankyo, and yonkyo, which start from almost the same grip
    Extension through the partner’s arm Kaiten-nage and most of the projection throws, which are ikkyo’s circle drawn larger
    Falling safely as uke Every technique, every class, from day one until you hang up your belt

    In the other pins

    Nikyo and sankyo begin from positions nearly identical to ikkyo’s. The difference arrives after the blend: instead of cutting your partner down, you keep the elbow raised and rotate the wrist to spiral them down instead. When a sankyo feels impossible, it’s usually because the ikkyo underneath it, the entry, the turn, the raised elbow, was skipped or rushed. Fix the ikkyo and the nikyo often appears by itself.

    In the throws

    Kaiten-nage is the clearest relative. Same wrist grab, same entry, same turning blend. The difference comes at the top of the circle: you send your partner forward and roll them out along the extension of their own arm instead of pinning it to the mat. Shihonage similarly takes the raised elbow and turns it over your partner’s head into a spiral throw. And honestly, I don’t think it’s an exaggeration to say that if your ikkyo is honest, these later throws take weeks to learn instead of months.

    On the weapons rack

    Pick up a bokken, a wooden practice sword, and the family resemblance gets hard to miss. The overhead cuts of basic suburi trace the same line the elbow follows in ikkyo, and many dojos teach a paired exercise where the two partners cross weapons exactly the way two arms cross in the technique. The connection runs both directions, too: practicing the sword cut cleans up the empty-handed version, because the sword is unforgiving about whether your power comes from your arms or your hips. Long-running publications like Aikido Journal have published decades of essays and interviews on exactly this overlap between weapons work and empty-hand technique, if you want to go down that particular rabbit hole.

    A Word About Being the Uke

    Half of your ikkyo training is taking the fall, and it’s worth saying plainly that this part is a skill too. Following the technique as uke, keeping your own balance alive until the moment it genuinely breaks, and falling out of the pin without tensing up are all learned behaviors. Good ukemi lets your partner train honestly and keeps your own shoulder out of trouble, which matters a lot more than it sounds. Some nights the whole lesson is in the receiving half of the exchange, especially early on when the person throwing you is still finding the shape.

    So the next time class opens with yet another round of ikkyo, maybe treat it as a measuring stick instead of a warm-up. Film yourself occasionally, or just notice whether the person on the other end folded without you having to convince them. Either tells you plenty. That feeling, the one where a committed grab turns into nothing and a heavy partner arrives gently on the mat, is the whole art arriving through its front door.

    This guide reflects common teaching practice in Aikikai-affiliated and independent dojos across the US and Canada; details vary by style and teacher, so treat your own instructor’s version as the final word. If you’re newer to the mat, you might also like our introductions to what aikido is and how a first class usually runs and to ukemi, the art of falling well. We last reviewed this article in October 2026.

  • Blending and Tenkan: The Footwork That Makes Aikido Work

    Blending and Tenkan: The Footwork That Makes Aikido Work

    Core Techniques & Principles

    Aikido techniques don’t work because your arms are stronger than your partner’s. They work because you stopped standing where the attack was aimed. This is a practical guide to tai sabaki, the tenkan pivot, and the solo drills that teach your feet to do the work.

    Updated October 2026 · 13 min read

    For my first year of aikido, I was basically an arm wrestler with a white belt. Somebody would grab my wrist, I’d plant my feet and pull back with everything I had, and the bigger students would stand there like lampposts while I grunted and accomplished nothing. My teacher would walk over, move his feet maybe eighteen inches, and suddenly the person who was beating me was on the mat wondering what happened. Same arms. The difference was entirely below the waist, and nobody had thought to explain that part in enough detail for me to practice it on my own. That explanation is what this article is for.

    Tai sabaki, meaning body movement, is the layer of aikido that makes everything else function, and tenkan, the pivoting turn, is its most famous single movement. Once those two ideas click, techniques stop being arm fights and start being geometry problems. Geometry problems you can practice in your living room. Which is convenient, because your living room is open every day of the week and the dojo isn’t.

    What Tai Sabaki Actually Means

    The Japanese term translates loosely as “body management,” which sounds administrative but means something very physical. It means moving your whole body as one connected unit so that an attack arrives where you used to be. In most traditional Japanese martial arts the phrase refers to repositioning around an attack rather than meeting it head-on, and you can see the same concept running through the way tai sabaki is described across judo, karate, and aikido, where the emphasis is always on the feet doing the work before the hands get involved.

    Aikido pushes this idea further than most arts, to the point where instructors sometimes say the technique is the footwork and everything else is decoration. I used to think that was dojo poetry. Then I watched a senior student demo a throw with her arms folded across her chest the entire time, steering her partner around purely with her body position, and I stopped thinking it was poetry. She was making a point, obviously, and her arms came back out after that rep, but the point landed hard.

    Why do the feet matter so much? Two reasons. First, your legs are vastly stronger than your arms, so any situation where the legs move you instead of the arms pulling is a situation you’re going to win. Second, and more important, moving your feet moves your center of mass, and aikido techniques are all about controlling the line between your center and your partner’s. An arm can be resisted by an arm. A center that has already vacated the line of attack can’t be grabbed at all, no matter how strong the hands on your sleeve are.

    If your shoulders are working harder than your feet, you’re doing it wrong. That sentence alone will fix half your aikido.

    Irimi and Tenkan: The Two Doors

    Every aikido entry is some blend of these two directions.

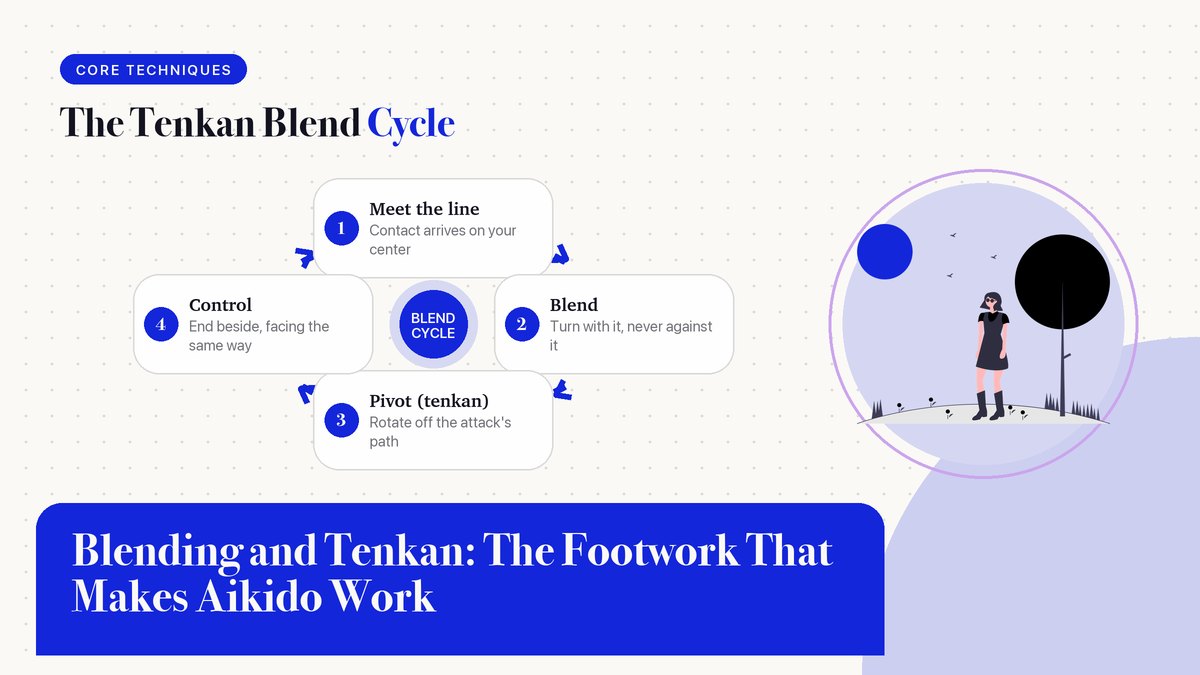
    Step back and watch an aikido class from the corner of the room, and you’ll notice that almost every technique starts with the defender doing one of two things. They either move in toward the attack along an angle, which is irimi, or they pivot away from the center line of it, which is tenkan. Sometimes they combine both, entering first and then pivoting, which has its own names depending on the school. But the two basic doors cover nearly everything a beginner will see in their first two years, and knowing which door a technique uses tells you a huge amount about how it’s supposed to feel before you’ve thrown a single person with it.

    Irimi means entering, and it’s the scarier of the two for most people because it involves stepping toward something that’s coming at you. Done right, you slide in at roughly a forty-five degree angle so you end up shoulder to shoulder with your partner, off their power line, looking at the same thing they are. Their punch or grab keeps going toward the spot you just left. You get to watch it sail past you from very close range, which is honestly one of the more satisfying experiences aikido offers.

    Tenkan is the pivot. Instead of stepping past the attack, you let it come to you and rotate around your own center, so that your partner’s committed energy carries them into empty space while you end up facing the same direction they do, side by side. If irimi feels like walking through a door that’s already open, tenkan feels like a revolving door. You don’t stop the person going through it. You just redirect where the ride drops them off. Both are simple. Neither is easy at speed.

    Irimi (entering) Tenkan (pivoting)
    Direction Steps in at an angle, off the line of attack Rotates around your own center line
    Feels like Walking past a wave as it breaks A revolving door redirecting a push
    Works best against Committed forward attacks: straight punches, pushes, shomen strikes Grabs and follow-through attacks that carry past you
    Common beginner error Stepping in too shallow and staying on the power line Treating the pivot as a retreat instead of a turn
    You end up Beside the attacker, facing the same way Beside the attacker, facing the same way

    Notice that last row, because it’s the real secret. Both doors open onto the same room. Whether you enter or pivot, the destination is identical: you and your attacker standing side by side, facing the same direction, with their balance compromised and yours intact. When teachers talk about blending, that’s the practical content of the word. You don’t fight the attack. You relocate so that the attack no longer has an argument with you, and then you deal with the person from a position where their strength points the wrong way. So the question is never really “which technique should I do,” it’s “which door gets me beside this person fastest.”

    The Tenkan Pivot, Step by Step

    Let’s get concrete, because “pivot” is the kind of word that hides a dozen small errors. Start in your basic stance, left foot forward, knees soft, weight settled in the balls of your feet rather than the heels. Your partner, or in the drills below an imagined partner, reaches for your left wrist or pushes toward your chest. The pivot begins with the front foot. That foot draws a small arc, maybe the length of your own shoe, swinging across in front of the back foot without crossing so tightly that your ankles tangle.

    As the front foot arcs, the back foot becomes the axle. You turn on the ball of that back foot, letting your whole body rotate until your front foot lands roughly where the side of your stance used to be, now pointing about one hundred and eighty degrees from where it started. Your hips turn with the feet, never after them, and your head stays level the whole time. Done slowly, one full tenkan takes about as long as a slow count of three. Slow is correct. Fast comes later, and it arrives on its own once the slow version is boring.

    Three details separate a clean pivot from a wobbly one. Your feet stay on the ground through the turn; lifting the axle foot is the single most common beginner mistake, and it costs you all your stability at exactly the moment you need it. Your shoulders stay above your hips, not leaning back away from the attack; leaning turns your pivot into a stumble. And your arms stay in front of your body rather than flaring out, because arms that drift behind your centerline are arms that can’t do anything useful when the turn finishes. I drill these on myself regularly, and I still catch my back heel floating up about once a session. Old habits keep receipts.

    What’s happening to your partner during all this? Their push or grab was aimed at the center of the person standing in front of them. Mid-turn, that person briefly isn’t there, and by the time their brain updates the picture you’re beside them with your hands still in contact and their momentum still traveling in the original direction. Contact without opposition, which is the whole game. Aikido’s founder, Morihei Ueshiba, built the entire art around this principle of meeting force with redirection rather than resistance, and the history of how that idea developed out of older jujutsu schools is worth reading if you want the deeper context. The article on Daito-ryu aiki-jujutsu, the school Ueshiba trained in before founding aikido, is a good place to start.

    Kaiten, the Turn You Slice Through

    One term you’ll hear near tenkan is kaiten, which means rotation or turning, and it’s worth separating the two because beginners blend them together. Where tenkan pivots you around your own center, kaiten describes a turning movement you move through, usually a rotation around an axis that isn’t you, like your partner’s arm, a line on the floor, or an imaginary pole planted between the two of you. Tenkan is how you get off the line. Kaiten is how you carry something around the line once you’re there.

    A concrete example helps. In many dojos, the way you take a wrist grab into a technique involves entering, then letting your partner’s own arm become the axle while your body rotates around it like a door swinging on its hinge. That’s kaiten in action, and it’s also why senior practitioners sometimes seem to disappear from in front of you. They haven’t moved fast, they’ve moved around a different center than the one you were tracking. If tenkan is stepping onto a carousel, kaiten is riding it once it’s turning.

    For solo practice the distinction matters less than the habit: your body should be comfortable rotating fully, either way, without your feet crossing or your head bobbing. Both turns live in the drills below, and both of them reward patience more than they reward repetition count.

    Ma-Ai: The Spacing You Manage

    None of the footwork above works without ma-ai, the Japanese term for the proper interval between you and your partner. Ma-ai isn’t a fixed distance so much as a living one. Close enough that your partner’s attack must commit to reach you, far enough that you have time to move your feet before it arrives. Think of it as the distance at which the attack has to become real. Inside that band, things happen. Outside it, you can both stand there indefinitely and nothing is ever proven.

    Beginners almost always stand too close or let the gap collapse without noticing. Too close, and you have no time for the pivot; you’ll be doing arm aikido again before you’ve turned fifteen degrees. Too far, and nothing your partner does requires a response, so your tenkan turns in empty air with no energy to blend with. The traditional rough guide is a distance of about two arm lengths for weapons work and somewhat closer for open-hand practice, but the honest answer is that correct ma-ai is whatever distance lets you finish your footwork before contact. That distance changes with your speed, your partner’s speed, the day of the week, and probably the humidity. It is not a number. It’s a feeling you calibrate over months of being slightly wrong.

    Safety noteWhen you practice these movements with a partner, agree on a cooperative pace first. Tenkan training at full resistance teaches you to muscle the technique, which is exactly the habit this art is trying to break. Save the speed for when the footwork is already reliable.

    Solo Drills You Can Do at Home

    Tai sabaki is one of the few parts of aikido you can genuinely train alone, because the movement is about your own geometry, not the exchange. A hallway, a kitchen floor, or six feet of garage all work fine. Do these slowly. The temptation is to drill them at speed, and speed hides errors that slowness exposes.

    The clock drill

    Put a strip of painter’s tape on the floor as your starting line. Stand in stance with your front toe touching it, then perform one full tenkan and pause. Where did your feet land relative to the tape? A clean pivot keeps you on the same spot on the compass; a sloppy one drifts you backward or sideways by several inches, which in a real technique translates to you tripping over your own retreat. Do ten reps, checking your drift each time, then switch your stance and do ten more. It sounds tedious. It is tedious, and it works, and after a month of it your pivots will land on a dinner plate.

    The wall shadow drill

    Face a wall at ma-ai distance from it, roughly one arm’s length plus a hand span, and imagine the wall is your partner pushing straight at your chest. Practice your tenkan so the imaginary push slides past where your chest used to be. The wall gives you instant feedback on two things. If you’re leaning away from the attack, your shoulder will brush the wall and tell you. If you’re completing the turn, you should finish able to see the wall comfortably out of the corner of your eye, facing along it. Ten slow reps, then try the irimi version, entering at an angle so your shoulder nearly touches the wall as you pass. Nearly. The first time you clip the drywall with your elbow you’ll recalibrate fast.

    The broomstick blend

    This one needs a stick about the length of a broom handle. Hold it horizontally in front of you with both hands, like your partner’s extended arm, and rest the far end against a door frame or a heavy piece of furniture. Now practice pivoting while keeping light, continuous contact between the stick’s far end and that fixed point. The stick plays the role of your connection to your partner. Pull, and the far end lifts off the frame. Push, and it jams. Move your feet well, and the contact stays soft and steady through the whole turn. It’s a surprisingly honest teacher. I still use it before tests, and I’ve been training for years.

    Two or three of these drills, maybe ten minutes a day, four or five days a week, will do more for your footwork than an extra class most months. Not a substitute for a qualified instructor, obviously, since a teacher can see the things you can’t feel yet, but a genuine supplement that keeps the movement alive between sessions. The Aikikai Foundation, the organization that carries on Ueshiba’s school in Tokyo, has long treated this kind of basic body movement as the foundation every rank is built on, and publications like Aikido Journal have decades of articles from senior teachers saying the same thing in different words.

    The Habit That Changes Everything

    Watch a skilled aikidoka handle a strong, aggressive attack and the most striking thing is how little happens. No strain, no speed, no clever grip. Their feet arrive somewhere sensible a half-beat before the problem does, and the rest of the technique is just tidying up. That unremarkable quality is the product of thousands of unremarkable repetitions: slow pivots on a taped line, quiet shadow turns against a hallway wall, stick work in a garage at seven in the morning. Nobody films those sessions. They’re where the art actually gets built.

    Start there. Fix the feet first, and let the arms come along when they’re ready. I promise they’ll catch up, mine eventually did, and when they do you’ll understand why the old saying in the dojo goes that aikido is ninety percent footwork and the other ten percent is footwork you haven’t noticed yet.

    A note on sources: movement terminology varies between aikido styles and schools, so if your dojo uses slightly different names for these turns, follow your own instructor’s vocabulary. External references in this article were checked and live as of the update date above. For more on this site’s core curriculum, see our guides to ukemi and to learning your first technique.

  • Ukemi Basics: How to Fall and Roll Safely in Aikido

    Ukemi Basics: How to Fall and Roll Safely in Aikido

    Core Techniques & Principles

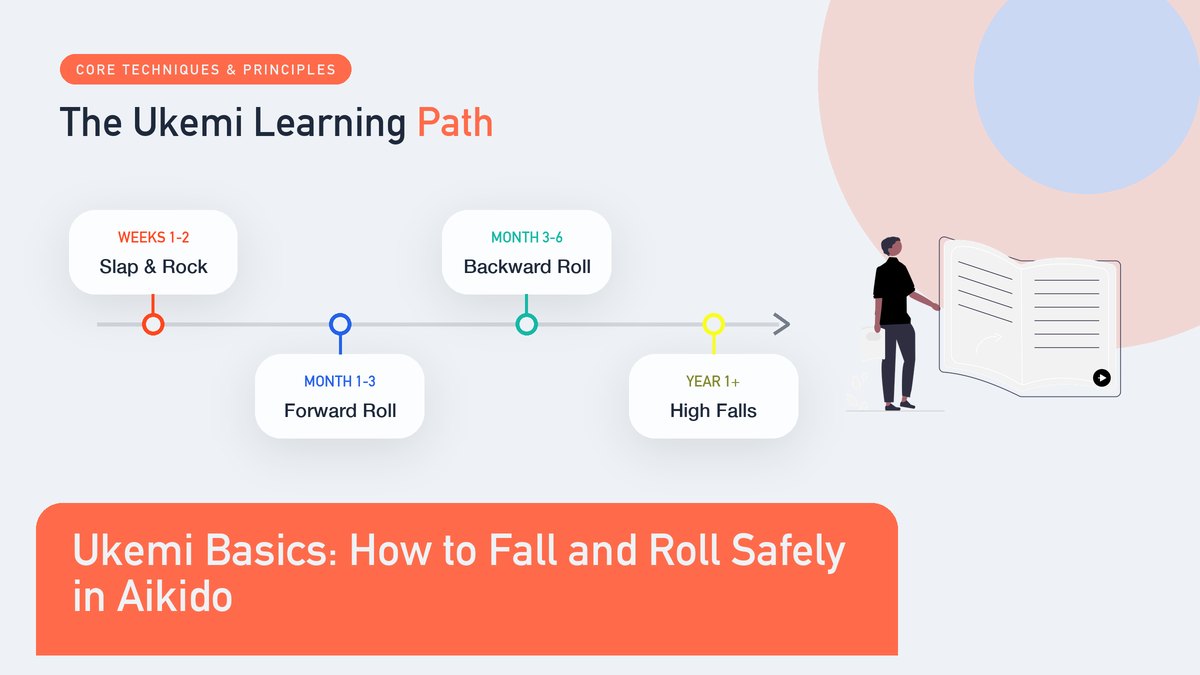
    Most people walk into an aikido dojo dreaming of the throws. Within a week they’re spending half of every class on the mat learning to fall, and a surprising number of them decide that’s the best part. No exaggeration. Good ukemi is learnable, it follows a clear progression, and it changes how every technique feels on both sides of the partnership.

    Updated October 2026 · 13 min read

    My first forward roll felt like a cartwheel gone wrong. I’d watched the senior students fold themselves over one shoulder and pop back up like it was nothing, so when my turn came I charged at the mat, tucked my head, and came down flat on my hip with a noise I can still hear. My partner, a patient brown belt named Denise, just said “again, slower” and walked me through it piece by piece. Ten minutes later I rolled, stood up, and grinned like an idiot. That arc, from clumsy to workable in a single class, is completely normal. Falling is a motor skill like any other, and nobody is born knowing how to do it.

    Ukemi is the Japanese word for the whole family of skills around receiving a technique, and the “receiving” part deserves a moment of respect. The word comes from uke, the partner who takes the fall, paired with mi, the body, so ukemi lands somewhere near “receiving with the body” in plain English. That framing explains almost everything about how an aikido class runs, because the uke is doing real work from the first minute of the first class. They attack with commitment, they move on the entry, they feel where the technique is going, and they follow it early enough to land in one piece and jump back in. None of that is passive. Experienced students will tell you ukemi takes years to get good at, and they’re right, though I’d argue the learning curve is front-loaded. The basics that keep you safe arrive fast, and everything after that is polish.

    The organization most aikido schools trace their lineage back to is the Aikikai Foundation, which runs the Hombu Dojo in Tokyo, where the art’s founder taught until 1969. You don’t need to care about lineage to learn a roll, honestly. But it explains why a dojo in Ohio and a dojo in Osaka use the same words for every part of this, and that shared vocabulary is genuinely useful when you visit a new school for a seminar weekend.

    Why Aikido Teaches Falling Before Anything Else

    If you are afraid of hitting the ground, you will stiffen up every time a technique starts to work, and stiff is exactly what you cannot afford to be on the mat. Simple as that. Aikido moves a partner through space in arcs and spirals, often off balance well before they ever leave their feet, so the first thing a beginner has to prove to their own nervous system is that going down is safe. Once that sinks in, techniques start making sense within weeks instead of months, because your attention stops being spent on bracing for impact and becomes free to notice what your partner is actually doing.

    There’s a training reason too, and it’s blunt. In aikido you take turns: attack for your partner, receive for them, switch. Roughly half your time on the mat is spent being thrown, so a student who only practices the throwing side is training at half speed for their entire first year. Half the art, right there. The fastest learners in any beginner class are rarely the athletic ones. They’re the people who relax into the fall early and pay attention while it’s happening, because the fall is where you feel the technique from the inside, and feeling it from the inside is the fastest way to learn how it works.

    For the historical picture, meaning where aikido came from and how it grew out of the older jujutsu schools of Japan in the early twentieth century, the Wikipedia article on aikido is a solid, well-sourced starting point. Back on the mat, the practical point stands on its own. You cannot receive a technique you are terrified of, so the curriculum removes the terror first.

    The Slap Is Not Optional

    Watch any judo or aikido class for five minutes and you’ll see it constantly. Just before the body lands, an arm sweeps out and the forearm and hand meet the mat with a sharp slap that echoes off the walls. It looks theatrical from the hallway. It is actually the single most useful habit a beginner will build, because the slap spreads the landing across a bigger patch of mat and gives your whole body a timed signal to go loose at the exact instant contact happens. Loose absorbs. Stiff bounces.

    The details matter more than people expect. You slap with the full length of the forearm plus an open hand, fingers spread, arm swinging from the shoulder so the contact lands a fraction of a second before your back or side touches down. Slap late and you’ve missed the entire point of the exercise. Slap with a floppy wrist and it stings without helping. Timing beats force every single time, so don’t muscle it. Let the arm swing and trust the mat to take the energy you’re offering it.

    Breathe out on contactHolding your breath is the most common beginner fault, and it shows up everywhere at once. Tight shoulders, a held face, a landing that sounds like a dropped sandbag. Exhale sharply as you slap and the rest of the body follows into softness. My first instructor used to say the slap should be the drumbeat of your exhale. Corny. Also correct.

    The Forward Roll, Step by Step

    The forward roll, mae ukemi in most dojo, is the first ukemi you’ll learn and the one you’ll perform ten thousand times over the years. The shape is simple once you’ve seen it. You fold at the waist, place one arm across your body, and roll over the shoulder so the back of it touches first, then the opposite hip, and then your feet come back under you and you’re standing again. The head never touches. If your head is touching the mat, something has already gone wrong, so stop, reset, and find the shoulder again.

    From a squat

    Start from a squat, and expect to stay there for a while. This is standard practice in most dojo for the first weeks, because a low roll keeps the drop small while your body memorizes the shape. From a deep squat with your feet together:

    • Kneel onto one knee, and tuck your chin until your eyes rest on your own belt knot.
    • Reach the opposite arm across your body, hand flat on the mat, fingers pointing away from the knee that’s down.
    • Tip forward from the hips, aiming the back of your shoulder at the floor rather than the top of your head.
    • Roll diagonally across that shoulder to the opposite hip, and let your legs unfold underneath you as you travel.
    • Finish on your feet, or at least sitting upright, then turn around and go again.

    Two things will feel wrong at first, and both are fine. The chin tuck feels like you’re staring at your stomach, and the diagonal line of the roll feels like you’re falling off to one side instead of straight ahead. That diagonal is the whole trick. Rolling straight over the spine is how people bang their heads, while rolling across the shoulder puts the sturdy parts of your back in charge of the trip. Give it twenty reps a side over a week or two and the shape stops being a puzzle and becomes a thing your body simply does.

    From standing

    Only when the squat roll feels boring should you take it from standing, and “boring” is the right milestone here, because boredom means your body trusts the shape enough to stop monitoring it. From there it’s the same squat roll with a run-up. Step forward into a lunge, sink through the same low position you already own, pass through it, and let the momentum carry you up onto your feet at the other end. Dojo that skip the squat version end up with students who fling themselves at the mat and call it rolling. Go slow. By month two or three the speed shows up on its own, more or less uninvited.

    The Backward Roll

    Backward rolls look easier than forward rolls and are sneakily harder, because the part of your body that lands first is the part you can’t see. Sit on the mat with your legs tucked, rock back, bring your knees toward your chest, and aim one shoulder at the floor as your hips travel up and over. Slap with the trailing arm the moment your back meets the mat, roll across the shoulder instead of straight over the spine, and let the momentum hand you back up to sitting. Most beginners spend their first month thumping onto the tailbone, and that thump almost always means the hips never made it over the shoulder. Timid rolls land on the seat. Committed ones land soft.

    Standing backward rolls

    The standing backward roll is a different animal, and it’s fine to leave it alone for your first year. It demands that you sit deeply, drop your hips below your knees, and tip backward without pushing off with your hands, all in one continuous motion that feels wrong until the day it abruptly doesn’t. A good readiness test is ten seated backward rolls in a row, soft landings, finishing in the same spot you started each time. When you can do that, ask your instructor about the standing version. Until then, more reps of the seated roll will do more for you than any amount of standing practice, and I say that as someone who tried to skip ahead and paid for it in bruises.

    The High Fall, and Why You Shouldn’t Rush It

    A backward breakfall is the high fall you see in demonstrations, the one where a technique lifts you into the air and you come down flat on your back with both arms slapping at once. It is also the one beginners want most and should get last. Nothing about it is mystical. Your body just needs hundreds of low, comfortable falls first so the slap, the exhale, and the loose landing all happen on autopilot, because at real height there is no time to think your way through any of them. Most dojo won’t ask for high falls until you’ve put in a year of consistent training, which strikes me as about right, maybe even a little generous toward the student.

    When your dojo does start teaching it, the progression is kind if you let it be. Your partner first lowers you almost to the mat while you rehearse the shape of the landing, then raises the entry a few inches at a time over the following weeks, and only then throws at full commitment. Never let an eager partner talk you into a full high fall you haven’t built up to. The mat forgives a lot, but it isn’t a trampoline, and confidence built out of order has a habit of cracking at the worst possible moment, usually in front of the people you were trying to impress.

    Being the Partner You’d Want

    A good uke makes the technique honest. A lazy one makes it a lie.

    Ukemi is a two-person skill, and your partners decide half of your progress whether you like it or not. On the receiving side, that means attacking for real, with committed grabs and strikes that actually travel to their target, because a technique performed against a dead attack teaches nobody anything. It also means relaxing once the technique has you rather than wrestling it to the last inch. Honest resistance early in the exchange is valuable. Sandbagging a beginner is just being difficult, and the difference between the two is visible from across the room. Your partners notice everything.

    On the throwing side, match your partner’s level every single rep. No exceptions. With a brand-new student, throw slowly and land them softly, full stop. With an experienced uke you can add speed, and they’ll turn your power into a beautiful fall, which is honestly one of the small private pleasures of this art. What you never do is surprise a beginner with a fast throw to test them. That’s how flinching gets trained into people, and flinching takes months to undo. The late George Ledyard made the case at length in an Aikido Journal interview on the role of ukemi, arguing that receiving skill shapes the entire practice, and after a few years on the mat I’d say he was right.

    Solo Drills That Build Comfort

    Class time is where the corrections happen, but the comfort gets built between classes. Nothing exotic, either. None of these need equipment, a partner, or much space, and fifteen quiet minutes twice a week does more for your ukemi than one heroic Sunday session ever will. Roughly twenty reps per side is a good default for each drill, give or take depending on how your shoulders feel that day.

    • The rocking drill. Sit with knees tucked, rock backward onto your shoulder blades, slap the mat, then come back to sitting; it teaches the exhale and the slap without any falling at all.
    • Seated forward folds. From the same tucked seat, fold forward over each knee in turn and place the back of the shoulder toward the mat, no roll. You’re rehearsing the entry line.
    • Kneeling shoulder rolls. The squat roll from the checklist above, done slowly at home on a carpeted floor or at the dojo before class.
    • Wrist and shoulder circles. A minute or two in each direction, every session, because ukemi asks a lot of both joints and cold joints complain.
    • Standing roll reps. Once the standing roll is yours, do a short set on each side as a warm-up and stop while they still feel crisp. Fatigued reps rehearse sloppiness.

    If you want to eavesdrop on how regular students talk through this stuff, the AikiWeb forums have hosted that conversation since the 1990s, and the ukemi threads there are full of exactly the questions you’ll have in your first year, answered by people who remember being where you are. Francis Takahashi’s classic essay “Ukemi: An Aiki Perspective” is the deeper read I’d recommend once the basics feel solid, because it treats receiving as a partner’s craft rather than a survival skill, and that reframe tends to land right around the one-year mark.

    The Faults Everyone Hits First

    Every beginner faults the same handful of ways, which is oddly comforting, because it means the problems are standard and so are the fixes. The table below maps the usual progression; expect to live in each row for a few months before the next one fits.

    Level What your ukemi looks like What to practice
    First few weeks Squat rolls with a thud, backward rolls onto the seat, breath held through every landing Squat roll reps, the rocking drill, sharp exhale timing
    Around six months Standing rolls most of the time, backward rolls usually clean, occasional tailbone landings when tired Standing roll from a lunge, seated backward roll finishing back on your feet
    First year Rolls flow straight back to your feet, first low breakfalls start feeling routine Partner-lowered high falls, even reps on both sides
    Intermediate Falls look rounded and unhurried from any height, both directions, at speed Falling for faster techniques, guiding newer students through their first rolls

    The chin fault comes first for most people. Somewhere around rep five, beginners get curious about where they’re going and lift their head to look, which plants the top of the skull in the roll path. The cue that fixed it for me was “look at your belt knot,” and I’d pass that along unchanged. It works. It keeps the neck long and the head out of the way without any tensing up.

    Tailbone landings in the backward roll are the hips’ fault, almost always. The shoulders go back but the hips stay home, and physics does the rest. Fix it by exaggerating the knee tuck on purpose for a session or two, so the hips are forced to travel with the shoulders. And the stiff-arm fault, where a beginner plants a straight hand on the mat to catch themselves, deserves a firm word from your instructor early, because a locked elbow in a fall is a lever working against you. Soft arms, always.

    Where This All Leads

    Nobody does aikido for ten years because they love falling. They stay because the falling stopped being an interruption and became part of the technique, something that happens in the flow of an exchange rather than at the end of it. Good ukemi feels like that from the inside too. You stop bracing, start reading your partner earlier, and one day a fast throw stops registering as danger at all. It registers as information. If you get hurt, stop training and tell your instructor, full stop. Beyond that plain rule, the path is just reps, honest partners, and patience with a skill that rewards both.

    Related reading on this site: What Is Aikido? The Basics Explained, our guide to ikkyo, the first technique most dojo teach, and blending and tenkan movement. External sources cited above are the Aikikai Foundation, Wikipedia, Aikido Journal, and AikiWeb, all checked as of October 2026. We revise articles as our own practice grows.