Category: Solo Practice Between Classes

  • Ashi Sabaki Drills: Footwork You Can Train Alone

    Ashi Sabaki Drills: Footwork You Can Train Alone

    Solo Practice Between Classes

    Most aikido problems that feel like technique problems are actually footwork problems wearing a disguise. Your ikkyo collapses because your feet stopped moving, your tenkan wobbles because your heels are glued down, and your irimi arrives late because you’re stepping where you were instead of where the opening is. The good news: footwork is the one part of aikido you can train properly by yourself, in ten quiet minutes, with nothing but a mirror and some floor space.

    Updated October 2026 · 13 min read

    There’s a conversation I’ve heard in dojos on three continents, and it always starts the same way. A frustrated student corners a senior after class and says some version of “I don’t understand why my technique isn’t working.” And the senior, almost every time, watches one repetition and points at the floor. Not at the hands. Not at the hips. The floor. Just the floor. The feet are the least glamorous part of aikido, which is exactly why they cause the most trouble: everyone wants to practice the throw, and nobody wants to practice sliding across the mat without crossing their ankles. Years of training and a lot of wasted effort have convinced me that clean footwork dissolves maybe eighty percent of your technique problems on its own, because aikido techniques are mostly just good body position arriving at the right moment, and body position is a footwork output.

    That idea has a name in Japanese: ashi sabaki, foot movement. It’s half of the broader concept of tai sabaki, body movement, and if you want the wider context of how this fits into the art as a whole, the overview of aikido’s principles and history on Wikipedia is a solid starting point. Ashi sabaki is also, not coincidentally, the most solo-friendly skill in the entire curriculum. Everything you need is already in your house. No partner, no pads, no special equipment, and no schedule to negotiate with anyone except yourself, which is more or less the entire appeal of training at home. This article walks through a progression of four solo drills, one each for the sliding step, the entering step, the pivot, and the rotation, with mirror checks at every stage and the faults you’re most likely to catch in the glass. Do them slowly, do them regularly, and your next class will feel different in a way that’s hard to explain but easy to notice.

    The Four Steps You Need

    Everything in aikido footwork is some combination of these.

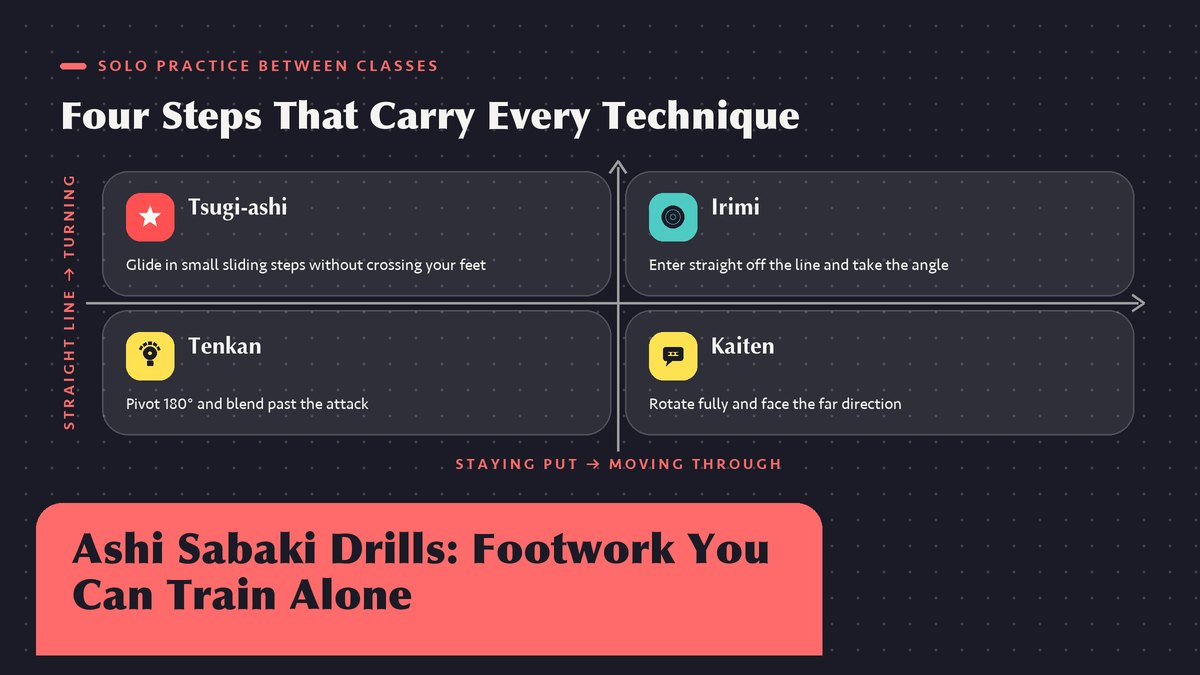
    Before the drills, a quick vocabulary pass, because “footwork” is too vague to practice. Japanese martial arts break movement down into a handful of named steps, and aikido classes in North America use four of them constantly. First is tsugi-ashi, the sliding step where the trailing foot follows the leading foot without ever crossing it, so your stance width stays constant and your balance never wobbles. This is how you travel on the mat. One step, then the next. Second is irimi, the entering step, where you slide in at an angle, roughly forty-five degrees off the line of attack, to end up beside your partner. Third is tenkan, the pivot, a hundred-and-eighty-degree turn on the balls of the feet that redirects the attacker’s line without you retreating an inch. Fourth is kaiten, the rotation, a full turning step that carries you around an axis, often your partner’s arm or an imagined point between you.

    You already know these movements from class even if the names haven’t stuck. Every technique you’ve ever been shown is built from them, shuffled and combined. Nothing else hides in there. What follows is a progression that teaches each one in isolation, then blends them the way real techniques do. I’ve ordered it deliberately, and the order matters more than people expect. The sliding step comes first because it underpins everything else, and a shaky tsugi-ashi makes every later drill feel like walking on a boat.

    What you needA mirror, preferably full length; a hallway or about eight feet of clear floor; and something to make a line with, painter’s tape or a broom handle or even a rolled-up towel. That’s the entire equipment list. Socks are fine on hardwood, bare feet are better on a mat, and I’d skip practicing on carpet since your feet will drag and teach you a false step length.

    Drill 1: Tsugi-Ashi, the Sliding Step

    Start in your basic hammi stance, one foot forward, knees soft, weight settled slightly forward into the balls of the feet rather than the heels. Weight stays forward. Now slide the front foot forward maybe six inches, and before your weight fully commits, draw the back foot up to restore the original stance width. That’s one rep. The back foot never passes the front foot, and the stance width never collapses. Your head stays at the same height throughout, because if it’s bobbing up and down you’re using vertical bounce to create the slide, which works at walking speed and falls apart the moment a real partner pushes back.

    Do this the length of your hallway and back. Slow. Your instinct will be to go faster, slow sliding feels faintly ridiculous, like miming an escape. Resist it. Speed conceals the two faults this drill exists to expose: the crossover, where the trailing foot sneaks past the front foot and your stance briefly becomes a tightrope walk, and the gap, where the trailing foot lags and leaves your legs too wide apart to move again quickly. I do this drill on my hallway floor at least twice a week, and after years of it I still catch my back foot getting lazy around rep fifteen.

    Why does this matter so much? Because aikido happens at a distance where your partner can reach you, and if your stance can be narrowed by pressure or scrambled by a nudge, every technique you know degrades into a scramble at exactly the wrong distance. So train the step slow. Boring is fine. Senior teachers sometimes describe good tsugi-ashi as the skill of being ready to move again at any instant, and that’s really what you’re training: not the step itself, but the permanent availability of the next step. Publications like Aikido Journal, which has spent decades interviewing senior instructors about fundamentals like this, return to the same point again and again. The fancy stuff is built on the boring step, whether anyone admits it or not.

    Mirror check for this drill: watch your shoulders. They should stay level and square to your imaginary partner the whole way down the hall. If one shoulder dips or leads as you slide, one foot is doing more work than the other, and in techniques that asymmetry shows up as you spiraling off your own line.

    Drill 2: Irimi, the Entering Step

    Irimi is the step beginners find scariest, because it goes toward the attack instead of away from it. Alone in your living room there’s no attack, so we fake one. Angle first, always. Stand at one end of your line facing the mirror, and imagine a partner directly in front of you, arms’ length away, pushing straight at your chest. Your job is to slide in at a forty-five-degree angle off that line, ending up beside the imagined attacker with your front foot pointing past them, not at them.

    The mechanics borrow directly from drill 1. The front foot slides forward and inward along the diagonal, the back foot follows with tsugi-ashi, and you finish in a stance that’s the mirror of the one you started in, just rotated around an invisible point beside your partner. Say your left foot was forward. After a clean irimi to your right, your right foot leads and you’re looking at the wall your partner’s shoulder points at. Check the finish. You’ve entered their space without ever stepping in front of their power.

    Stepping shallow is the common fault here. A timid irimi at twenty degrees keeps you on the attacker’s line, and at that point you’ve done the worst of both worlds, moved closer and stayed in the firing zone. A useful cue is to finish each rep and check whether you can see the imaginary partner comfortably out of the corner of your eye. If you have to turn your head sharply to see them, you entered too shallow. If you can’t see them at all, you entered past ninety degrees and you’re now facing away, which is a different mistake with a different fix. Aim for the shoulder-in-your-peripheral-vision spot.

    Entering feels wrong for about six months. Then one day it feels like the only safe place to be, and you wonder why you ever stepped backward.

    Mirror check: your posture at the end of the entry. Spine tall, weight forward. Beginners almost always lean back slightly after irimi, a half-conscious flinch away from the thing they just approached, and it survives for months because nobody thinks to mirror their own entries. In the mirror it looks like you’re leaning away from a bad smell. Your shoulders should sit directly over your hips at the finish, spine tall, weight still forward. If you’re leaning, the entry was fear doing the steering, and a partner who pushes at that moment will fold you in half.

    Drill 3: Tenkan, the Pivot

    Tenkan gets its own article elsewhere on this site, so I’ll keep this practical. Stand in stance with your left foot forward, toe on your taped line. The front foot draws a small arc across in front of the back foot, the back foot pivots on the ball, and your whole body rotates until you’ve turned one hundred and eighty degrees and your right foot now leads, on or near the same spot on the floor. Your hips turn with your feet, never after them, and your head stays level like it’s riding on rails.

    The arc of the front foot is the detail that makes or breaks this. Beginners usually swing it in a big semicircle, feet getting wide, which turns a pivot into a small waddling hike around your own ankles. Keep the arc tight, about the length of your own shoe. Small arc, big difference. Your ankles should pass close but never tangle, and your feet should never cross one over the other. Crossing in a tenkan is the single most common footwork fault in beginner aikido, and it’s exactly as bad as it looks, because a crossed stance is a standing invitation to be pushed over.

    Do sets of ten, alternating lead sides, and pause after each rep to note where your feet actually landed relative to the tape. A clean tenkan keeps you on your spot on the compass. A drifting one slides you backward or sideways, which means you turned while retreating, and retreating pivots lose the blend because you’ve added distance at the exact moment the technique needs to stay connected. Slow count of three per rep. Then check the tape. Boredom is the milestone. When the slow version bores you, you’re getting close.

    Mirror check for tenkan is the best in the whole progression, because a mirror tells you instantly whether your shoulders turned with your hips. Set up sideways to the glass and watch yourself pivot. If you see your shoulders arrive late, lagging behind your feet like they’re being dragged, that’s the fault that makes your pivots feel heavy and your techniques telegraphed. Feet first, hips second. The feet lead by a hair, but the hips and shoulders must commit fully, together. There should be a moment mid-turn when your chest faces the mirror dead on. If there isn’t, you turned your feet and left your body behind to catch up.

    Knee noteIf pivoting on the ball of the foot bothers your knees, check that your weight is actually settling into the hip of the turning leg and not hanging on the knee joint itself. Most knee discomfort in tenkan comes from a stiff, vertical pivot leg. Let the knee bend a little and travel with the turn, and the load spreads where it’s supposed to go.

    Drill 4: Kaiten, the Rotation

    Kaiten is the turn you move through rather than around. Tenkan pivots you about your own center; kaiten carries you in a full circle around something external, an imagined partner’s arm, a point on the floor between you, a lamppost if you’re practicing outside. In class this is the movement behind techniques where you seem to orbit your partner and reappear somewhere they didn’t expect. Alone, you train the orbit.

    Mark a point on the floor, a shoe works fine. Stand facing it in stance, then perform a tenkan pivot, and instead of stopping at one hundred and eighty degrees, continue the rotation all the way around until you face the point again from the same side you started, having moved along the rim of an imaginary circle around it. Keep facing inward. Head turns first. Your feet use the same small arcs as tenkan, chained, and your head turns steadily, spotting the marker the whole way around so your neck doesn’t wind up and snap. It should feel less like spinning and more like walking a very small circle while facing inward. If you’ve ever watched a cat turn around on a windowsill before lying down, that’s roughly the shape, minus the tail.

    The faults here are the tenkan faults, amplified. Feet crossing mid-circle, head lagging so the last ninety degrees is a blind stumble, and rising up on tiptoe as the turn speeds up, which shrinks your contact with the floor to almost nothing. Slow it down until the circle is silent. Slow is smooth here. A quiet turn is a balanced turn; you can hear the difference on a wooden floor.

    Putting It Together: The Shadow Partner

    Once the four steps are individually honest, combine them into the drill that most resembles actual training. Face your mirror, imagine a partner in front of you, and run a short imaginary exchange. They push, you irimi in at the angle. They turn to follow, you tenkan to stay blended. They reach again, you kaiten through the gap their reach opens. Between every movement, restore your stance with tsugi-ashi so you’re never caught mid-stride. Slow beats smooth.

    Keep it to four or five movements, slowly. Four moves is plenty. The real work is the transitions, those half-instants where one step hands off to the next. In my experience, transitions are where real technique lives or dies. Anyone can do a decent tenkan in isolation; the person who can pivot smoothly out of a moving entry, at the right angle, without their feet tangling, is the person whose techniques feel effortless. So go slow on purpose. Thirty slow shadow exchanges will teach you more about those handoffs than a month of rushing through them in class.

    Mirror check for the combined drill: step back and watch your whole silhouette. You’re looking for continuity. Hiccups show up fast. No pauses where you mentally reload, no little hops to fix your stance, no shoulder hitch before the pivot. Your shadow should move like it has somewhere to be and plenty of time to get there.

    The Fault and Fix Table

    The table below gathers everything the mirror will show you, drawn from years of watching my own feet and correcting the same few mistakes over and over on other beginners. Eight rows, eight faults. Cross-reference it against what you see in the glass.

    Fault you see in the mirror What it does to your aikido The fix
    Trailing foot crosses past the front foot when sliding Stance collapses to a line; you can be toppled with a light push Slow the tsugi-ashi down and keep the stance-width constant. Practice along a taped line
    Feet cross during the tenkan or kaiten turn Ankles tangle at speed; the pivot ends in a stumble, not a blend Shrink the front-foot arc to about a shoe-length; pause between reps and reset
    Standing and moving with weight in the heels Slow reactions; techniques arrive late because you must roll forward before you can step Shift weight to the balls of the feet. If you can’t lift your heels an inch, you’re back on them
    Heels splayed outward on the pivot so feet trace a zigzag Pivot loses its axle; power bleeds sideways instead of rotating Turn on the ball of the back foot with the heel tracing a small tight circle, not a wander
    Shoulders leaning back after irimi Fold under any forward pressure; the entry reads as fear, not commitment Finish each entry and stack shoulders over hips. Imagine a wall behind you
    Head bobbing or dipping during slides and turns Telegraphs every movement; your vertical bounce becomes your partner’s timing cue Fix your eyes on one point in the mirror and keep it at constant height through the rep
    Dragging the feet across the floor instead of sliding Loses the glide that makes aikido smooth; feet stick mid-technique Press through the balls of the feet and skim the surface. Listen for a quiet slide
    Stance so wide you can’t move again One good step and you’re stranded; techniques become single-shot attempts Reset stance width between movements; if you can’t rise slightly, the stance is too low and wide

    One fault deserves special mention because it’s nearly universal among people who train alone: practicing only to your good side. In class your partner hands you grabs and attacks from everywhere, but alone in front of a mirror you’ll unconsciously favor the direction that feels smooth. Comfort is a trap. My strong side is a perfectly serviceable tenkan and my weak side used to look like furniture being moved. So split every drill in this article fifty-fifty, and treat your awkward side as the real practice and your comfortable side as the warm-up. The forums at AikiWeb are full of threads from home practitioners complaining that their techniques only work one way, and the answer is almost always the same. Train the other side first.

    A Ten-Minute Solo Session

    On a busy weekday I’d stack it like this, roughly ten minutes door to door. Two minutes of tsugi-ashi up and down the hallway to wake up the sliding step. Two minutes of irimi entries to each side, checking the finish in the mirror. Three minutes of tenkan, alternating lead feet, pausing to check foot placement against the tape. One minute of kaiten around a marker in each direction, slow and silent. Then two minutes of shadow-partner exchanges, chaining the steps together and watching your silhouette for hitches. That’s the whole session. I call it ten minutes, though if your hallway is short you’ll run closer to twelve. Close enough.

    That cadence, four or five days a week, is genuinely enough to change your footwork within a couple of months, and I mean the kind of change your training partners notice first. It won’t replace class, because nothing replaces a live partner and an instructor’s eyes, and if you’re looking for training resources beyond solo work, Aikido International maintains directories and material that connect practitioners with schools and seminars across North America. Think of the solo work as upkeep. Class is where your footwork gets tested under pressure, and the drills are how you make sure it holds up when someone actually pushes.

    Nobody at your dojo will ever compliment your footwork. They’ll just start saying your techniques feel much better lately, and they won’t know why.

    So keep at it, even when it feels silly. Start with drill one. The mirror is honest, the floor doesn’t lie, and in a few months the difference shows up in cleaner entries, calmer pivots, and techniques that stop feeling like a fight. That’s the whole point of ashi sabaki. Your hands are just along for the ride.

    Footwork terminology varies between aikido styles, so if your dojo names these steps differently, follow your instructor’s vocabulary. External links in this article were verified live as of the update date above. If you’re new to the art, start with what aikido is and how it works, then our guide to blending and tenkan movement, your first technique, ukemi basics, and dojo etiquette for beginners.
  • Jo Staff Solo Drills: Spins, Strikes, and Movement

    Jo Staff Solo Drills: Spins, Strikes, and Movement

    Solo Practice Between Classes

    A four-foot oak stick, a strip of empty floor, twenty minutes twice a week, and a bit of stubbornness will do more for your aikido than most people expect. Here are the strikes, the spins, the stepping drills I hand every new student, and the order that keeps them from quitting the staff out of frustration.

    Updated October 2026 · 13 min read

    The jo showed up in my life as a leftover. My dojo had finished a weapons weekend, and a pile of practice staffs leaned in the corner of the equipment closet like a handful of spilled broom handles. Sensei told everyone to take one home. “Work on it between classes,” he said, “or it’ll take you five years to learn what takes two.” That was the whole lesson plan. I brought mine back to my apartment, moved the coffee table aside, and spent my first evening whacking the ceiling fan on a clumsy overhead cut. The fan survived. The lesson stuck anyway. The jo is portable, cheap compared to a sword, and endlessly patient, and it’s the best solo training partner aikido offers, because everything that makes you better with a stick in your hands (posture, footwork, timing, a quiet grip) makes you better empty-handed too.

    If you’ve never touched a jo, or you picked one up once at a seminar and fumbled through a group form with everyone moving in a direction you weren’t expecting, this article is the on-ramp. We’ll cover the three basic strikes, the wrist spins that make the staff feel alive instead of like a piece of lumber, and the stepping patterns that tie hands to feet. I’ll mention the 13-count kata along the way, since that’s where all of this eventually lands in a traditional dojo. For the backstory on the weapon itself, the Wikipedia overview of the jō is a solid place to start, and it covers the stick’s famous duel with Musashi, which I’ll get to in a minute.

    What a Jo Is, and Why Aikido Loves It

    Four feet of hardwood, roughly the height of your armpit.

    The jō is a wooden staff about 128 centimeters long, a touch over four feet, noticeably shorter than a bō but much longer than a sword. Legend credits it to a 17th-century warrior named Muso Gonnosuke, who supposedly developed the weapon and its art, Shintō Musō-ryū, after a famous encounter with the swordsman Miyamoto Musashi. The story says Musashi beat him with a wooden sword. Gonnosuke retired to a shrine, and after a stretch of meditation came back with a shorter staff and a new set of angles that worked against a blade. Historians argue about the details, but the legend explains something real about the weapon’s character. A jo is short enough to move like a sword in your hands, long enough to keep a blade at a distance, and quick enough to change ends mid-fight.

    Aikido adopted the jo through its founder, Morihei Ueshiba, who trained in multiple weapon arts before developing aikido and never really separated weapons from empty-hand practice. In most traditional lineages, the jo shows up as solo forms (kata), paired practice where one person has a jo and the other attacks empty-handed or with a wooden sword, and blending exercises where the staff teaches you the same entering and turning movements you’d do with your arms. The long-running magazine Aikido Journal has published decades of interviews and articles on how weapons work fits into modern aikido training, and it’s worth browsing once you’ve got the basic moves under your belt.

    Equipment-wise, you don’t need much. A standard white-oak or red-oak jo costs somewhere between thirty and sixty dollars from any martial arts supplier, and honestly a closet pole of the right length works for your first month if you’re careful about splinters. (I’d spend the thirty dollars. The oak version comes balanced and sanded smooth, with no slivers to pick out of your palms.) Measure for your height by standing the staff upright; most people want it somewhere between armpit and chin. Shorter staffs spin faster but lose reach. Longer ones feel authoritative and swing slower.

    One safety note before anything else. You are holding a hardwood lever with two weighted ends, and the most common beginner injury is self-inflicted, usually a strike to your own kneecap, elbow, or the ceiling fixture. Give yourself a clear space about the length of the jo in every direction. I knocked a drinking glass off a shelf with a rear spin in my second month, and my spouse instituted a garage-only rule that’s still in effect. Train outside or in the garage if you can swing it.

    The Three Strikes Everything Builds On

    Aikido’s jo work rests on three core strikes, and they’re the same three you’ll see in the sword work, which is no accident. Ueshiba intended them as one study. Learn these solo first, slowly, in the air.

    Shomen-uchi is the overhead cut. The jo rises up along your center line and comes down diagonally in front of you, like chopping wood with an axe, except the power comes from your hips rather than your shoulders. Beginners muscle it. Don’t. The staff should fall under its own weight once you’ve started it moving, your job is steering the fall. A good shomen ends with the jo pointing down and forward at roughly forty-five degrees, your front knee bent, both hands still on the stick. Thirty slow repetitions, and your shoulders will tell you whether you’re muscling it.

    Tsuki is the thrust. You drive the end of the jo straight forward at mid-height, like a bayonet or a pool cue, and your rear hip rotates into it so the power starts at the floor. The back hand pushes while the front hand guides, and at full extension the staff should be level with your solar plexus rather than your chin. Beginners push with both arms and lean, which topples them forward and, against a partner, hands the other person their balance. Think of the thrust arriving from behind you, traveling up through your legs and torso, rather than originating at your arms. The legs do the work, in other words.

    Yokomen-uchi is the side cut. The jo travels in a rising arc that crests beside your head and then falls diagonally across, aimed at the temple or collarbone line of an imaginary opponent. If shomen is an axe, yokomen is a tennis forehand with a follow-through. It teaches the sideways hip switch that’s the parent of half the turning movements in aikido, the same body mechanics behind tenkan and irimi, which I wrote about in the guide to blending and tenkan movement.

    The three strikes share one skeleton. Feet set the range and hips start the motion; the hands only finish what the floor began. When a strike feels off, run the checklist in reverse order. Nine times out of ten the hands are fine and the feet did nothing.

    Grip / Strike How it looks What it trains
    Honte grip (forward hand over) Right hand on top of the shaft, both palms down Power through structure, the default grip for most strikes
    Gyakute grip (reverse) Top hand palm-up, like holding a bicycle handlebar Wrist mobility and the figure-8 spin transitions
    Shomen-uchi Overhead diagonal cut Whole-body alignment, relaxing the shoulders
    Tsuki Straight thrust at mid-height Hip rotation, extension without leaning
    Yokomen-uchi Arcing side cut past the temple Side-to-side hip switch, tenkan body mechanics
    Wrist spin (nawa-nawa style) Continuous figure-8 rolling in front of the body Independence of the hands, smooth grip changes
    Hasso stance Jo held vertical beside the shoulder Readiness posture, the starting and ending position of most solo forms
    Hidari orientation Left foot and hand forward The non-dominant side, which feels broken for the first month

    A good staff feels heavy on the way down, light on the way back up. If every direction feels like work, your shoulders are doing the job your hips were hired for.

    Wrist Spins, or Teaching the Stick to Move Itself

    This is the part beginners skip, and it’s the part that transforms the jo from a stick you’re carrying into a stick you’re handling. The goal is simple to describe and humbling to achieve. Keep the staff rolling continuously in front of your body so it traces a horizontal figure-8, with the ends trading the lead as it passes from side to side. Japanese dojo slang for this kind of continuous flowing movement is “nawa-nawa,” a mimetic word for rope-like motion, and you’ll hear instructors use it for anything smooth and unbroken.

    Start with both hands at the center of the staff, right hand above left in the gyakute grip. Roll the right hand over the top of the shaft so the staff pivots in your left palm. The far end swings across to your left, and as it crosses, your left hand takes over the roll. That’s half a figure-8. Keep trading hands, and the staff draws a sideways 8 in the air while your wrists do small circles. Sounds easy. The first attempts look like you’re stirring an enormous pot of soup with two broken wrists, and everyone goes through that stage. Give it a week of five minutes a day.

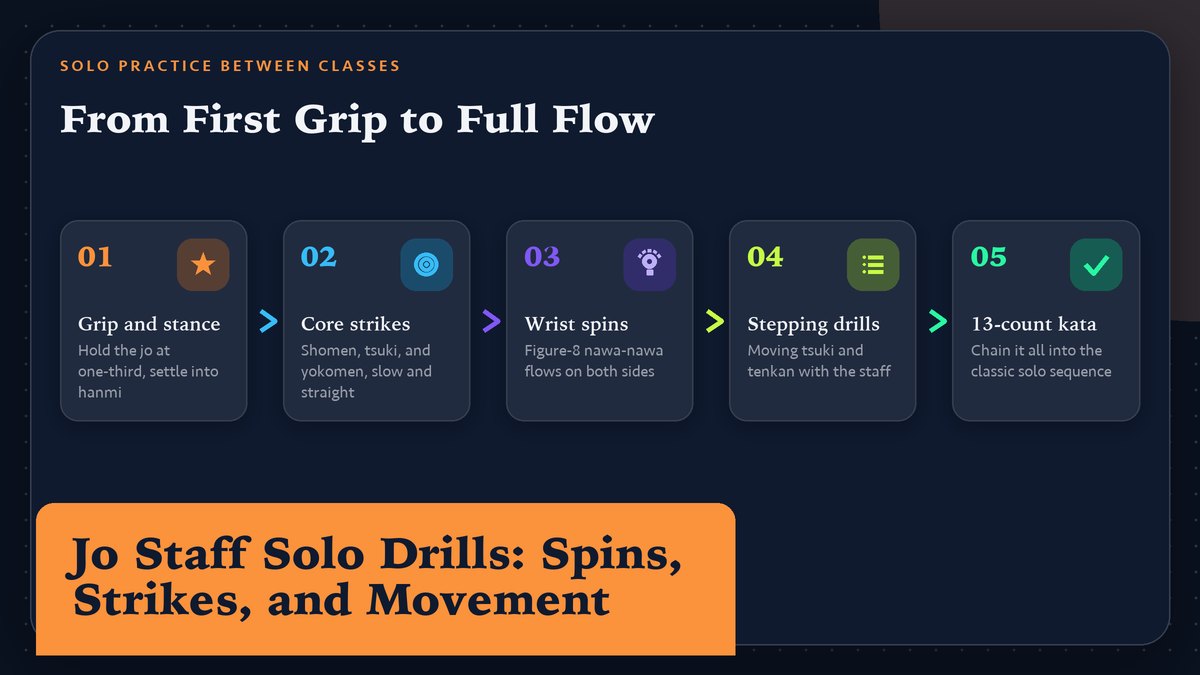
    Once the basic roll runs on its own, learn the forward spin and the reverse spin. In a forward spin, the top of the staff rotates away from you as the jo turns over; reverse, it comes toward your face. You’ll use forward spins to flip the striking end from one side to the other mid-movement, and reverse spins to bring the staff back into guard after a committed strike. The paired versions of these appear everywhere in the 13-count jo kata, which most Aikikai-affiliated dojos teach as the first formal solo sequence and which strings the strikes, spins and steps into thirteen continuous movements. Counting varies slightly by lineage; my current dojo counts fourteen, and neither of us is wrong. The pattern matters more than the arithmetic.

    But what the spins actually build is hard to see until you do paired practice. When a partner grabs your jo, or their sword beats against yours, a stiff grip freezes the staff and the force travels straight into your shoulders. A person with fluid spins absorbs that same contact through a rolling wrist and the strike keeps going. The spin work is sensitivity training disguised as a party trick. The community at AikiWeb, one of the oldest English-language forums on the art, has threads going back years about how these small solo exercises connect to the much-debated “internal” body skills in aikido, if you want to go down that rabbit hole later.

    Quick tipPractice spins over your bed for the first two weeks. Sounds silly, but the mattress catches the jo when (not if) your grip fails, and it lets you train in a room where the ceiling is too low for full strikes. Move to open floor once you can roll ten consecutive figure-8s without a bobble.

    Stepping Drills: Where the Feet Join the Party

    Strikes and spins are hand skills. The moment you add footwork, the exercise becomes aikido, because aikido is mostly about where your feet are when something arrives. Two stepping patterns cover most of what you’ll need solo.

    The first is the advance-and-strike, or moving tsuki. Stand in a natural stance with the jo ready, then slide your front foot forward about half a step while the rear foot follows, and immediately thrust. The sequence is foot-foot-stick, in that order, always. Beginners reverse it, stabbing first and stepping after, which in a real exchange means your strike lands nowhere near where your body now stands. Do ten slow crossings of your practice space this way, then ten more leading with the other foot. The non-dominant side will feel like someone else’s body. That’s the point of training it.

    Pattern two is the turning step, the solo version of tenkan. From your stance, pivot 180 degrees on the balls of your feet so the jo sweeps around with you at shoulder height, and finish facing the other direction in the same stance you started. No crossing the feet. The jo should describe a big horizontal arc during the turn, which is exactly the distance-management movement you’d use to let an attacker’s momentum sail past you, the same idea I covered in the falling and ukemi basics article from the other side of the contact. Do this slowly. The turn hides a tendency to lean away from the spin, and leaning is the habit you’re training out.

    Now chain them. One turn, one strike, one turn, across the room and back. This begins to resemble the spine of the 13-count kata without being the kata, which makes it a friendly gateway if your dojo hasn’t introduced the form yet. Some lineages add a low sweeping movement to the sequence to teach dropping your level. The traditional sources on the weapon’s own art are worth a look if you get curious about where aikido’s staff practice came from, and the Aikikai Foundation, the Tokyo-based organization Ueshiba’s family still heads, offers context on how weapons study sits inside mainstream aikido.

    So train slow. Speed hides errors, and I keep a metronome app on my phone at 60 beats per minute when I’m ironing something out, one movement per beat. It feels absurd, like a tai chi DVD, and it finds every foot that drags and every shoulder that creeps up. After a month of slow work, normal speed feels easy, almost suspiciously easy.

    How Solo Work Pays Off with a Partner

    Everything in this article becomes visible the first time you do jo partner practice. The solo spins turn into recoveries when your partner’s strike slides down your staff and tries to own it. The stepping drills become the entries and exits that keep you at the end of the jo instead of inside it. The three strikes become the attacks your partner practices receiving, and later, the structure underneath your empty-hand technique, because shomen, tsuki and yokomen are the same lines as the grabs and strikes that start every aikido technique.

    A concrete example. In a typical paired jo exercise your partner strikes shomen with a wooden sword, you rise to meet it with a diagonal block while your feet step off the line, and the contact lands at a comfortable distance. Done well, it’s the paired version of your solo turn-and-strike chain, where the feet move first and the staff rises because your hips turned, so the contact happens at a comfortable distance. Done poorly (drilled without the solo foundation), it’s a stick collision followed by a wrestling match. I’ve been both people in that exchange, sometimes in the same class. Solo work is what keeps the paired version smooth.

    It also fixes your empty hand work in ways that take a while to notice. Carrying a jo makes your posture honest, because a rounded back puts the staff in the wrong place and you feel it immediately. It exposes over-gripping, which is the same habit that makes your empty-hand throws stiff. And it builds the habit of moving from center, since any strike that starts at the arms telegraphs itself a mile off. This is why so many instructors, mine included, hand a jo to a struggling beginner and say “work on this for a month.” The staff is a diagnostic instrument that happens to also be a weapon.

    If you’re newer to the art and wondering where this fits among the empty-hand fundamentals, the overview of what aikido actually is lays out how weapons and unarmed practice interlock, and the first technique article on ikkyo shows the same body mechanics from the receiving end.

    A Simple 20-Minute Solo Session

    The routine I’d hand you on day one fits in a living room corner, a backyard, or a park, and it covers everything above in the order your body learns best. Posture first, then hands, then feet, then flow.

    • Open (minutes 0–3) with standing and holding. Hold the jo in hasso position, vertical beside your shoulder, and simply stand. Feel where the weight sits. Relax your grip until the staff is almost slipping. This is posture calibration, and skipping it is why most people’s shoulders stay tense for the whole session.
    • Then minutes 3–8, slow strikes. Ten each of shomen, tsuki and yokomen per side, at metronome pace if you have the patience. One movement per breath. When a strike feels off, run the checklist in reverse order. Feet, hips, hands.
    • Minutes 8–13 go to spins over the bed. Continuous figure-8 rolls, then forward spins, then reverse spins. Aim for unbroken flow and let speed arrive on its own. When you drop the staff, which you will, just pick it up without the sigh.
    • Follow with minutes 13–18 of stepping chains. Turn, strike, turn, across the room and back. Five minutes of this builds more usable aikido than an hour of fast strikes, partly because turning under control is the exact skill that pairs with the etiquette of safe movement around other people on a crowded mat, or see the dojo etiquette guide for the group-practice side.
    • Close (minutes 18–20) with a cool-down kata sketch. Walk through the first third of the 13-count form, or, if you haven’t learned it yet, just improvise a smooth chain of two strikes and a spin. End with the jo in hasso, bow to nobody in particular, and put it away, because the bow matters even alone. It marks the practice as practice, a small boundary between the rest of the day and the work you just did.

    Twenty minutes twice a week, and within about two months you’ll notice it at your dojo. Strikes arrive on time. Grips adjust instead of freezing. Footwork stops abandoning you the moment a partner moves unpredictably, and that last one is the real prize, because unpredictable partners are the entire sport.

    One more thingRespect the ceiling. Before every session, give the jo one full overhead swing and confirm clearance, because lamps, fans and door frames are undefeated against beginners, and a broken light fixture costs more than the jo did. Ask me how I know.

    The jo rewards consistency more than talent, which is the best kind of training tool for the average busy adult. Some rainy Tuesday in your third month, the figure-8 will suddenly run itself, the strikes will stop wobbling, and the staff will feel less like an object and more like an extension you’ve been issued. That feeling carries straight onto the mat. Bring it to class, and your partner will feel the difference before you say a word about drills.

    More from akac.org — What is aikido? The basics, explained · Ikkyo, the first technique you learn · Blending and tenkan movement · Ukemi, rolling and falling basics · Dojo etiquette for beginners. External sources include Wikipedia’s article on the jō, plus Aikido Journal, AikiWeb and the Aikikai Foundation. This page is reviewed periodically; solo drills described here are standard across most Aikikai-lineage dojos in the US and Canada, though your instructor’s count and terminology should win any disagreement.

  • Suburi Basics: Building Your Bokken Practice from Zero

    Suburi Basics: Building Your Bokken Practice from Zero

    Solo Practice Between Classes

    The wooden sword is the cheapest training partner you’ll ever have. This guide covers the four foundational cuts, a rep scheme that builds without wrecking your shoulders, and what to look for when you buy your first bokken.

    Updated October 2026 · 14 min read

    My first bokken cost forty dollars at a martial arts supply table set up in a community center hallway, and I bought it mostly because the guy running the table let me hold it. Forty dollars, no plan. That was a mistake in one way, since I had no idea what I was supposed to do with the thing, and a very good decision in another, because solo sword practice ended up doing more for my aikido than almost anything else I did off the mat. Suburi, the word for those repeated solo cuts, sounds exotic until you translate it. It just means “empty swing.” No partner, no target, no drill sergeant. You, a wooden sword, and a patch of floor where you won’t break anything. This article assumes you’re a beginner with a new bokken and no instructor standing nearby, which describes most people who own one.

    One thing before we start. Every dojo teaches weapons a little differently. The details here reflect common Aikikai-style practice in North American dojos, because that’s what I know best, and your own sensei’s version takes precedence over anything you read online, mine included. If your school does suburi differently, or doesn’t do weapons at all yet, ask before you build habits.

    What Suburi Actually Is

    “Empty swing” — repetition of solo cuts with the wooden sword.

    Suburi is the practice of repeating basic sword cuts, over and over, by yourself. That’s the whole definition, and I think it’s worth stating plainly because beginners sometimes imagine there’s a hidden layer of complexity waiting underneath. There isn’t, really. The cut is simple on purpose; the depth comes from doing it ten thousand times. The overview of suburi on Wikipedia traces the term and its place in kendo and aikido training, where it’s been used for generations as a way to build the body before the body is trusted with a partner.

    Why does an aikido student need sword work at all? This confuses people in their first year, and the answer I got from my own teacher was unsatisfying at the time. The sword shows you what your body is doing. Your posture, your balance, the path your hands travel, the timing of your footwork, all of it gets exaggerated and made visible when you hold a stick that extends your arms by three feet. Try to cut while leaning back and the bokken tells on you immediately. A good swing ends with your weight where it belongs; a sloppy one ends with you tipping forward like a drinking bird toy. The sword doesn’t care about your excuses, which is exactly what makes it useful. Many aikido lineages, including the one practiced at the Aikikai Hombu Dojo in Tokyo, treat weapons work as a core part of the curriculum rather than a side hobby, because it cleans up everything else.

    A short history note first, and I promise it earns its place. Morihei Ueshiba, aikido’s founder, was deeply skilled with the sword and spear before he ever formulated aikido, and the empty-hand techniques people picture when they think of the art carry sword logic inside them. The sword came first. The angle of an irimi entry, the way the leading hand shapes a spiral, the timing of a tenkan turn, all of these live inside the empty-hand shapes you will drill in your first months on the mat, whether anyone mentions the connection or not. When you do suburi, you’re practicing the parent skill that aikido’s empty-hand movement grew out of, and that context makes the solo work feel less arbitrary than “swing a stick a hundred times.” You’re rehearsing the shape of the whole art, one cut at a time.

    You also don’t need a dojo to do it. A garage, a backyard, a cleared corner of an apartment, a parking lot at 6 a.m. if your neighbors are forgiving. No commute, either. That’s the actual appeal for most people, I suspect. Class happens twice a week on someone else’s schedule; the bokken hangs on your wall the rest of the time, asking when you’re going to pick it up.

    Buying Your First Bokken

    First, the good news. A first bokken does not need to be expensive, exotic, or pretty. The standard hardwood training bokken sold by any martial arts supplier will carry you through your first several years, and it should cost somewhere in the forty to seventy dollar range. What follows is what I’d check before handing over money, in rough order of importance, plus one strong opinion.

    Weight first. A typical red or white oak bokken runs about 450 to 550 grams, roughly a pound. That’s the right zone for a beginner. Much heavier weapons exist, and they tempt people who want to “make it count,” but a heavy bokken teaches you to muscle the cut, which is the opposite of what suburi is for. You’ll know you’re muscling it because your shoulders will be on fire within five minutes and your cuts will look like you’re chopping firewood. Start standard.

    Wood second. Red oak and white oak are the common choices. White oak is denser and a bit more durable; red oak is slightly lighter and usually cheaper. Either is fine. Avoid pine or any softwood bokken, which dent, splinter, and occasionally crack mid-swing, none of which you want happening at head height in your living room. Spend the extra ten bucks. Also skip bokken with a glossy varnish, which gets slippery the moment your hands sweat, and they will sweat.

    Shape third. You want the classic curved katana-shaped training bokken, not the straight aikido-style “Iwama” shape and not a kendo-shaped shinai substitute. Actually, let me soften that, because plenty of Iwama-style schools train with the straight shape and there’s nothing wrong with it. Buy the shape your dojo uses, because walking into your first class with the wrong-shaped bokken is the equivalent of showing up with left-handed scissors. The bokken article on Wikipedia covers the common shapes and their uses if you want the full taxonomy.

    Length last. Standard length (about 102 centimeters, around 40 inches) fits nearly all adults. If you’re significantly shorter than about five foot four, a slightly shorter child-sized or women’s model can actually help your form, because a bokken that’s too long drags on the floor during some movements and ruins your posture compensation without you noticing. Weight matters more than length, though, so don’t overthink this one.

    Used bokken are worth considering too, by the way. A worn one with honest dents has character, costs half as much, and the wear tells you it was swung rather than displayed. I like them. The only thing I’d check on a used one is that there are no deep cracks running along the grain near the tip, because that’s the spot where old oak lets go first, and it lets go without much warning. While you’re shopping, grab a cheap saya (scabbard) only if you enjoy owning nice things; it’s strictly optional for practice. If you want a sense of what else the community discusses around training gear and dojo life, the forums at AikiWeb have decades of threads from practitioners of every style, and a search there will answer almost any beginner question you come up with at midnight.

    Quick tipBefore your first real session, swing the bokken a hundred times in the store or the day it arrives, and run your hand slowly along the entire length of the blade edge and tip. You’re checking for splinters and rough spots, which cheap bokken sometimes have straight from the factory. Five minutes with fine sandpaper now beats pulling a two-inch oak sliver out of your palm later.

    Grip, Stance, and the Shape of a Cut

    Everything in suburi rests on a small number of physical details, and getting them right early saves you a year of undoing bad habits. Take your time on this section before you chase rep counts.

    The grip (te-no-uchi)

    Hold the bokken with both hands, left hand near the very end of the handle (the kashira), right hand a hands-width above it if you’re right-handed. Reverse that for left-handers. Your grip should be firm enough that the bokken doesn’t slide or rotate in your hands when you swing, and relaxed enough that your forearms aren’t braced hard the whole time. There’s a phrase you’ll hear. The grip should be like holding a small bird, tight enough it can’t escape, loose enough you don’t crush it. I found that image annoying for about a year before it suddenly made sense around my five hundredth swing. The power of the cut comes from the whole body arriving together, and if your forearms are clenched from the start, they’ve got nowhere to go.

    Watch two common beginner grip faults. The first is the “death grip,” white knuckles from start to finish, which tires you out fast and makes the cut stiff and telegraphed. The second is letting the bottom hand slide off the end of the handle during big swings, which usually means the bokken is slick or your hands are too close together. Fix the first by shaking out your hands between sets. Simple, and it works. Fix the second by checking hand placement every twenty reps or so, because hands migrate when you’re tired and nobody notices it happening.

    The stance (kamae)

    The basic ready position is hanmi, the same staggered stance you use in empty-hand aikido practice: feet about shoulder-width apart along a line, one foot forward, most of your weight settling into the balls of the feet with the knees soft. If you’ve read our piece on blending and tenkan movement, you already know this stance from the empty-hand side, and the weapons version will feel familiar within a session or two. Keep it narrow. The bokken rests raised in front of you, angled up and slightly to the right, tip pointing roughly at your imaginary opponent’s throat. From the side, your body should make a narrow profile, same as in the empty-hand art.

    The cut itself (hasuji and kirioroshi)

    Three things have to arrive at the same moment for a cut to be correct: the blade reaches its target line, your forward foot plants, and your body weight commits forward. If the blade arrives first, you’re arm-swinging. If the foot arrives first, you’re stabbing at air with a late stick. All three at once, or the cut isn’t really yours. When everything lands together, the cut has what practitioners call hasuji, correct blade path, and you can feel the difference immediately because the bokken stops feeling heavy. A well-timed cut feels almost weightless at the bottom of the arc. A badly timed one feels like you’re fighting the wood the whole way down.

    One more principle surprises every beginner. You cut with the bottom two or three inches of the blade, the monouchi. The middle is wrong. The tip is too. Aim small. Think of the last few inches of the bokken as the business end, and let the rest of the weapon be the delivery system. This is why swinging a bokken is nothing like swinging a baseball bat, where you want contact in the fat middle. The baseball instinct is strong, I still catch myself doing it when I’m tired, and it produces a shallow, slapping cut instead of a committed one.

    A well-timed cut feels almost weightless. A badly timed one feels like you’re fighting the wood the whole way down, and the wood always wins.

    The Four Cuts to Learn First

    Different schools count different core suburi sets, anywhere from five to twenty individual movements. Ignore the big lists for now. Four cuts will keep you busy for your first year, and they’re the ones your empty-hand aikido leans on most, and nobody at your dojo will care that you skipped numbers five through twelve.

    Shomen uchi (straight overhead cut)

    The foundational cut. Raise the bokken up and slightly back over your head, then bring it straight down the centerline, finishing with the blade stopping at about the level of your own forehead (in solo practice you stop short of your body, of course), hands ending in front of your solar plexus. The whole movement should come from the hips and the settling of your weight, with the arms mostly along for the ride. One detail I wish someone had told me in week one. Don’t raise the sword by lifting your shoulders up around your ears. Shoulders down. The backswing comes from a small turn in the hips and a rise in the center of the body. If your shoulders creep up, your neck gets involved, and then everything downstream gets tight and short.

    Yokomen uchi (diagonal side cut)

    Raise the bokken the same way as shomen, then cut diagonally down across the front of your body, as if tracing a line from the top of your partner’s ear toward the opposite shoulder. Your hands finish off to the side of your hip rather than in the center. The path of the blade should be a clean diagonal, not a horizontal swipe that dips at the end. Clean diagonals only, no matter how tired you get. In paired practice, yokomen is the attack that most aikido techniques against a strike are built to answer, so the solo version of it is you rehearsing the attack your partners will feed you. Getting it clean on your own makes you a much better training partner in class, and people notice.

    Kesagiri (diagonal downward cut)

    Cut down along the opposite diagonal, from your own high right toward the low left, like the sash of a robe, which is literally what the name refers to. Functionally, it’s the mirror logic of yokomen with a different intent, and the two of them together teach your shoulders to work independently of your hips, which is a skill with no shortcut. The finish matters here. Let the cut come to a full, settled stop at the bottom before you return to kamae. Let it settle. Beginners tend to let the bokken bounce or wobble at the bottom of kesagiri because the diagonal path is harder to arrest cleanly than the vertical one. A stopped blade, held still for a half-beat, is how you know the cut was yours rather than the bokken’s momentum.

    Kiri-kaeshi (left-right alternating cuts)

    Now the combination drill: a shomen cut, then a diagonal cut to the left, shomen, diagonal to the right, and so on, flowing continuously without pausing at kamae between cuts. This is the one that starts to feel like aikido instead of like sword-shaped exercise, because the transitions between the cuts are where the blending movement lives. Start slow. Your body turns, your weight shifts from foot to foot, and the bokken keeps moving through the changes. It feels awkward for a while, and then one day it clicks and you understand why people call weapons practice the skeleton of the art. If you only have five minutes, do kiri-kaeshi for those five minutes and you haven’t wasted them.

    How Many Reps, and How to Build Up

    Most articles get vague right about here. Let’s use actual numbers. The classic suburi standard you’ll hear quoted in dojos is three hundred to five hundred cuts per session, and some traditions go well past a thousand. Those numbers assume conditioned shoulders and years of practice. A beginner who swings a bokken three hundred times on day one will very likely wake up the next morning unable to lift their arms to brush their teeth, and then won’t pick the bokken up again for two weeks. I base that prediction on watching it happen to a training partner, and also on doing it myself.

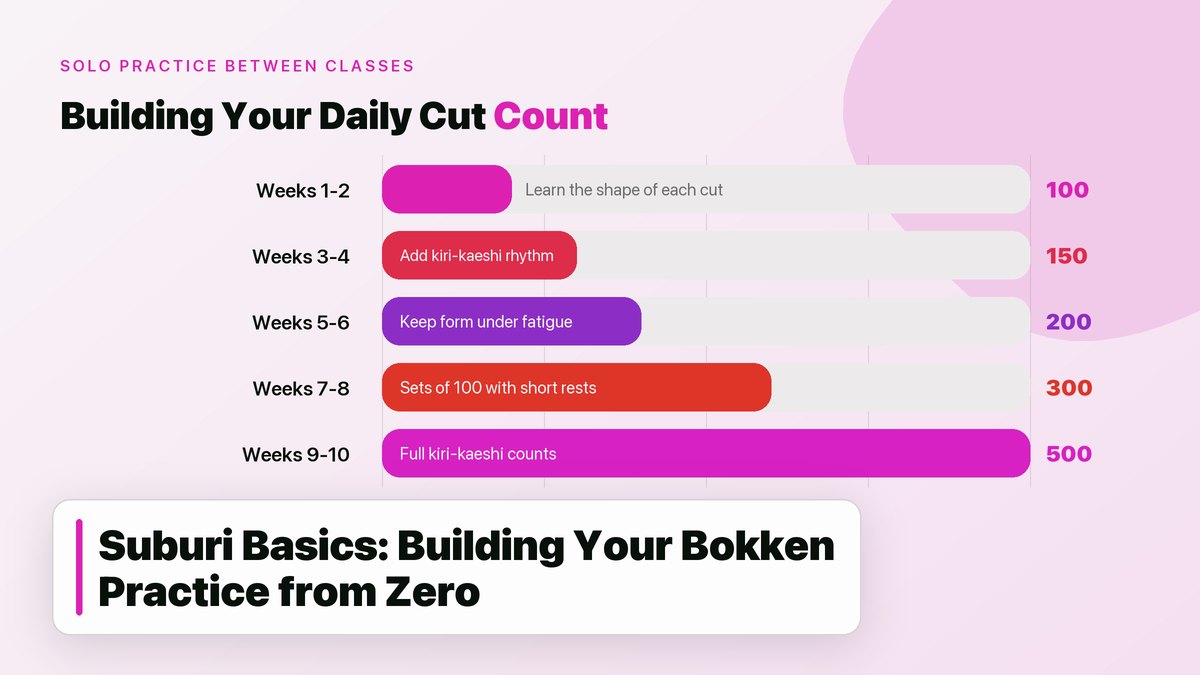
    The progression below builds from a hundred total cuts to a sustained five hundred per session over about ten weeks. It assumes three or four short sessions per week, roughly fifteen to twenty minutes each, which is about the length of a coffee break and fits between dinner and dishes without requiring any real negotiation with the rest of your evening, at least in my house. That’s more effective than one long weekend session, for the same reason that two aikido classes a week beats one double class. The nervous system consolidates frequency, not volume, and your shoulders need the recovery days between sessions more than they need heroic single efforts.

    Weeks Total cuts per session How to split it What to watch for
    1–2 100 Shomen 40, yokomen 30, kesagiri 30. Rest between sets. Sore forearms are normal; sharp shoulder pain is not. Check grip tension, you’re probably over-squeezing.
    3–4 150 Shomen 60, yokomen 40, kesagiri 50. If the shoulders creep up, film one set from the side on your phone, because the truth lives in the recording.
    5–6 200 Shomen 80, yokomen 60, kesagiri 60. Add one slow set of 20 with a three-second pause at the bottom of each cut. The slow set exposes timing cheats the fast sets hide.
    7–8 300 Shomen 100, then kiri-kaeshi 100, then yokomen and kesagiri 50 each. Kiri-kaeshi at volume is where form falls apart first, so slow it down before adding more.
    9–10 400 Kiri-kaeshi 200, shomen 100, yokomen 50, kesagiri 50. Breath starts to matter. Exhale on each cut, don’t hold air.
    10+ 500 Continuous rotation: 100 shomen, 200 kiri-kaeshi, 100 yokomen, 100 kesagiri. This is the standard dojo warm-up level. From here the practice shifts into maintenance mode.

    A few notes on using the table. The split between cuts isn’t sacred. Favor your weak cut. Shifting reps toward whatever feels sloppiest is good self-coaching, and shomen deserves the biggest share early because everything else inherits its shape. The week boundaries are approximate. Some people will hit five hundred by week six, some will want twelve weeks, and both are fine, the table is a scaffold rather than a contract. What matters is that you arrive at volume through gradual loading, because the connective tissue in your shoulders and elbows adapts slower than your enthusiasm does, and tendon complaints from sword work take months to fully settle once they start.

    Counting is its own small skill, by the way. I use sets of twenty-five with a quiet count under the breath, because counting past about thirty in my head reliably fails and I end up doing 180 cuts and calling it 200. Or I set a timer and count sets instead of individual cuts. Some people use a mala-style counter on the sword rack. Whatever gets you honest numbers without breaking your concentration on the cut itself.

    You don’t rise to the level of your ambition on the mat. You fall to the level of what your shoulders can repeat without complaint, so build the shoulders first and let the ambition catch up.

    Safety and Small Spaces

    Most suburi injuries are embarrassingly avoidable, and nearly all of them happen at home rather than in the dojo, because at home there’s no instructor watching and no sprung floor. A few rules I hold to, some learned by violation.

    Clearance above all. You need enough room to swing overhead without hitting anything, which in practice means a ceiling you can reach with the bokken raised plus a foot, and no light fixtures, fans, or hanging plants anywhere near the arc. Ceiling fans are the classic casualty. A garage with open rafters works. A finished basement with seven-foot ceilings does not, and I say that as someone who put a dent in a rental’s ceiling track lighting in 2019. That dent cost me part of a security deposit, and the landlord kept asking questions.

    Flooring matters less than you’d think but more than you’d hope. Bare concrete or tile transmits every bit of vibration up through your feet and ankles over a few hundred reps. A thin rubber mat, an old yoga mat, or even a patch of grass outside changes the feel of the session considerably. Swing in socks on hardwood and you’re one sweaty-foot pivot away from learning why dojos don’t allow that.

    The backswing zone deserves special respect. Beginners fixate on where the blade lands and forget that the sword travels the same distance behind them on the backswing. Check your six. A wall, a pet, a child wandering in to ask a question, a television. My rule is that if anyone else is home, the door to the practice space stays closed and I’ve told them I’m swinging wood for the next fifteen minutes. Pets in particular treat a moving bokken as either a threat or an invitation, and neither ends well.

    Check the bokken itself before every session, and I mean actually look at it. Run a hand along the blade for cracks, wiggle the tip to feel for looseness in the grain, and check for splinters. Ten seconds, every session. A cracked bokken usually gives warning in the form of a new vibration or a buzzing feel through the grip before it fails, so if the sword suddenly feels different, stop and inspect. Trust the change. Finally, never do suburi tired in the specific way that means “had a drink.” Coordination is the whole practice, and dull coordination plus a rigid wooden object at head height is a bad combination. This is the one piece of safety advice that feels preachy and also happens to be the most common cause of home injuries I’ve heard about at seminars.

    Quick tipThe cheapest upgrade to your home practice is a mirror, or better, your phone’s front camera propped at hip height. One recorded set per week will show you what no amount of internal feel can: shoulder creep, leaning, a backswing that wanders, hips that don’t turn. Watch it once, fix one thing the next session, and don’t fall into the trap of recording every swing and performing for the camera instead of practicing.

    Connecting Solo Practice Back to Class

    Solo suburi earns its keep when it shows up in your paired work, so it’s worth being deliberate about the handoff rather than hoping it happens on its own. Then it pays rent. The connection runs through a few specific skills: your posture under pressure, the shape of your strikes when you take the role of attacker, and the timing of your entries. You’ll also develop what practitioners call a feel for maai, the working distance between you and a partner, and there’s no way to drill maai alone with full honesty, but solo practice at least keeps the body honest about the rest. If you want the paired side of this, our guide to ikkyo, the first technique most students learn, covers how these body habits show up the moment someone actually grabs your wrist.

    There’s also a quieter benefit, and after years of practice I’d argue it’s the main one. Twenty minutes of suburi is moving meditation with a feedback mechanism. The counting occupies the chatty part of the mind, the physical feedback (tired forearms, a blade that won’t stop clean, breath that runs short) keeps you honest, and the repetition does for the nervous system what footwork drills do for a dancer. It adds up. On days when I can’t make class, fifteen minutes of kiri-kaeshi leaves me more settled than almost anything else I could do with that time, including the couch and the phone. Regular solo practice also means class time gets spent on the parts that actually require a partner, because you’ve already rehearsed the cut a few hundred times that week and your partner isn’t waiting while your body figures out which end of the bokken is which.

    When you’re ready to go deeper, the archives at Aikido Journal are one of the best reading rooms in the art, decades of interviews and essays from senior teachers on exactly this question of how weapons work feeds empty-hand skill. And if you take nothing else from this article, take the habit: pick up the bokken most days, even for five minutes, even badly. The hundredth session looks completely different from the first, and nobody remembers the first.

    Related reads on this site: what aikido is, explained for beginners, ukemi: rolling and falling basics, dojo etiquette for beginners, and blending and tenkan movement. External links checked and working as of October 2026; terminology follows common Aikikai usage in North American dojos, and your own dojo’s usage takes precedence.

  • Aikido Practice at Home: A Solo Training Plan Between Classes

    Aikido Practice at Home: A Solo Training Plan Between Classes

    Solo Practice Between Classes

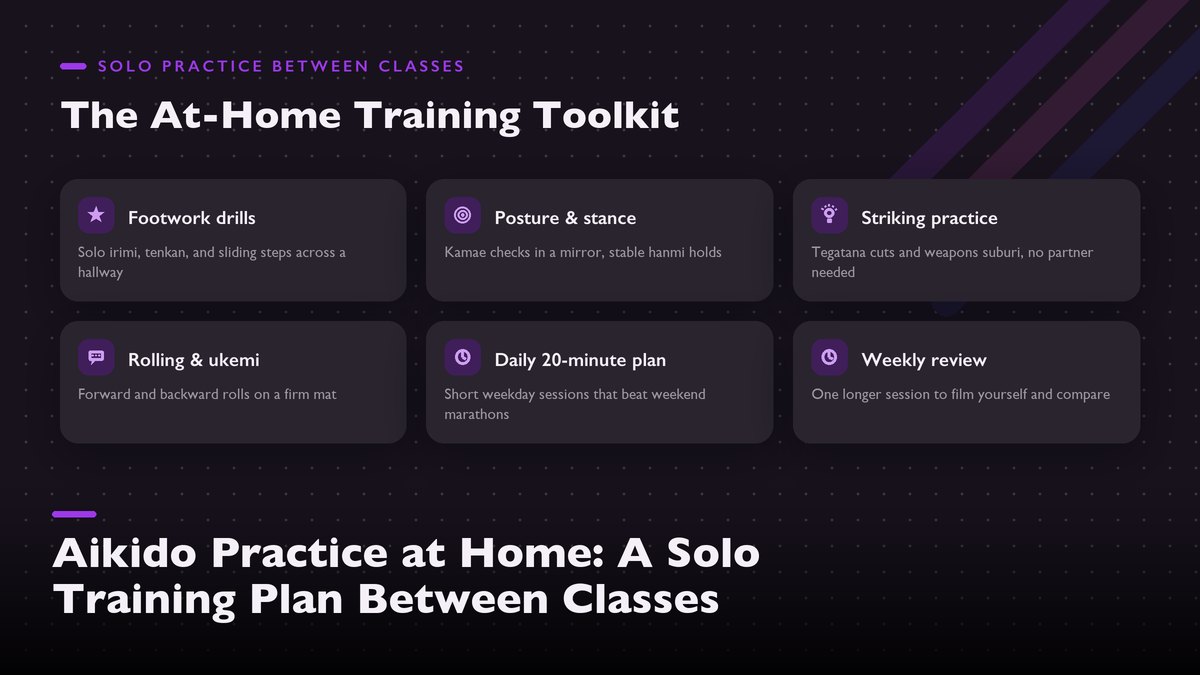
    A realistic weekly routine of footwork, posture, striking, and rolling that needs no partner, fits in a living room, and makes your dojo training sharper every single week.

    Updated October 2026 · 13 min read

    Most aikido students in the US and Canada train twice a week, maybe three times if the schedule and the commute cooperate. That leaves five or six evenings where the only aikido happening is whatever you choose to do about it. I spent my first two years doing nothing about it, and I could feel the difference. Every Monday class started with my body re-learning things it had half-forgotten since Thursday. Then a senior student at my dojo told me the thing nobody puts in the brochure. It stung a little. The people who visibly improve between gradings are almost never the ones with natural talent. They’re the ones who practice at home for twenty minutes and don’t make a big deal of it. This article is the plan I wish someone had handed me on day one, built around one honest idea. You can’t practice aikido alone, but you can practice almost everything that makes aikido work, and you can do it in the space between your couch and your TV.

    What Solo Practice Can (and Can’t) Do

    Let’s be straight about the limits first, because a plan that lies about its own limits is worthless by week three. Aikido is a paired art. No partner, no aikido. At least not the part that matters most. The throw, the blend, the timing, the feeling of someone’s grab landing on your wrist, all of that needs a partner, and no amount of living-room footwork replaces it. Our overview of what aikido actually is makes the same point from the other direction, describing the art as something that happens between two people rather than inside one.

    Solo practice does give you real things, though. It builds the physical foundation the paired work stands on. How your feet move, how your posture holds up when you’re tired, how your hips turn, how safely you fall. All four are solo-trainable. In my experience, the biggest difference between a student who progresses steadily and one who stalls is rarely raw technique. It’s that the steady one shows up with feet that already know where to go. And it keeps the habit alive between classes, so aikido stops being two islands in your week and starts being a thread running through it. A brief history of the art is on Wikipedia’s aikido page if you want the wider context of where this practice tradition comes from.

    The catch, if there is one, is that solo practice magnifies whatever you feed it. Drill a movement wrong at home and you’ll arrive at the dojo with a polished mistake. So the plan below sticks to things you can self-check, and it tells you exactly what to check. Also, roughly twenty minutes is the sweet spot. Shorter and it barely registers. Go longer and your attention starts to wander. That’s when the bad reps sneak in.

    You can’t practice aikido alone. You can practice almost everything that makes aikido work.

    The Four Things You Can Actually Train Alone

    Everything in the weekly plan below comes from four pillars. Learn these once and the rest of the article is just scheduling, because each one maps directly onto what your instructor is trying to do on the mat.

    Footwork (ashi sabaki)

    Aikido lives in the feet before it lives anywhere else. The irimi entry, the tenkan pivot, the shuffle that keeps you off the line of an attack, these are foot patterns, and you can drill them all solo across six feet of carpet. Our article on blending and tenkan movement breaks the pivot down step by step, and everything there can be walked slowly in your living room with no partner in sight.

    Start slow. Like, embarrassingly slow. Step through an irimi entry ten times at quarter speed, watching that your feet don’t cross and your weight stays settled instead of bobbing up and down. Then ten tenkan pivots. Check that the back foot swings through a real arc instead of scooting along the floor. Once the pattern is clean you can speed it up, and this is the part that’s actually fun. Put on some music and shadow-step through combinations for three minutes straight. It looks ridiculous. It also fixes your balance in ways that transfer straight to the mat, usually within a couple of weeks.

    Posture and centering

    Stand the way your instructor keeps telling you to stand: feet about shoulder-width, knees soft, pelvis tucked slightly under so your lower back isn’t arched, crown of the head reaching up. Then hold it. Two minutes feels like nothing on day one and like an argument with your own spine by week two. That tells you how much postural work you actually need. Add slow knee-bends (you’ll hear them called shikko in the dojo, walking on the knees), ten across the floor and ten back, and your legs learn the low, stable stance most standing techniques lean on. Harder than beginners realize, most of them.

    Striking practice (tegatana and weapons)

    Aikido isn’t about trading punches, but it does start from strikes: the straight punch, the overhead shomen strike, the sideways yokomen. Solo, you train the receiving end of that vocabulary by practicing the strikes themselves. No bag required. Work the tegatana (the “hand blade”) by extending your arm with fingers together and thumb tucked, cutting the air along clean lines. If you own a bokken or a jo, even better, because suburi, the basic repetition cuts, are the classic solo drill of Japanese budo. Twenty of them a day will do more for your shoulders and your timing than most beginners expect. The Aikikai Foundation in Tokyo, the organization that grew out of the founder’s own dojo, still treats weapons work as part of the art’s foundation rather than a side hobby. That should tell you how seriously to take those twenty cuts.

    Rolling and falling (ukemi)

    Forward rolls, backward rolls, breakfalls on a padded surface, all of it can be rehearsed solo, and this is probably the highest-value solo work you can do. Our guide to ukemi, the art of rolling and falling, covers the mechanics in detail, and every one of those mechanics can be practiced alone. One caveat worth respecting is where you do it. Slow beats brave here. Roll on a firm mat, a thick carpet, or grass outside, and keep a sofa cushion or two nearby. Hardwood floors are unforgiving teachers, and they grade on a curve you don’t want to be on. Ten quiet, careful rolls beat thirty sloppy ones every single time, and your future self, the one who gets projected across a dojo at speed, will be built out of those ten careful ones.

    Safety firstSolo rolling is the one pillar where overconfidence actually bites. Warm up your neck and shoulders first, tuck your chin, and roll across the back of the shoulder rather than the point of it. If a roll hurts at home, stop. Bring the question to your instructor instead of drilling through the pain and teaching yourself a fear that takes months to unlearn.

    Setting Up Your Living Room Dojo

    You need less than you think. A rectangle of floor about six by eight feet is enough for every drill in this article, which means the average living room clears the bar with furniture pushed back a little. Move the coffee table, warn anyone else in the house that you’re about to do something that looks odd, and you’re done. Odd is fine. If you own a tatami or an exercise mat, lay it down; if you don’t, a rug over carpet works fine for footwork and posture, and the rolling work can migrate to grass in the warmer months.

    Two small investments pay off disproportionately. The first is a cheap full-length mirror, or even a glass patio door at dusk, so you can watch your own posture and foot angles. Your instructor sees your movement from the outside; a mirror is the closest solo equivalent. Simple, and it works. The second is a jo or a broomstick standing in a corner. Suburi with an ordinary broomstick is ninety percent as good as suburi with a real jo, and it costs nothing, though I’d be lying if I said the real one doesn’t feel better.

    One more setup note, and it’s about time rather than space. Attach the practice to something that already happens every day. Right after work, right before a shower, while dinner simmers, any anchor works, but anchored sessions survive busy weeks and unanchored ones die by the third Tuesday. Mine sits between pouring coffee and opening my laptop. Yours can sit anywhere, as long as it sits somewhere definite.

    The Weekly Session Plan

    The plan below assumes two dojo classes a week. Adjust the days freely if you train more often, because the shape matters more than the exact days. Sessions run twenty to thirty minutes. That’s the whole ask. Sunday evening is rest. Rest is how bodies consolidate. And a plan with no gap in it is a plan you’ll abandon by week five, guaranteed.

    Day Session focus What to drill (20–30 min)
    Monday Footwork Ten slow irimi entries, ten slow tenkan pivots, then three minutes of shadow-stepping to music, and finish with two minutes of quiet standing for a posture check.
    Tuesday Dojo class Attend class. No solo work after; just note one thing your instructor corrected.
    Wednesday Rolling Warm up neck and shoulders, then ten forward rolls and five backward rolls on a padded surface. Finish with two slow knee-walks across the room.
    Thursday Dojo class Attend class. Afterward, write one line in a notebook about what clicked.
    Friday Striking & weapons Tegatana cuts along eight lines (shomen, yokomen both sides, plus the diagonals), twenty cuts on each line. With a bokken or a broomstick, add twenty shomen suburi. Shoulders stay loose throughout.
    Saturday Mix & review Your choice: repeat the weakest pillar from the week, or shadow-box an entire technique start to finish, stepping through ikkyo, shihonage, or whatever your class is covering. About twenty minutes.
    Sunday Rest No practice. Maybe read an article or watch one demonstration video instead.

    Notice the shape of the week. Footwork opens it, because footwork is the foundation everything else stands on, and rolling lands midweek so your body has time to recover before the weekend. The Saturday review session exists for a practical reason. It forces you to recall what the dojo taught you, and recall is where learning actually cements. Reading about a technique feels like learning it. Walking it through your own living room, badly at first, is closer to the real thing.

    If twenty minutes feels like too much, halve everything rather than dropping a pillar entirely. Ten minutes of footwork still beats zero, and a five-minute rolling session still counts. The plan is a floor, not a ceiling; on good weeks I’ll stretch Saturday to forty-five minutes without any guilt, and on bad weeks the whole thing compresses to ten minutes of shikko while the kettle heats. Both weeks count as wins.

    Quick tipRecord yourself once a month. Sixty seconds is plenty. One footwork sequence and one roll on your phone camera is the cheapest coaching you’ll ever get. Comparing this month’s clip to last month’s shows drift you can’t feel from the inside, and it gives you something concrete to ask your instructor about.

    Connecting Home Practice Back to the Dojo

    A solo plan that floats free of your classes is just exercise, so the trick is letting the dojo drive the content. Whatever technique your instructor spent the most time on this week becomes your Saturday shadow-walk and maybe next Monday’s footwork pattern. Our breakdown of ikkyo, the first technique most students learn, is a good template for how to deconstruct a throw into steppable parts you can rehearse solo.

    Ask your instructor what they’d suggest for home practice, too. Most love the question, and the answer you get will be more specific than anything an article can give you, because it targets whatever your movement actually needs right now rather than a generic beginner. Some dojos even keep a short list of approved solo drills for students who ask. It costs you nothing. Others will tell you to just relax and enjoy your evenings, which is also a defensible position, to be fair.

    There’s a mindset piece here as well. Leave the ego at home. Between-class practice works best when you treat it as homework rather than as a second dojo. You’re not trying to learn new techniques from videos (please don’t; that’s how polished mistakes get born). You’re reinforcing what a qualified instructor already taught you in person. When in doubt about a detail, leave it alone and ask at the next class. The dojo stays the source of truth; the living room is where the source gets practiced until it sticks.

    How to Keep the Habit Alive

    Every article like this one ends with the plan, and most readers quit by week three. So let’s talk about the actual hard part, which is showing up in your own living room on a rainy Wednesday when nobody’s watching and there’s no instructor to disappoint. Three things have worked for me and for the students I’ve watched stick with it, and they’re all boring, which is maybe why they work.

    • Anchor it to an existing habit. Same time, same trigger, every day. After the coffee, before the shower, while the pasta boils. Vague plans like “sometime this evening” evaporate under any pressure at all.
    • Lower the bar on bad days. Decide in advance that five minutes counts. A plan you can do exhausted is a plan you still have on your worst week, and keeping the chain unbroken matters more than any single session’s quality.
    • Track it somewhere visible. A wall calendar with a slash mark per session, a note on your phone, anything. Paper works fine. After three weeks the chain itself becomes the reason you roll out the mat, and after two months you’ll notice the difference at the dojo, which is the feedback loop that sustains everything.

    One more honest note before the close. Some weeks you’ll skip everything, and that’s fine, it happens to me a couple of times a year around deadlines and family visits. The plan doesn’t need perfect attendance. It needs you back on the mat after the interruption, without the guilt spiral that turns one missed week into three. If you’re reading this in January with a new year resolution fresh in mind, I’d suggest starting with the Monday footwork session only, and letting the rest of the week fill in on its own once that one stops feeling like a chore.

    For extra study between sessions, the long-running archives of Aikido Journal carry decades of interviews and essays from senior teachers. AikiWeb hosts one of the oldest ongoing discussion forums in the art, where beginners ask exactly the questions you’ll have by week four, sometimes in threads that run to fifty replies. If you ever want to see how the art organizes itself worldwide, the International Aikido Federation lists member organizations from dozens of countries, a nice reminder that your little living room practice connects to something much larger. None of that replaces mat time, of course. Rest days count too. But on a rest day, reading a good interview beats scrolling. Your dojo etiquette will still be waiting on the mat for you on Tuesday.

    Notes and related reads. This plan assumes a typical beginner schedule of two dojo classes per week; adjust days and volume to your own school and body. Related articles on this site: what aikido is, blending and tenkan movement, ukemi basics, and dojo etiquette for beginners. External links were checked and working as of October 2026; always confirm solo drills with your own instructor before drilling them hard.