Blog

  • Ashi Sabaki Drills: Footwork You Can Train Alone

    Ashi Sabaki Drills: Footwork You Can Train Alone

    Solo Practice Between Classes

    Most aikido problems that feel like technique problems are actually footwork problems wearing a disguise. Your ikkyo collapses because your feet stopped moving, your tenkan wobbles because your heels are glued down, and your irimi arrives late because you’re stepping where you were instead of where the opening is. The good news: footwork is the one part of aikido you can train properly by yourself, in ten quiet minutes, with nothing but a mirror and some floor space.

    Updated October 2026 · 13 min read

    There’s a conversation I’ve heard in dojos on three continents, and it always starts the same way. A frustrated student corners a senior after class and says some version of “I don’t understand why my technique isn’t working.” And the senior, almost every time, watches one repetition and points at the floor. Not at the hands. Not at the hips. The floor. Just the floor. The feet are the least glamorous part of aikido, which is exactly why they cause the most trouble: everyone wants to practice the throw, and nobody wants to practice sliding across the mat without crossing their ankles. Years of training and a lot of wasted effort have convinced me that clean footwork dissolves maybe eighty percent of your technique problems on its own, because aikido techniques are mostly just good body position arriving at the right moment, and body position is a footwork output.

    That idea has a name in Japanese: ashi sabaki, foot movement. It’s half of the broader concept of tai sabaki, body movement, and if you want the wider context of how this fits into the art as a whole, the overview of aikido’s principles and history on Wikipedia is a solid starting point. Ashi sabaki is also, not coincidentally, the most solo-friendly skill in the entire curriculum. Everything you need is already in your house. No partner, no pads, no special equipment, and no schedule to negotiate with anyone except yourself, which is more or less the entire appeal of training at home. This article walks through a progression of four solo drills, one each for the sliding step, the entering step, the pivot, and the rotation, with mirror checks at every stage and the faults you’re most likely to catch in the glass. Do them slowly, do them regularly, and your next class will feel different in a way that’s hard to explain but easy to notice.

    The Four Steps You Need

    Everything in aikido footwork is some combination of these.

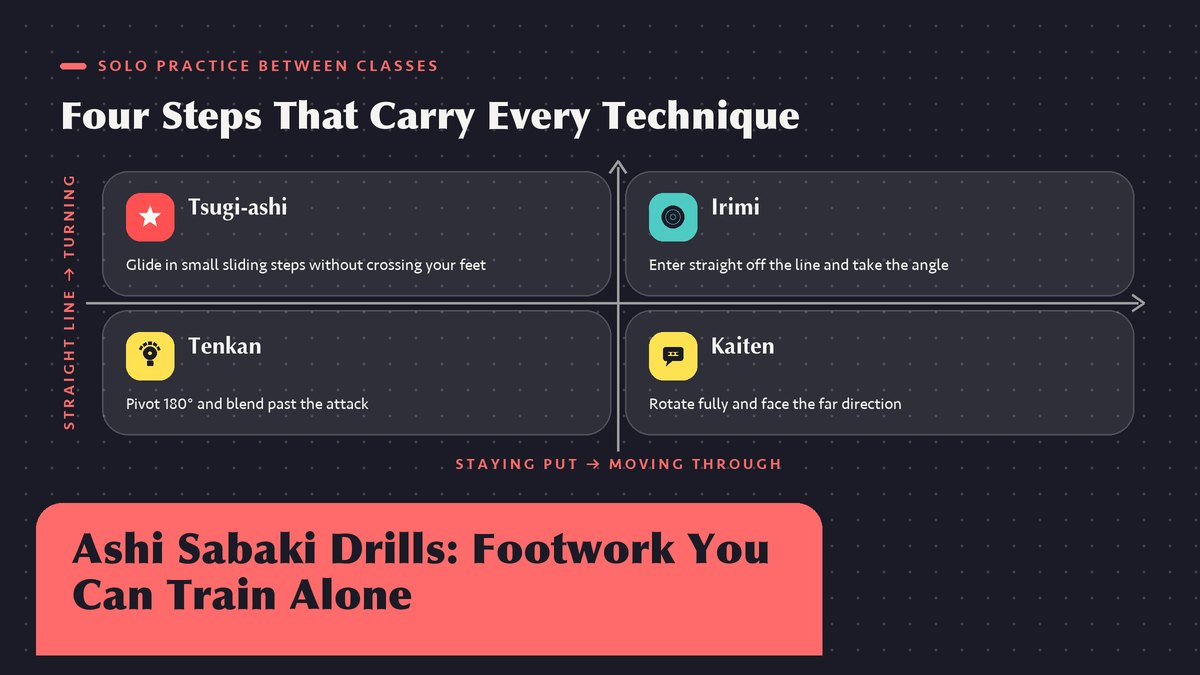
    Before the drills, a quick vocabulary pass, because “footwork” is too vague to practice. Japanese martial arts break movement down into a handful of named steps, and aikido classes in North America use four of them constantly. First is tsugi-ashi, the sliding step where the trailing foot follows the leading foot without ever crossing it, so your stance width stays constant and your balance never wobbles. This is how you travel on the mat. One step, then the next. Second is irimi, the entering step, where you slide in at an angle, roughly forty-five degrees off the line of attack, to end up beside your partner. Third is tenkan, the pivot, a hundred-and-eighty-degree turn on the balls of the feet that redirects the attacker’s line without you retreating an inch. Fourth is kaiten, the rotation, a full turning step that carries you around an axis, often your partner’s arm or an imagined point between you.

    You already know these movements from class even if the names haven’t stuck. Every technique you’ve ever been shown is built from them, shuffled and combined. Nothing else hides in there. What follows is a progression that teaches each one in isolation, then blends them the way real techniques do. I’ve ordered it deliberately, and the order matters more than people expect. The sliding step comes first because it underpins everything else, and a shaky tsugi-ashi makes every later drill feel like walking on a boat.

    What you needA mirror, preferably full length; a hallway or about eight feet of clear floor; and something to make a line with, painter’s tape or a broom handle or even a rolled-up towel. That’s the entire equipment list. Socks are fine on hardwood, bare feet are better on a mat, and I’d skip practicing on carpet since your feet will drag and teach you a false step length.

    Drill 1: Tsugi-Ashi, the Sliding Step

    Start in your basic hammi stance, one foot forward, knees soft, weight settled slightly forward into the balls of the feet rather than the heels. Weight stays forward. Now slide the front foot forward maybe six inches, and before your weight fully commits, draw the back foot up to restore the original stance width. That’s one rep. The back foot never passes the front foot, and the stance width never collapses. Your head stays at the same height throughout, because if it’s bobbing up and down you’re using vertical bounce to create the slide, which works at walking speed and falls apart the moment a real partner pushes back.

    Do this the length of your hallway and back. Slow. Your instinct will be to go faster, slow sliding feels faintly ridiculous, like miming an escape. Resist it. Speed conceals the two faults this drill exists to expose: the crossover, where the trailing foot sneaks past the front foot and your stance briefly becomes a tightrope walk, and the gap, where the trailing foot lags and leaves your legs too wide apart to move again quickly. I do this drill on my hallway floor at least twice a week, and after years of it I still catch my back foot getting lazy around rep fifteen.

    Why does this matter so much? Because aikido happens at a distance where your partner can reach you, and if your stance can be narrowed by pressure or scrambled by a nudge, every technique you know degrades into a scramble at exactly the wrong distance. So train the step slow. Boring is fine. Senior teachers sometimes describe good tsugi-ashi as the skill of being ready to move again at any instant, and that’s really what you’re training: not the step itself, but the permanent availability of the next step. Publications like Aikido Journal, which has spent decades interviewing senior instructors about fundamentals like this, return to the same point again and again. The fancy stuff is built on the boring step, whether anyone admits it or not.

    Mirror check for this drill: watch your shoulders. They should stay level and square to your imaginary partner the whole way down the hall. If one shoulder dips or leads as you slide, one foot is doing more work than the other, and in techniques that asymmetry shows up as you spiraling off your own line.

    Drill 2: Irimi, the Entering Step

    Irimi is the step beginners find scariest, because it goes toward the attack instead of away from it. Alone in your living room there’s no attack, so we fake one. Angle first, always. Stand at one end of your line facing the mirror, and imagine a partner directly in front of you, arms’ length away, pushing straight at your chest. Your job is to slide in at a forty-five-degree angle off that line, ending up beside the imagined attacker with your front foot pointing past them, not at them.

    The mechanics borrow directly from drill 1. The front foot slides forward and inward along the diagonal, the back foot follows with tsugi-ashi, and you finish in a stance that’s the mirror of the one you started in, just rotated around an invisible point beside your partner. Say your left foot was forward. After a clean irimi to your right, your right foot leads and you’re looking at the wall your partner’s shoulder points at. Check the finish. You’ve entered their space without ever stepping in front of their power.

    Stepping shallow is the common fault here. A timid irimi at twenty degrees keeps you on the attacker’s line, and at that point you’ve done the worst of both worlds, moved closer and stayed in the firing zone. A useful cue is to finish each rep and check whether you can see the imaginary partner comfortably out of the corner of your eye. If you have to turn your head sharply to see them, you entered too shallow. If you can’t see them at all, you entered past ninety degrees and you’re now facing away, which is a different mistake with a different fix. Aim for the shoulder-in-your-peripheral-vision spot.

    Entering feels wrong for about six months. Then one day it feels like the only safe place to be, and you wonder why you ever stepped backward.

    Mirror check: your posture at the end of the entry. Spine tall, weight forward. Beginners almost always lean back slightly after irimi, a half-conscious flinch away from the thing they just approached, and it survives for months because nobody thinks to mirror their own entries. In the mirror it looks like you’re leaning away from a bad smell. Your shoulders should sit directly over your hips at the finish, spine tall, weight still forward. If you’re leaning, the entry was fear doing the steering, and a partner who pushes at that moment will fold you in half.

    Drill 3: Tenkan, the Pivot

    Tenkan gets its own article elsewhere on this site, so I’ll keep this practical. Stand in stance with your left foot forward, toe on your taped line. The front foot draws a small arc across in front of the back foot, the back foot pivots on the ball, and your whole body rotates until you’ve turned one hundred and eighty degrees and your right foot now leads, on or near the same spot on the floor. Your hips turn with your feet, never after them, and your head stays level like it’s riding on rails.

    The arc of the front foot is the detail that makes or breaks this. Beginners usually swing it in a big semicircle, feet getting wide, which turns a pivot into a small waddling hike around your own ankles. Keep the arc tight, about the length of your own shoe. Small arc, big difference. Your ankles should pass close but never tangle, and your feet should never cross one over the other. Crossing in a tenkan is the single most common footwork fault in beginner aikido, and it’s exactly as bad as it looks, because a crossed stance is a standing invitation to be pushed over.

    Do sets of ten, alternating lead sides, and pause after each rep to note where your feet actually landed relative to the tape. A clean tenkan keeps you on your spot on the compass. A drifting one slides you backward or sideways, which means you turned while retreating, and retreating pivots lose the blend because you’ve added distance at the exact moment the technique needs to stay connected. Slow count of three per rep. Then check the tape. Boredom is the milestone. When the slow version bores you, you’re getting close.

    Mirror check for tenkan is the best in the whole progression, because a mirror tells you instantly whether your shoulders turned with your hips. Set up sideways to the glass and watch yourself pivot. If you see your shoulders arrive late, lagging behind your feet like they’re being dragged, that’s the fault that makes your pivots feel heavy and your techniques telegraphed. Feet first, hips second. The feet lead by a hair, but the hips and shoulders must commit fully, together. There should be a moment mid-turn when your chest faces the mirror dead on. If there isn’t, you turned your feet and left your body behind to catch up.

    Knee noteIf pivoting on the ball of the foot bothers your knees, check that your weight is actually settling into the hip of the turning leg and not hanging on the knee joint itself. Most knee discomfort in tenkan comes from a stiff, vertical pivot leg. Let the knee bend a little and travel with the turn, and the load spreads where it’s supposed to go.

    Drill 4: Kaiten, the Rotation

    Kaiten is the turn you move through rather than around. Tenkan pivots you about your own center; kaiten carries you in a full circle around something external, an imagined partner’s arm, a point on the floor between you, a lamppost if you’re practicing outside. In class this is the movement behind techniques where you seem to orbit your partner and reappear somewhere they didn’t expect. Alone, you train the orbit.

    Mark a point on the floor, a shoe works fine. Stand facing it in stance, then perform a tenkan pivot, and instead of stopping at one hundred and eighty degrees, continue the rotation all the way around until you face the point again from the same side you started, having moved along the rim of an imaginary circle around it. Keep facing inward. Head turns first. Your feet use the same small arcs as tenkan, chained, and your head turns steadily, spotting the marker the whole way around so your neck doesn’t wind up and snap. It should feel less like spinning and more like walking a very small circle while facing inward. If you’ve ever watched a cat turn around on a windowsill before lying down, that’s roughly the shape, minus the tail.

    The faults here are the tenkan faults, amplified. Feet crossing mid-circle, head lagging so the last ninety degrees is a blind stumble, and rising up on tiptoe as the turn speeds up, which shrinks your contact with the floor to almost nothing. Slow it down until the circle is silent. Slow is smooth here. A quiet turn is a balanced turn; you can hear the difference on a wooden floor.

    Putting It Together: The Shadow Partner

    Once the four steps are individually honest, combine them into the drill that most resembles actual training. Face your mirror, imagine a partner in front of you, and run a short imaginary exchange. They push, you irimi in at the angle. They turn to follow, you tenkan to stay blended. They reach again, you kaiten through the gap their reach opens. Between every movement, restore your stance with tsugi-ashi so you’re never caught mid-stride. Slow beats smooth.

    Keep it to four or five movements, slowly. Four moves is plenty. The real work is the transitions, those half-instants where one step hands off to the next. In my experience, transitions are where real technique lives or dies. Anyone can do a decent tenkan in isolation; the person who can pivot smoothly out of a moving entry, at the right angle, without their feet tangling, is the person whose techniques feel effortless. So go slow on purpose. Thirty slow shadow exchanges will teach you more about those handoffs than a month of rushing through them in class.

    Mirror check for the combined drill: step back and watch your whole silhouette. You’re looking for continuity. Hiccups show up fast. No pauses where you mentally reload, no little hops to fix your stance, no shoulder hitch before the pivot. Your shadow should move like it has somewhere to be and plenty of time to get there.

    The Fault and Fix Table

    The table below gathers everything the mirror will show you, drawn from years of watching my own feet and correcting the same few mistakes over and over on other beginners. Eight rows, eight faults. Cross-reference it against what you see in the glass.

    Fault you see in the mirror What it does to your aikido The fix
    Trailing foot crosses past the front foot when sliding Stance collapses to a line; you can be toppled with a light push Slow the tsugi-ashi down and keep the stance-width constant. Practice along a taped line
    Feet cross during the tenkan or kaiten turn Ankles tangle at speed; the pivot ends in a stumble, not a blend Shrink the front-foot arc to about a shoe-length; pause between reps and reset
    Standing and moving with weight in the heels Slow reactions; techniques arrive late because you must roll forward before you can step Shift weight to the balls of the feet. If you can’t lift your heels an inch, you’re back on them
    Heels splayed outward on the pivot so feet trace a zigzag Pivot loses its axle; power bleeds sideways instead of rotating Turn on the ball of the back foot with the heel tracing a small tight circle, not a wander
    Shoulders leaning back after irimi Fold under any forward pressure; the entry reads as fear, not commitment Finish each entry and stack shoulders over hips. Imagine a wall behind you
    Head bobbing or dipping during slides and turns Telegraphs every movement; your vertical bounce becomes your partner’s timing cue Fix your eyes on one point in the mirror and keep it at constant height through the rep
    Dragging the feet across the floor instead of sliding Loses the glide that makes aikido smooth; feet stick mid-technique Press through the balls of the feet and skim the surface. Listen for a quiet slide
    Stance so wide you can’t move again One good step and you’re stranded; techniques become single-shot attempts Reset stance width between movements; if you can’t rise slightly, the stance is too low and wide

    One fault deserves special mention because it’s nearly universal among people who train alone: practicing only to your good side. In class your partner hands you grabs and attacks from everywhere, but alone in front of a mirror you’ll unconsciously favor the direction that feels smooth. Comfort is a trap. My strong side is a perfectly serviceable tenkan and my weak side used to look like furniture being moved. So split every drill in this article fifty-fifty, and treat your awkward side as the real practice and your comfortable side as the warm-up. The forums at AikiWeb are full of threads from home practitioners complaining that their techniques only work one way, and the answer is almost always the same. Train the other side first.

    A Ten-Minute Solo Session

    On a busy weekday I’d stack it like this, roughly ten minutes door to door. Two minutes of tsugi-ashi up and down the hallway to wake up the sliding step. Two minutes of irimi entries to each side, checking the finish in the mirror. Three minutes of tenkan, alternating lead feet, pausing to check foot placement against the tape. One minute of kaiten around a marker in each direction, slow and silent. Then two minutes of shadow-partner exchanges, chaining the steps together and watching your silhouette for hitches. That’s the whole session. I call it ten minutes, though if your hallway is short you’ll run closer to twelve. Close enough.

    That cadence, four or five days a week, is genuinely enough to change your footwork within a couple of months, and I mean the kind of change your training partners notice first. It won’t replace class, because nothing replaces a live partner and an instructor’s eyes, and if you’re looking for training resources beyond solo work, Aikido International maintains directories and material that connect practitioners with schools and seminars across North America. Think of the solo work as upkeep. Class is where your footwork gets tested under pressure, and the drills are how you make sure it holds up when someone actually pushes.

    Nobody at your dojo will ever compliment your footwork. They’ll just start saying your techniques feel much better lately, and they won’t know why.

    So keep at it, even when it feels silly. Start with drill one. The mirror is honest, the floor doesn’t lie, and in a few months the difference shows up in cleaner entries, calmer pivots, and techniques that stop feeling like a fight. That’s the whole point of ashi sabaki. Your hands are just along for the ride.

    Footwork terminology varies between aikido styles, so if your dojo names these steps differently, follow your instructor’s vocabulary. External links in this article were verified live as of the update date above. If you’re new to the art, start with what aikido is and how it works, then our guide to blending and tenkan movement, your first technique, ukemi basics, and dojo etiquette for beginners.
  • Jo Staff Solo Drills: Spins, Strikes, and Movement

    Jo Staff Solo Drills: Spins, Strikes, and Movement

    Solo Practice Between Classes

    A four-foot oak stick, a strip of empty floor, twenty minutes twice a week, and a bit of stubbornness will do more for your aikido than most people expect. Here are the strikes, the spins, the stepping drills I hand every new student, and the order that keeps them from quitting the staff out of frustration.

    Updated October 2026 · 13 min read

    The jo showed up in my life as a leftover. My dojo had finished a weapons weekend, and a pile of practice staffs leaned in the corner of the equipment closet like a handful of spilled broom handles. Sensei told everyone to take one home. “Work on it between classes,” he said, “or it’ll take you five years to learn what takes two.” That was the whole lesson plan. I brought mine back to my apartment, moved the coffee table aside, and spent my first evening whacking the ceiling fan on a clumsy overhead cut. The fan survived. The lesson stuck anyway. The jo is portable, cheap compared to a sword, and endlessly patient, and it’s the best solo training partner aikido offers, because everything that makes you better with a stick in your hands (posture, footwork, timing, a quiet grip) makes you better empty-handed too.

    If you’ve never touched a jo, or you picked one up once at a seminar and fumbled through a group form with everyone moving in a direction you weren’t expecting, this article is the on-ramp. We’ll cover the three basic strikes, the wrist spins that make the staff feel alive instead of like a piece of lumber, and the stepping patterns that tie hands to feet. I’ll mention the 13-count kata along the way, since that’s where all of this eventually lands in a traditional dojo. For the backstory on the weapon itself, the Wikipedia overview of the jō is a solid place to start, and it covers the stick’s famous duel with Musashi, which I’ll get to in a minute.

    What a Jo Is, and Why Aikido Loves It

    Four feet of hardwood, roughly the height of your armpit.

    The jō is a wooden staff about 128 centimeters long, a touch over four feet, noticeably shorter than a bō but much longer than a sword. Legend credits it to a 17th-century warrior named Muso Gonnosuke, who supposedly developed the weapon and its art, Shintō Musō-ryū, after a famous encounter with the swordsman Miyamoto Musashi. The story says Musashi beat him with a wooden sword. Gonnosuke retired to a shrine, and after a stretch of meditation came back with a shorter staff and a new set of angles that worked against a blade. Historians argue about the details, but the legend explains something real about the weapon’s character. A jo is short enough to move like a sword in your hands, long enough to keep a blade at a distance, and quick enough to change ends mid-fight.

    Aikido adopted the jo through its founder, Morihei Ueshiba, who trained in multiple weapon arts before developing aikido and never really separated weapons from empty-hand practice. In most traditional lineages, the jo shows up as solo forms (kata), paired practice where one person has a jo and the other attacks empty-handed or with a wooden sword, and blending exercises where the staff teaches you the same entering and turning movements you’d do with your arms. The long-running magazine Aikido Journal has published decades of interviews and articles on how weapons work fits into modern aikido training, and it’s worth browsing once you’ve got the basic moves under your belt.

    Equipment-wise, you don’t need much. A standard white-oak or red-oak jo costs somewhere between thirty and sixty dollars from any martial arts supplier, and honestly a closet pole of the right length works for your first month if you’re careful about splinters. (I’d spend the thirty dollars. The oak version comes balanced and sanded smooth, with no slivers to pick out of your palms.) Measure for your height by standing the staff upright; most people want it somewhere between armpit and chin. Shorter staffs spin faster but lose reach. Longer ones feel authoritative and swing slower.

    One safety note before anything else. You are holding a hardwood lever with two weighted ends, and the most common beginner injury is self-inflicted, usually a strike to your own kneecap, elbow, or the ceiling fixture. Give yourself a clear space about the length of the jo in every direction. I knocked a drinking glass off a shelf with a rear spin in my second month, and my spouse instituted a garage-only rule that’s still in effect. Train outside or in the garage if you can swing it.

    The Three Strikes Everything Builds On

    Aikido’s jo work rests on three core strikes, and they’re the same three you’ll see in the sword work, which is no accident. Ueshiba intended them as one study. Learn these solo first, slowly, in the air.

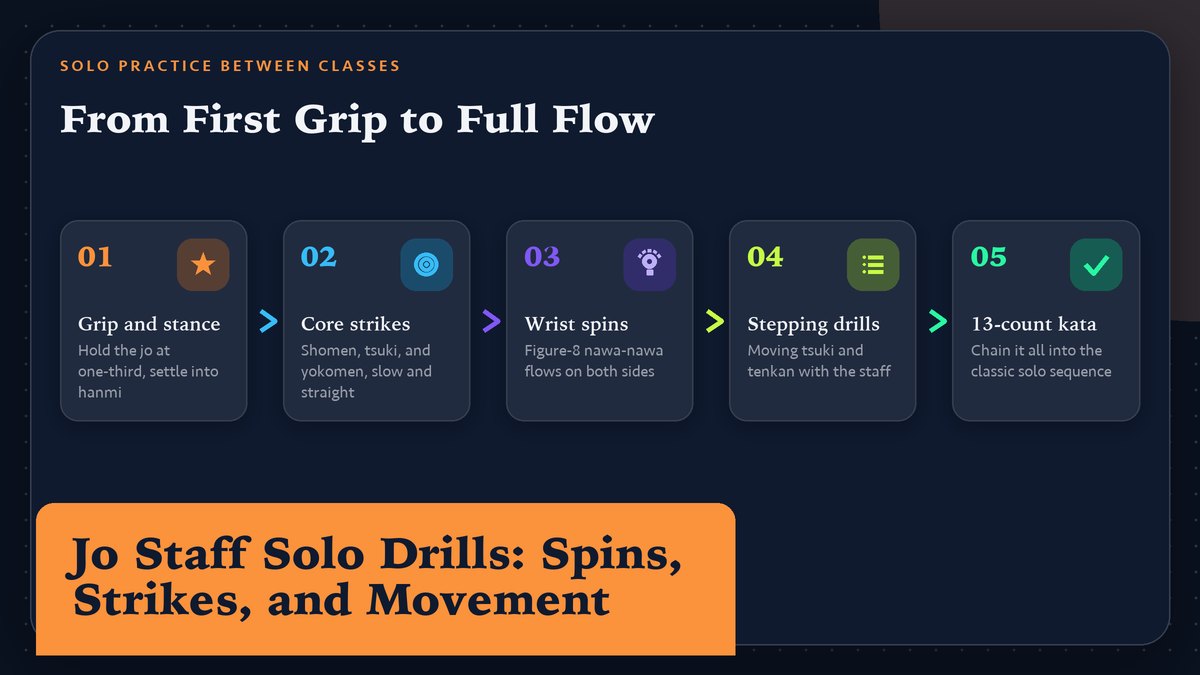
    Shomen-uchi is the overhead cut. The jo rises up along your center line and comes down diagonally in front of you, like chopping wood with an axe, except the power comes from your hips rather than your shoulders. Beginners muscle it. Don’t. The staff should fall under its own weight once you’ve started it moving, your job is steering the fall. A good shomen ends with the jo pointing down and forward at roughly forty-five degrees, your front knee bent, both hands still on the stick. Thirty slow repetitions, and your shoulders will tell you whether you’re muscling it.

    Tsuki is the thrust. You drive the end of the jo straight forward at mid-height, like a bayonet or a pool cue, and your rear hip rotates into it so the power starts at the floor. The back hand pushes while the front hand guides, and at full extension the staff should be level with your solar plexus rather than your chin. Beginners push with both arms and lean, which topples them forward and, against a partner, hands the other person their balance. Think of the thrust arriving from behind you, traveling up through your legs and torso, rather than originating at your arms. The legs do the work, in other words.

    Yokomen-uchi is the side cut. The jo travels in a rising arc that crests beside your head and then falls diagonally across, aimed at the temple or collarbone line of an imaginary opponent. If shomen is an axe, yokomen is a tennis forehand with a follow-through. It teaches the sideways hip switch that’s the parent of half the turning movements in aikido, the same body mechanics behind tenkan and irimi, which I wrote about in the guide to blending and tenkan movement.

    The three strikes share one skeleton. Feet set the range and hips start the motion; the hands only finish what the floor began. When a strike feels off, run the checklist in reverse order. Nine times out of ten the hands are fine and the feet did nothing.

    Grip / Strike How it looks What it trains
    Honte grip (forward hand over) Right hand on top of the shaft, both palms down Power through structure, the default grip for most strikes
    Gyakute grip (reverse) Top hand palm-up, like holding a bicycle handlebar Wrist mobility and the figure-8 spin transitions
    Shomen-uchi Overhead diagonal cut Whole-body alignment, relaxing the shoulders
    Tsuki Straight thrust at mid-height Hip rotation, extension without leaning
    Yokomen-uchi Arcing side cut past the temple Side-to-side hip switch, tenkan body mechanics
    Wrist spin (nawa-nawa style) Continuous figure-8 rolling in front of the body Independence of the hands, smooth grip changes
    Hasso stance Jo held vertical beside the shoulder Readiness posture, the starting and ending position of most solo forms
    Hidari orientation Left foot and hand forward The non-dominant side, which feels broken for the first month

    A good staff feels heavy on the way down, light on the way back up. If every direction feels like work, your shoulders are doing the job your hips were hired for.

    Wrist Spins, or Teaching the Stick to Move Itself

    This is the part beginners skip, and it’s the part that transforms the jo from a stick you’re carrying into a stick you’re handling. The goal is simple to describe and humbling to achieve. Keep the staff rolling continuously in front of your body so it traces a horizontal figure-8, with the ends trading the lead as it passes from side to side. Japanese dojo slang for this kind of continuous flowing movement is “nawa-nawa,” a mimetic word for rope-like motion, and you’ll hear instructors use it for anything smooth and unbroken.

    Start with both hands at the center of the staff, right hand above left in the gyakute grip. Roll the right hand over the top of the shaft so the staff pivots in your left palm. The far end swings across to your left, and as it crosses, your left hand takes over the roll. That’s half a figure-8. Keep trading hands, and the staff draws a sideways 8 in the air while your wrists do small circles. Sounds easy. The first attempts look like you’re stirring an enormous pot of soup with two broken wrists, and everyone goes through that stage. Give it a week of five minutes a day.

    Once the basic roll runs on its own, learn the forward spin and the reverse spin. In a forward spin, the top of the staff rotates away from you as the jo turns over; reverse, it comes toward your face. You’ll use forward spins to flip the striking end from one side to the other mid-movement, and reverse spins to bring the staff back into guard after a committed strike. The paired versions of these appear everywhere in the 13-count jo kata, which most Aikikai-affiliated dojos teach as the first formal solo sequence and which strings the strikes, spins and steps into thirteen continuous movements. Counting varies slightly by lineage; my current dojo counts fourteen, and neither of us is wrong. The pattern matters more than the arithmetic.

    But what the spins actually build is hard to see until you do paired practice. When a partner grabs your jo, or their sword beats against yours, a stiff grip freezes the staff and the force travels straight into your shoulders. A person with fluid spins absorbs that same contact through a rolling wrist and the strike keeps going. The spin work is sensitivity training disguised as a party trick. The community at AikiWeb, one of the oldest English-language forums on the art, has threads going back years about how these small solo exercises connect to the much-debated “internal” body skills in aikido, if you want to go down that rabbit hole later.

    Quick tipPractice spins over your bed for the first two weeks. Sounds silly, but the mattress catches the jo when (not if) your grip fails, and it lets you train in a room where the ceiling is too low for full strikes. Move to open floor once you can roll ten consecutive figure-8s without a bobble.

    Stepping Drills: Where the Feet Join the Party

    Strikes and spins are hand skills. The moment you add footwork, the exercise becomes aikido, because aikido is mostly about where your feet are when something arrives. Two stepping patterns cover most of what you’ll need solo.

    The first is the advance-and-strike, or moving tsuki. Stand in a natural stance with the jo ready, then slide your front foot forward about half a step while the rear foot follows, and immediately thrust. The sequence is foot-foot-stick, in that order, always. Beginners reverse it, stabbing first and stepping after, which in a real exchange means your strike lands nowhere near where your body now stands. Do ten slow crossings of your practice space this way, then ten more leading with the other foot. The non-dominant side will feel like someone else’s body. That’s the point of training it.

    Pattern two is the turning step, the solo version of tenkan. From your stance, pivot 180 degrees on the balls of your feet so the jo sweeps around with you at shoulder height, and finish facing the other direction in the same stance you started. No crossing the feet. The jo should describe a big horizontal arc during the turn, which is exactly the distance-management movement you’d use to let an attacker’s momentum sail past you, the same idea I covered in the falling and ukemi basics article from the other side of the contact. Do this slowly. The turn hides a tendency to lean away from the spin, and leaning is the habit you’re training out.

    Now chain them. One turn, one strike, one turn, across the room and back. This begins to resemble the spine of the 13-count kata without being the kata, which makes it a friendly gateway if your dojo hasn’t introduced the form yet. Some lineages add a low sweeping movement to the sequence to teach dropping your level. The traditional sources on the weapon’s own art are worth a look if you get curious about where aikido’s staff practice came from, and the Aikikai Foundation, the Tokyo-based organization Ueshiba’s family still heads, offers context on how weapons study sits inside mainstream aikido.

    So train slow. Speed hides errors, and I keep a metronome app on my phone at 60 beats per minute when I’m ironing something out, one movement per beat. It feels absurd, like a tai chi DVD, and it finds every foot that drags and every shoulder that creeps up. After a month of slow work, normal speed feels easy, almost suspiciously easy.

    How Solo Work Pays Off with a Partner

    Everything in this article becomes visible the first time you do jo partner practice. The solo spins turn into recoveries when your partner’s strike slides down your staff and tries to own it. The stepping drills become the entries and exits that keep you at the end of the jo instead of inside it. The three strikes become the attacks your partner practices receiving, and later, the structure underneath your empty-hand technique, because shomen, tsuki and yokomen are the same lines as the grabs and strikes that start every aikido technique.

    A concrete example. In a typical paired jo exercise your partner strikes shomen with a wooden sword, you rise to meet it with a diagonal block while your feet step off the line, and the contact lands at a comfortable distance. Done well, it’s the paired version of your solo turn-and-strike chain, where the feet move first and the staff rises because your hips turned, so the contact happens at a comfortable distance. Done poorly (drilled without the solo foundation), it’s a stick collision followed by a wrestling match. I’ve been both people in that exchange, sometimes in the same class. Solo work is what keeps the paired version smooth.

    It also fixes your empty hand work in ways that take a while to notice. Carrying a jo makes your posture honest, because a rounded back puts the staff in the wrong place and you feel it immediately. It exposes over-gripping, which is the same habit that makes your empty-hand throws stiff. And it builds the habit of moving from center, since any strike that starts at the arms telegraphs itself a mile off. This is why so many instructors, mine included, hand a jo to a struggling beginner and say “work on this for a month.” The staff is a diagnostic instrument that happens to also be a weapon.

    If you’re newer to the art and wondering where this fits among the empty-hand fundamentals, the overview of what aikido actually is lays out how weapons and unarmed practice interlock, and the first technique article on ikkyo shows the same body mechanics from the receiving end.

    A Simple 20-Minute Solo Session

    The routine I’d hand you on day one fits in a living room corner, a backyard, or a park, and it covers everything above in the order your body learns best. Posture first, then hands, then feet, then flow.

    • Open (minutes 0–3) with standing and holding. Hold the jo in hasso position, vertical beside your shoulder, and simply stand. Feel where the weight sits. Relax your grip until the staff is almost slipping. This is posture calibration, and skipping it is why most people’s shoulders stay tense for the whole session.
    • Then minutes 3–8, slow strikes. Ten each of shomen, tsuki and yokomen per side, at metronome pace if you have the patience. One movement per breath. When a strike feels off, run the checklist in reverse order. Feet, hips, hands.
    • Minutes 8–13 go to spins over the bed. Continuous figure-8 rolls, then forward spins, then reverse spins. Aim for unbroken flow and let speed arrive on its own. When you drop the staff, which you will, just pick it up without the sigh.
    • Follow with minutes 13–18 of stepping chains. Turn, strike, turn, across the room and back. Five minutes of this builds more usable aikido than an hour of fast strikes, partly because turning under control is the exact skill that pairs with the etiquette of safe movement around other people on a crowded mat, or see the dojo etiquette guide for the group-practice side.
    • Close (minutes 18–20) with a cool-down kata sketch. Walk through the first third of the 13-count form, or, if you haven’t learned it yet, just improvise a smooth chain of two strikes and a spin. End with the jo in hasso, bow to nobody in particular, and put it away, because the bow matters even alone. It marks the practice as practice, a small boundary between the rest of the day and the work you just did.

    Twenty minutes twice a week, and within about two months you’ll notice it at your dojo. Strikes arrive on time. Grips adjust instead of freezing. Footwork stops abandoning you the moment a partner moves unpredictably, and that last one is the real prize, because unpredictable partners are the entire sport.

    One more thingRespect the ceiling. Before every session, give the jo one full overhead swing and confirm clearance, because lamps, fans and door frames are undefeated against beginners, and a broken light fixture costs more than the jo did. Ask me how I know.

    The jo rewards consistency more than talent, which is the best kind of training tool for the average busy adult. Some rainy Tuesday in your third month, the figure-8 will suddenly run itself, the strikes will stop wobbling, and the staff will feel less like an object and more like an extension you’ve been issued. That feeling carries straight onto the mat. Bring it to class, and your partner will feel the difference before you say a word about drills.

    More from akac.org — What is aikido? The basics, explained · Ikkyo, the first technique you learn · Blending and tenkan movement · Ukemi, rolling and falling basics · Dojo etiquette for beginners. External sources include Wikipedia’s article on the jō, plus Aikido Journal, AikiWeb and the Aikikai Foundation. This page is reviewed periodically; solo drills described here are standard across most Aikikai-lineage dojos in the US and Canada, though your instructor’s count and terminology should win any disagreement.

  • Suburi Basics: Building Your Bokken Practice from Zero

    Suburi Basics: Building Your Bokken Practice from Zero

    Solo Practice Between Classes

    The wooden sword is the cheapest training partner you’ll ever have. This guide covers the four foundational cuts, a rep scheme that builds without wrecking your shoulders, and what to look for when you buy your first bokken.

    Updated October 2026 · 14 min read

    My first bokken cost forty dollars at a martial arts supply table set up in a community center hallway, and I bought it mostly because the guy running the table let me hold it. Forty dollars, no plan. That was a mistake in one way, since I had no idea what I was supposed to do with the thing, and a very good decision in another, because solo sword practice ended up doing more for my aikido than almost anything else I did off the mat. Suburi, the word for those repeated solo cuts, sounds exotic until you translate it. It just means “empty swing.” No partner, no target, no drill sergeant. You, a wooden sword, and a patch of floor where you won’t break anything. This article assumes you’re a beginner with a new bokken and no instructor standing nearby, which describes most people who own one.

    One thing before we start. Every dojo teaches weapons a little differently. The details here reflect common Aikikai-style practice in North American dojos, because that’s what I know best, and your own sensei’s version takes precedence over anything you read online, mine included. If your school does suburi differently, or doesn’t do weapons at all yet, ask before you build habits.

    What Suburi Actually Is

    “Empty swing” — repetition of solo cuts with the wooden sword.

    Suburi is the practice of repeating basic sword cuts, over and over, by yourself. That’s the whole definition, and I think it’s worth stating plainly because beginners sometimes imagine there’s a hidden layer of complexity waiting underneath. There isn’t, really. The cut is simple on purpose; the depth comes from doing it ten thousand times. The overview of suburi on Wikipedia traces the term and its place in kendo and aikido training, where it’s been used for generations as a way to build the body before the body is trusted with a partner.

    Why does an aikido student need sword work at all? This confuses people in their first year, and the answer I got from my own teacher was unsatisfying at the time. The sword shows you what your body is doing. Your posture, your balance, the path your hands travel, the timing of your footwork, all of it gets exaggerated and made visible when you hold a stick that extends your arms by three feet. Try to cut while leaning back and the bokken tells on you immediately. A good swing ends with your weight where it belongs; a sloppy one ends with you tipping forward like a drinking bird toy. The sword doesn’t care about your excuses, which is exactly what makes it useful. Many aikido lineages, including the one practiced at the Aikikai Hombu Dojo in Tokyo, treat weapons work as a core part of the curriculum rather than a side hobby, because it cleans up everything else.

    A short history note first, and I promise it earns its place. Morihei Ueshiba, aikido’s founder, was deeply skilled with the sword and spear before he ever formulated aikido, and the empty-hand techniques people picture when they think of the art carry sword logic inside them. The sword came first. The angle of an irimi entry, the way the leading hand shapes a spiral, the timing of a tenkan turn, all of these live inside the empty-hand shapes you will drill in your first months on the mat, whether anyone mentions the connection or not. When you do suburi, you’re practicing the parent skill that aikido’s empty-hand movement grew out of, and that context makes the solo work feel less arbitrary than “swing a stick a hundred times.” You’re rehearsing the shape of the whole art, one cut at a time.

    You also don’t need a dojo to do it. A garage, a backyard, a cleared corner of an apartment, a parking lot at 6 a.m. if your neighbors are forgiving. No commute, either. That’s the actual appeal for most people, I suspect. Class happens twice a week on someone else’s schedule; the bokken hangs on your wall the rest of the time, asking when you’re going to pick it up.

    Buying Your First Bokken

    First, the good news. A first bokken does not need to be expensive, exotic, or pretty. The standard hardwood training bokken sold by any martial arts supplier will carry you through your first several years, and it should cost somewhere in the forty to seventy dollar range. What follows is what I’d check before handing over money, in rough order of importance, plus one strong opinion.

    Weight first. A typical red or white oak bokken runs about 450 to 550 grams, roughly a pound. That’s the right zone for a beginner. Much heavier weapons exist, and they tempt people who want to “make it count,” but a heavy bokken teaches you to muscle the cut, which is the opposite of what suburi is for. You’ll know you’re muscling it because your shoulders will be on fire within five minutes and your cuts will look like you’re chopping firewood. Start standard.

    Wood second. Red oak and white oak are the common choices. White oak is denser and a bit more durable; red oak is slightly lighter and usually cheaper. Either is fine. Avoid pine or any softwood bokken, which dent, splinter, and occasionally crack mid-swing, none of which you want happening at head height in your living room. Spend the extra ten bucks. Also skip bokken with a glossy varnish, which gets slippery the moment your hands sweat, and they will sweat.

    Shape third. You want the classic curved katana-shaped training bokken, not the straight aikido-style “Iwama” shape and not a kendo-shaped shinai substitute. Actually, let me soften that, because plenty of Iwama-style schools train with the straight shape and there’s nothing wrong with it. Buy the shape your dojo uses, because walking into your first class with the wrong-shaped bokken is the equivalent of showing up with left-handed scissors. The bokken article on Wikipedia covers the common shapes and their uses if you want the full taxonomy.

    Length last. Standard length (about 102 centimeters, around 40 inches) fits nearly all adults. If you’re significantly shorter than about five foot four, a slightly shorter child-sized or women’s model can actually help your form, because a bokken that’s too long drags on the floor during some movements and ruins your posture compensation without you noticing. Weight matters more than length, though, so don’t overthink this one.

    Used bokken are worth considering too, by the way. A worn one with honest dents has character, costs half as much, and the wear tells you it was swung rather than displayed. I like them. The only thing I’d check on a used one is that there are no deep cracks running along the grain near the tip, because that’s the spot where old oak lets go first, and it lets go without much warning. While you’re shopping, grab a cheap saya (scabbard) only if you enjoy owning nice things; it’s strictly optional for practice. If you want a sense of what else the community discusses around training gear and dojo life, the forums at AikiWeb have decades of threads from practitioners of every style, and a search there will answer almost any beginner question you come up with at midnight.

    Quick tipBefore your first real session, swing the bokken a hundred times in the store or the day it arrives, and run your hand slowly along the entire length of the blade edge and tip. You’re checking for splinters and rough spots, which cheap bokken sometimes have straight from the factory. Five minutes with fine sandpaper now beats pulling a two-inch oak sliver out of your palm later.

    Grip, Stance, and the Shape of a Cut

    Everything in suburi rests on a small number of physical details, and getting them right early saves you a year of undoing bad habits. Take your time on this section before you chase rep counts.

    The grip (te-no-uchi)

    Hold the bokken with both hands, left hand near the very end of the handle (the kashira), right hand a hands-width above it if you’re right-handed. Reverse that for left-handers. Your grip should be firm enough that the bokken doesn’t slide or rotate in your hands when you swing, and relaxed enough that your forearms aren’t braced hard the whole time. There’s a phrase you’ll hear. The grip should be like holding a small bird, tight enough it can’t escape, loose enough you don’t crush it. I found that image annoying for about a year before it suddenly made sense around my five hundredth swing. The power of the cut comes from the whole body arriving together, and if your forearms are clenched from the start, they’ve got nowhere to go.

    Watch two common beginner grip faults. The first is the “death grip,” white knuckles from start to finish, which tires you out fast and makes the cut stiff and telegraphed. The second is letting the bottom hand slide off the end of the handle during big swings, which usually means the bokken is slick or your hands are too close together. Fix the first by shaking out your hands between sets. Simple, and it works. Fix the second by checking hand placement every twenty reps or so, because hands migrate when you’re tired and nobody notices it happening.

    The stance (kamae)

    The basic ready position is hanmi, the same staggered stance you use in empty-hand aikido practice: feet about shoulder-width apart along a line, one foot forward, most of your weight settling into the balls of the feet with the knees soft. If you’ve read our piece on blending and tenkan movement, you already know this stance from the empty-hand side, and the weapons version will feel familiar within a session or two. Keep it narrow. The bokken rests raised in front of you, angled up and slightly to the right, tip pointing roughly at your imaginary opponent’s throat. From the side, your body should make a narrow profile, same as in the empty-hand art.

    The cut itself (hasuji and kirioroshi)

    Three things have to arrive at the same moment for a cut to be correct: the blade reaches its target line, your forward foot plants, and your body weight commits forward. If the blade arrives first, you’re arm-swinging. If the foot arrives first, you’re stabbing at air with a late stick. All three at once, or the cut isn’t really yours. When everything lands together, the cut has what practitioners call hasuji, correct blade path, and you can feel the difference immediately because the bokken stops feeling heavy. A well-timed cut feels almost weightless at the bottom of the arc. A badly timed one feels like you’re fighting the wood the whole way down.

    One more principle surprises every beginner. You cut with the bottom two or three inches of the blade, the monouchi. The middle is wrong. The tip is too. Aim small. Think of the last few inches of the bokken as the business end, and let the rest of the weapon be the delivery system. This is why swinging a bokken is nothing like swinging a baseball bat, where you want contact in the fat middle. The baseball instinct is strong, I still catch myself doing it when I’m tired, and it produces a shallow, slapping cut instead of a committed one.

    A well-timed cut feels almost weightless. A badly timed one feels like you’re fighting the wood the whole way down, and the wood always wins.

    The Four Cuts to Learn First

    Different schools count different core suburi sets, anywhere from five to twenty individual movements. Ignore the big lists for now. Four cuts will keep you busy for your first year, and they’re the ones your empty-hand aikido leans on most, and nobody at your dojo will care that you skipped numbers five through twelve.

    Shomen uchi (straight overhead cut)

    The foundational cut. Raise the bokken up and slightly back over your head, then bring it straight down the centerline, finishing with the blade stopping at about the level of your own forehead (in solo practice you stop short of your body, of course), hands ending in front of your solar plexus. The whole movement should come from the hips and the settling of your weight, with the arms mostly along for the ride. One detail I wish someone had told me in week one. Don’t raise the sword by lifting your shoulders up around your ears. Shoulders down. The backswing comes from a small turn in the hips and a rise in the center of the body. If your shoulders creep up, your neck gets involved, and then everything downstream gets tight and short.

    Yokomen uchi (diagonal side cut)

    Raise the bokken the same way as shomen, then cut diagonally down across the front of your body, as if tracing a line from the top of your partner’s ear toward the opposite shoulder. Your hands finish off to the side of your hip rather than in the center. The path of the blade should be a clean diagonal, not a horizontal swipe that dips at the end. Clean diagonals only, no matter how tired you get. In paired practice, yokomen is the attack that most aikido techniques against a strike are built to answer, so the solo version of it is you rehearsing the attack your partners will feed you. Getting it clean on your own makes you a much better training partner in class, and people notice.

    Kesagiri (diagonal downward cut)

    Cut down along the opposite diagonal, from your own high right toward the low left, like the sash of a robe, which is literally what the name refers to. Functionally, it’s the mirror logic of yokomen with a different intent, and the two of them together teach your shoulders to work independently of your hips, which is a skill with no shortcut. The finish matters here. Let the cut come to a full, settled stop at the bottom before you return to kamae. Let it settle. Beginners tend to let the bokken bounce or wobble at the bottom of kesagiri because the diagonal path is harder to arrest cleanly than the vertical one. A stopped blade, held still for a half-beat, is how you know the cut was yours rather than the bokken’s momentum.

    Kiri-kaeshi (left-right alternating cuts)

    Now the combination drill: a shomen cut, then a diagonal cut to the left, shomen, diagonal to the right, and so on, flowing continuously without pausing at kamae between cuts. This is the one that starts to feel like aikido instead of like sword-shaped exercise, because the transitions between the cuts are where the blending movement lives. Start slow. Your body turns, your weight shifts from foot to foot, and the bokken keeps moving through the changes. It feels awkward for a while, and then one day it clicks and you understand why people call weapons practice the skeleton of the art. If you only have five minutes, do kiri-kaeshi for those five minutes and you haven’t wasted them.

    How Many Reps, and How to Build Up

    Most articles get vague right about here. Let’s use actual numbers. The classic suburi standard you’ll hear quoted in dojos is three hundred to five hundred cuts per session, and some traditions go well past a thousand. Those numbers assume conditioned shoulders and years of practice. A beginner who swings a bokken three hundred times on day one will very likely wake up the next morning unable to lift their arms to brush their teeth, and then won’t pick the bokken up again for two weeks. I base that prediction on watching it happen to a training partner, and also on doing it myself.

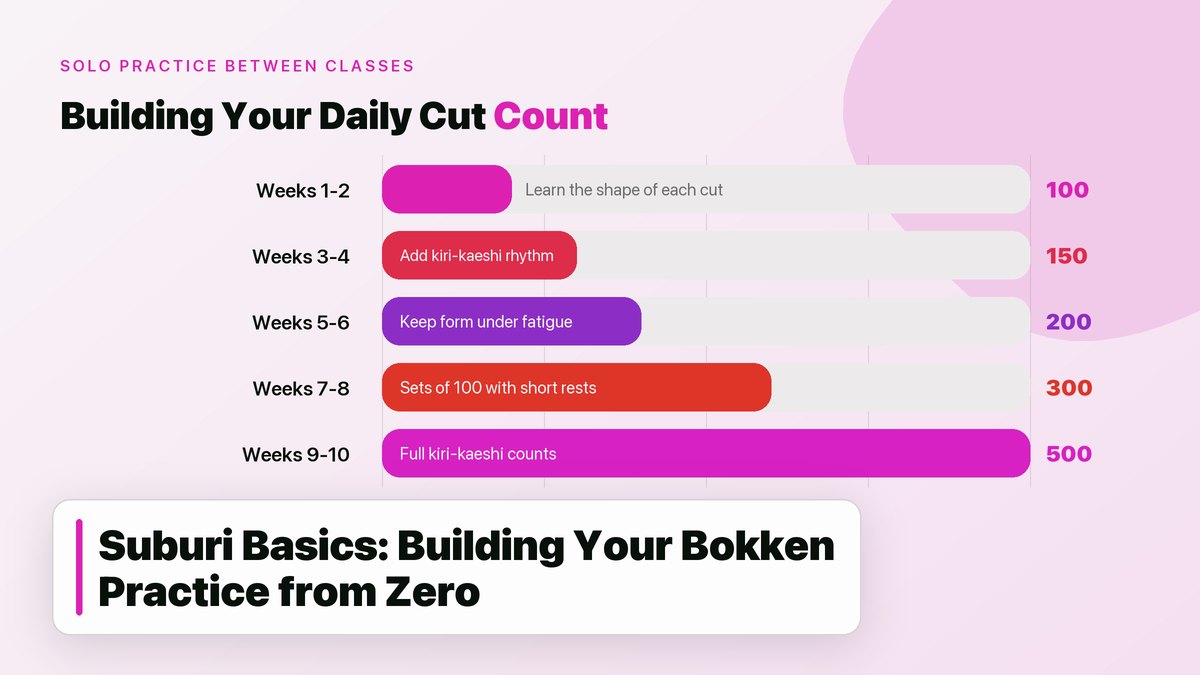
    The progression below builds from a hundred total cuts to a sustained five hundred per session over about ten weeks. It assumes three or four short sessions per week, roughly fifteen to twenty minutes each, which is about the length of a coffee break and fits between dinner and dishes without requiring any real negotiation with the rest of your evening, at least in my house. That’s more effective than one long weekend session, for the same reason that two aikido classes a week beats one double class. The nervous system consolidates frequency, not volume, and your shoulders need the recovery days between sessions more than they need heroic single efforts.

    Weeks Total cuts per session How to split it What to watch for
    1–2 100 Shomen 40, yokomen 30, kesagiri 30. Rest between sets. Sore forearms are normal; sharp shoulder pain is not. Check grip tension, you’re probably over-squeezing.
    3–4 150 Shomen 60, yokomen 40, kesagiri 50. If the shoulders creep up, film one set from the side on your phone, because the truth lives in the recording.
    5–6 200 Shomen 80, yokomen 60, kesagiri 60. Add one slow set of 20 with a three-second pause at the bottom of each cut. The slow set exposes timing cheats the fast sets hide.
    7–8 300 Shomen 100, then kiri-kaeshi 100, then yokomen and kesagiri 50 each. Kiri-kaeshi at volume is where form falls apart first, so slow it down before adding more.
    9–10 400 Kiri-kaeshi 200, shomen 100, yokomen 50, kesagiri 50. Breath starts to matter. Exhale on each cut, don’t hold air.
    10+ 500 Continuous rotation: 100 shomen, 200 kiri-kaeshi, 100 yokomen, 100 kesagiri. This is the standard dojo warm-up level. From here the practice shifts into maintenance mode.

    A few notes on using the table. The split between cuts isn’t sacred. Favor your weak cut. Shifting reps toward whatever feels sloppiest is good self-coaching, and shomen deserves the biggest share early because everything else inherits its shape. The week boundaries are approximate. Some people will hit five hundred by week six, some will want twelve weeks, and both are fine, the table is a scaffold rather than a contract. What matters is that you arrive at volume through gradual loading, because the connective tissue in your shoulders and elbows adapts slower than your enthusiasm does, and tendon complaints from sword work take months to fully settle once they start.

    Counting is its own small skill, by the way. I use sets of twenty-five with a quiet count under the breath, because counting past about thirty in my head reliably fails and I end up doing 180 cuts and calling it 200. Or I set a timer and count sets instead of individual cuts. Some people use a mala-style counter on the sword rack. Whatever gets you honest numbers without breaking your concentration on the cut itself.

    You don’t rise to the level of your ambition on the mat. You fall to the level of what your shoulders can repeat without complaint, so build the shoulders first and let the ambition catch up.

    Safety and Small Spaces

    Most suburi injuries are embarrassingly avoidable, and nearly all of them happen at home rather than in the dojo, because at home there’s no instructor watching and no sprung floor. A few rules I hold to, some learned by violation.

    Clearance above all. You need enough room to swing overhead without hitting anything, which in practice means a ceiling you can reach with the bokken raised plus a foot, and no light fixtures, fans, or hanging plants anywhere near the arc. Ceiling fans are the classic casualty. A garage with open rafters works. A finished basement with seven-foot ceilings does not, and I say that as someone who put a dent in a rental’s ceiling track lighting in 2019. That dent cost me part of a security deposit, and the landlord kept asking questions.

    Flooring matters less than you’d think but more than you’d hope. Bare concrete or tile transmits every bit of vibration up through your feet and ankles over a few hundred reps. A thin rubber mat, an old yoga mat, or even a patch of grass outside changes the feel of the session considerably. Swing in socks on hardwood and you’re one sweaty-foot pivot away from learning why dojos don’t allow that.

    The backswing zone deserves special respect. Beginners fixate on where the blade lands and forget that the sword travels the same distance behind them on the backswing. Check your six. A wall, a pet, a child wandering in to ask a question, a television. My rule is that if anyone else is home, the door to the practice space stays closed and I’ve told them I’m swinging wood for the next fifteen minutes. Pets in particular treat a moving bokken as either a threat or an invitation, and neither ends well.

    Check the bokken itself before every session, and I mean actually look at it. Run a hand along the blade for cracks, wiggle the tip to feel for looseness in the grain, and check for splinters. Ten seconds, every session. A cracked bokken usually gives warning in the form of a new vibration or a buzzing feel through the grip before it fails, so if the sword suddenly feels different, stop and inspect. Trust the change. Finally, never do suburi tired in the specific way that means “had a drink.” Coordination is the whole practice, and dull coordination plus a rigid wooden object at head height is a bad combination. This is the one piece of safety advice that feels preachy and also happens to be the most common cause of home injuries I’ve heard about at seminars.

    Quick tipThe cheapest upgrade to your home practice is a mirror, or better, your phone’s front camera propped at hip height. One recorded set per week will show you what no amount of internal feel can: shoulder creep, leaning, a backswing that wanders, hips that don’t turn. Watch it once, fix one thing the next session, and don’t fall into the trap of recording every swing and performing for the camera instead of practicing.

    Connecting Solo Practice Back to Class

    Solo suburi earns its keep when it shows up in your paired work, so it’s worth being deliberate about the handoff rather than hoping it happens on its own. Then it pays rent. The connection runs through a few specific skills: your posture under pressure, the shape of your strikes when you take the role of attacker, and the timing of your entries. You’ll also develop what practitioners call a feel for maai, the working distance between you and a partner, and there’s no way to drill maai alone with full honesty, but solo practice at least keeps the body honest about the rest. If you want the paired side of this, our guide to ikkyo, the first technique most students learn, covers how these body habits show up the moment someone actually grabs your wrist.

    There’s also a quieter benefit, and after years of practice I’d argue it’s the main one. Twenty minutes of suburi is moving meditation with a feedback mechanism. The counting occupies the chatty part of the mind, the physical feedback (tired forearms, a blade that won’t stop clean, breath that runs short) keeps you honest, and the repetition does for the nervous system what footwork drills do for a dancer. It adds up. On days when I can’t make class, fifteen minutes of kiri-kaeshi leaves me more settled than almost anything else I could do with that time, including the couch and the phone. Regular solo practice also means class time gets spent on the parts that actually require a partner, because you’ve already rehearsed the cut a few hundred times that week and your partner isn’t waiting while your body figures out which end of the bokken is which.

    When you’re ready to go deeper, the archives at Aikido Journal are one of the best reading rooms in the art, decades of interviews and essays from senior teachers on exactly this question of how weapons work feeds empty-hand skill. And if you take nothing else from this article, take the habit: pick up the bokken most days, even for five minutes, even badly. The hundredth session looks completely different from the first, and nobody remembers the first.

    Related reads on this site: what aikido is, explained for beginners, ukemi: rolling and falling basics, dojo etiquette for beginners, and blending and tenkan movement. External links checked and working as of October 2026; terminology follows common Aikikai usage in North American dojos, and your own dojo’s usage takes precedence.

  • Aikido Practice at Home: A Solo Training Plan Between Classes

    Aikido Practice at Home: A Solo Training Plan Between Classes

    Solo Practice Between Classes

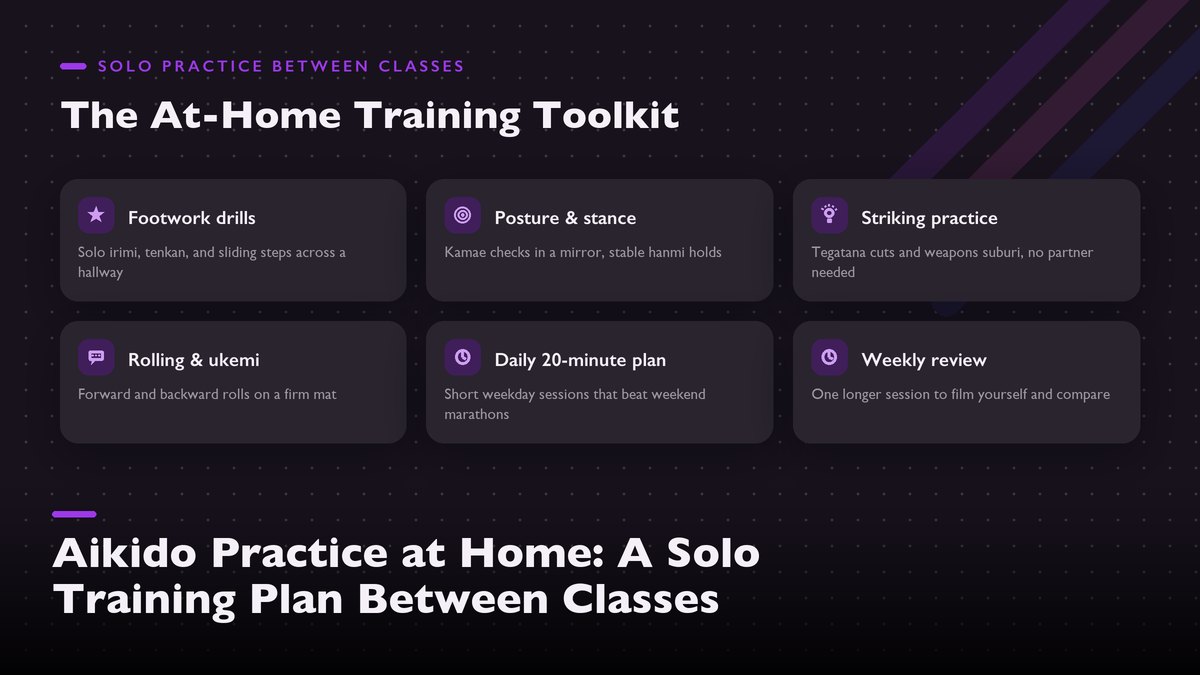
    A realistic weekly routine of footwork, posture, striking, and rolling that needs no partner, fits in a living room, and makes your dojo training sharper every single week.

    Updated October 2026 · 13 min read

    Most aikido students in the US and Canada train twice a week, maybe three times if the schedule and the commute cooperate. That leaves five or six evenings where the only aikido happening is whatever you choose to do about it. I spent my first two years doing nothing about it, and I could feel the difference. Every Monday class started with my body re-learning things it had half-forgotten since Thursday. Then a senior student at my dojo told me the thing nobody puts in the brochure. It stung a little. The people who visibly improve between gradings are almost never the ones with natural talent. They’re the ones who practice at home for twenty minutes and don’t make a big deal of it. This article is the plan I wish someone had handed me on day one, built around one honest idea. You can’t practice aikido alone, but you can practice almost everything that makes aikido work, and you can do it in the space between your couch and your TV.

    What Solo Practice Can (and Can’t) Do

    Let’s be straight about the limits first, because a plan that lies about its own limits is worthless by week three. Aikido is a paired art. No partner, no aikido. At least not the part that matters most. The throw, the blend, the timing, the feeling of someone’s grab landing on your wrist, all of that needs a partner, and no amount of living-room footwork replaces it. Our overview of what aikido actually is makes the same point from the other direction, describing the art as something that happens between two people rather than inside one.

    Solo practice does give you real things, though. It builds the physical foundation the paired work stands on. How your feet move, how your posture holds up when you’re tired, how your hips turn, how safely you fall. All four are solo-trainable. In my experience, the biggest difference between a student who progresses steadily and one who stalls is rarely raw technique. It’s that the steady one shows up with feet that already know where to go. And it keeps the habit alive between classes, so aikido stops being two islands in your week and starts being a thread running through it. A brief history of the art is on Wikipedia’s aikido page if you want the wider context of where this practice tradition comes from.

    The catch, if there is one, is that solo practice magnifies whatever you feed it. Drill a movement wrong at home and you’ll arrive at the dojo with a polished mistake. So the plan below sticks to things you can self-check, and it tells you exactly what to check. Also, roughly twenty minutes is the sweet spot. Shorter and it barely registers. Go longer and your attention starts to wander. That’s when the bad reps sneak in.

    You can’t practice aikido alone. You can practice almost everything that makes aikido work.

    The Four Things You Can Actually Train Alone

    Everything in the weekly plan below comes from four pillars. Learn these once and the rest of the article is just scheduling, because each one maps directly onto what your instructor is trying to do on the mat.

    Footwork (ashi sabaki)

    Aikido lives in the feet before it lives anywhere else. The irimi entry, the tenkan pivot, the shuffle that keeps you off the line of an attack, these are foot patterns, and you can drill them all solo across six feet of carpet. Our article on blending and tenkan movement breaks the pivot down step by step, and everything there can be walked slowly in your living room with no partner in sight.

    Start slow. Like, embarrassingly slow. Step through an irimi entry ten times at quarter speed, watching that your feet don’t cross and your weight stays settled instead of bobbing up and down. Then ten tenkan pivots. Check that the back foot swings through a real arc instead of scooting along the floor. Once the pattern is clean you can speed it up, and this is the part that’s actually fun. Put on some music and shadow-step through combinations for three minutes straight. It looks ridiculous. It also fixes your balance in ways that transfer straight to the mat, usually within a couple of weeks.

    Posture and centering

    Stand the way your instructor keeps telling you to stand: feet about shoulder-width, knees soft, pelvis tucked slightly under so your lower back isn’t arched, crown of the head reaching up. Then hold it. Two minutes feels like nothing on day one and like an argument with your own spine by week two. That tells you how much postural work you actually need. Add slow knee-bends (you’ll hear them called shikko in the dojo, walking on the knees), ten across the floor and ten back, and your legs learn the low, stable stance most standing techniques lean on. Harder than beginners realize, most of them.

    Striking practice (tegatana and weapons)

    Aikido isn’t about trading punches, but it does start from strikes: the straight punch, the overhead shomen strike, the sideways yokomen. Solo, you train the receiving end of that vocabulary by practicing the strikes themselves. No bag required. Work the tegatana (the “hand blade”) by extending your arm with fingers together and thumb tucked, cutting the air along clean lines. If you own a bokken or a jo, even better, because suburi, the basic repetition cuts, are the classic solo drill of Japanese budo. Twenty of them a day will do more for your shoulders and your timing than most beginners expect. The Aikikai Foundation in Tokyo, the organization that grew out of the founder’s own dojo, still treats weapons work as part of the art’s foundation rather than a side hobby. That should tell you how seriously to take those twenty cuts.

    Rolling and falling (ukemi)

    Forward rolls, backward rolls, breakfalls on a padded surface, all of it can be rehearsed solo, and this is probably the highest-value solo work you can do. Our guide to ukemi, the art of rolling and falling, covers the mechanics in detail, and every one of those mechanics can be practiced alone. One caveat worth respecting is where you do it. Slow beats brave here. Roll on a firm mat, a thick carpet, or grass outside, and keep a sofa cushion or two nearby. Hardwood floors are unforgiving teachers, and they grade on a curve you don’t want to be on. Ten quiet, careful rolls beat thirty sloppy ones every single time, and your future self, the one who gets projected across a dojo at speed, will be built out of those ten careful ones.

    Safety firstSolo rolling is the one pillar where overconfidence actually bites. Warm up your neck and shoulders first, tuck your chin, and roll across the back of the shoulder rather than the point of it. If a roll hurts at home, stop. Bring the question to your instructor instead of drilling through the pain and teaching yourself a fear that takes months to unlearn.

    Setting Up Your Living Room Dojo

    You need less than you think. A rectangle of floor about six by eight feet is enough for every drill in this article, which means the average living room clears the bar with furniture pushed back a little. Move the coffee table, warn anyone else in the house that you’re about to do something that looks odd, and you’re done. Odd is fine. If you own a tatami or an exercise mat, lay it down; if you don’t, a rug over carpet works fine for footwork and posture, and the rolling work can migrate to grass in the warmer months.

    Two small investments pay off disproportionately. The first is a cheap full-length mirror, or even a glass patio door at dusk, so you can watch your own posture and foot angles. Your instructor sees your movement from the outside; a mirror is the closest solo equivalent. Simple, and it works. The second is a jo or a broomstick standing in a corner. Suburi with an ordinary broomstick is ninety percent as good as suburi with a real jo, and it costs nothing, though I’d be lying if I said the real one doesn’t feel better.

    One more setup note, and it’s about time rather than space. Attach the practice to something that already happens every day. Right after work, right before a shower, while dinner simmers, any anchor works, but anchored sessions survive busy weeks and unanchored ones die by the third Tuesday. Mine sits between pouring coffee and opening my laptop. Yours can sit anywhere, as long as it sits somewhere definite.

    The Weekly Session Plan

    The plan below assumes two dojo classes a week. Adjust the days freely if you train more often, because the shape matters more than the exact days. Sessions run twenty to thirty minutes. That’s the whole ask. Sunday evening is rest. Rest is how bodies consolidate. And a plan with no gap in it is a plan you’ll abandon by week five, guaranteed.

    Day Session focus What to drill (20–30 min)
    Monday Footwork Ten slow irimi entries, ten slow tenkan pivots, then three minutes of shadow-stepping to music, and finish with two minutes of quiet standing for a posture check.
    Tuesday Dojo class Attend class. No solo work after; just note one thing your instructor corrected.
    Wednesday Rolling Warm up neck and shoulders, then ten forward rolls and five backward rolls on a padded surface. Finish with two slow knee-walks across the room.
    Thursday Dojo class Attend class. Afterward, write one line in a notebook about what clicked.
    Friday Striking & weapons Tegatana cuts along eight lines (shomen, yokomen both sides, plus the diagonals), twenty cuts on each line. With a bokken or a broomstick, add twenty shomen suburi. Shoulders stay loose throughout.
    Saturday Mix & review Your choice: repeat the weakest pillar from the week, or shadow-box an entire technique start to finish, stepping through ikkyo, shihonage, or whatever your class is covering. About twenty minutes.
    Sunday Rest No practice. Maybe read an article or watch one demonstration video instead.

    Notice the shape of the week. Footwork opens it, because footwork is the foundation everything else stands on, and rolling lands midweek so your body has time to recover before the weekend. The Saturday review session exists for a practical reason. It forces you to recall what the dojo taught you, and recall is where learning actually cements. Reading about a technique feels like learning it. Walking it through your own living room, badly at first, is closer to the real thing.

    If twenty minutes feels like too much, halve everything rather than dropping a pillar entirely. Ten minutes of footwork still beats zero, and a five-minute rolling session still counts. The plan is a floor, not a ceiling; on good weeks I’ll stretch Saturday to forty-five minutes without any guilt, and on bad weeks the whole thing compresses to ten minutes of shikko while the kettle heats. Both weeks count as wins.

    Quick tipRecord yourself once a month. Sixty seconds is plenty. One footwork sequence and one roll on your phone camera is the cheapest coaching you’ll ever get. Comparing this month’s clip to last month’s shows drift you can’t feel from the inside, and it gives you something concrete to ask your instructor about.

    Connecting Home Practice Back to the Dojo

    A solo plan that floats free of your classes is just exercise, so the trick is letting the dojo drive the content. Whatever technique your instructor spent the most time on this week becomes your Saturday shadow-walk and maybe next Monday’s footwork pattern. Our breakdown of ikkyo, the first technique most students learn, is a good template for how to deconstruct a throw into steppable parts you can rehearse solo.

    Ask your instructor what they’d suggest for home practice, too. Most love the question, and the answer you get will be more specific than anything an article can give you, because it targets whatever your movement actually needs right now rather than a generic beginner. Some dojos even keep a short list of approved solo drills for students who ask. It costs you nothing. Others will tell you to just relax and enjoy your evenings, which is also a defensible position, to be fair.

    There’s a mindset piece here as well. Leave the ego at home. Between-class practice works best when you treat it as homework rather than as a second dojo. You’re not trying to learn new techniques from videos (please don’t; that’s how polished mistakes get born). You’re reinforcing what a qualified instructor already taught you in person. When in doubt about a detail, leave it alone and ask at the next class. The dojo stays the source of truth; the living room is where the source gets practiced until it sticks.

    How to Keep the Habit Alive

    Every article like this one ends with the plan, and most readers quit by week three. So let’s talk about the actual hard part, which is showing up in your own living room on a rainy Wednesday when nobody’s watching and there’s no instructor to disappoint. Three things have worked for me and for the students I’ve watched stick with it, and they’re all boring, which is maybe why they work.

    • Anchor it to an existing habit. Same time, same trigger, every day. After the coffee, before the shower, while the pasta boils. Vague plans like “sometime this evening” evaporate under any pressure at all.
    • Lower the bar on bad days. Decide in advance that five minutes counts. A plan you can do exhausted is a plan you still have on your worst week, and keeping the chain unbroken matters more than any single session’s quality.
    • Track it somewhere visible. A wall calendar with a slash mark per session, a note on your phone, anything. Paper works fine. After three weeks the chain itself becomes the reason you roll out the mat, and after two months you’ll notice the difference at the dojo, which is the feedback loop that sustains everything.

    One more honest note before the close. Some weeks you’ll skip everything, and that’s fine, it happens to me a couple of times a year around deadlines and family visits. The plan doesn’t need perfect attendance. It needs you back on the mat after the interruption, without the guilt spiral that turns one missed week into three. If you’re reading this in January with a new year resolution fresh in mind, I’d suggest starting with the Monday footwork session only, and letting the rest of the week fill in on its own once that one stops feeling like a chore.

    For extra study between sessions, the long-running archives of Aikido Journal carry decades of interviews and essays from senior teachers. AikiWeb hosts one of the oldest ongoing discussion forums in the art, where beginners ask exactly the questions you’ll have by week four, sometimes in threads that run to fifty replies. If you ever want to see how the art organizes itself worldwide, the International Aikido Federation lists member organizations from dozens of countries, a nice reminder that your little living room practice connects to something much larger. None of that replaces mat time, of course. Rest days count too. But on a rest day, reading a good interview beats scrolling. Your dojo etiquette will still be waiting on the mat for you on Tuesday.

    Notes and related reads. This plan assumes a typical beginner schedule of two dojo classes per week; adjust days and volume to your own school and body. Related articles on this site: what aikido is, blending and tenkan movement, ukemi basics, and dojo etiquette for beginners. External links were checked and working as of October 2026; always confirm solo drills with your own instructor before drilling them hard.
  • How Long Does It Take to Earn a Black Belt in Aikido?

    How Long Does It Take to Earn a Black Belt in Aikido?

    Grading & Belt Systems

    The honest answer, broken down by how often you actually train: what the timelines look like at one class a week, at two or three, and at the committed end, plus why aikido’s first black belt usually arrives later than in most other arts.

    Updated October 2026 · 15 min read

    Someone asks this question in almost every beginner class I’ve ever been part of, usually in the parking lot after the trial lesson, gi still on, questions already forming. And the answers floating around the internet are a mess. One site promises a black belt in eighteen months if you pay for the accelerated track. Another warns it takes a decade. Both are describing real dojos, which is exactly the problem. The true answer depends on things most articles skip: how many hours a week you train, which organization your school belongs to, and what the art itself believes a black belt is for. So let me give you the straight version, with numbers, and no sales pitch waiting at the end of it.

    First, the short answer. For a typical adult training two to three times a week, earning shodan, the first-degree black belt in aikido, takes roughly four to six years in most Aikikai-affiliated and independent schools in North America. Train once a week and the same journey stretches to six or ten years, if it stays on track at all. Train four or more times a week, add seminar travel on top, and some organizations with aggressive minimums will get you to shodan in closer to three or four years. Those are honest ranges rather than guarantees; later in this article I’ll show you exactly which variables push you toward either end.

    What “Black Belt” Means in Aikido

    In Japanese it’s called shodan: “first level.”

    Before the timeline makes sense, you need to know what the destination actually is, because aikido’s first black belt is not the same object as a first-degree black belt in most other martial arts. Shodan (初段) breaks down as sho, “beginning,” and dan, “grade.” Read that again slowly. The name of the rank itself says that the holder has reached the first stage of serious study, the point at which the foundations are considered solid enough to start learning the art properly. The history of the dan ranking system explains how judo founder Jigoro Kano borrowed the idea from board games like go in the 1880s and spread it through Japanese budo, where it stuck.

    This isn’t false modesty on the part of senior aikidoka. It’s structural. An aikido shodan is expected to move correctly, fall safely, know the basic vocabulary of throws and pins, handle a wooden sword and staff at an introductory level, and train in a way that doesn’t endanger a partner. That’s a real list of skills, and it takes real time to build; nobody expects a shodan to have their own mature aikido yet, and growing one takes years more through nidan, sandan, and beyond.

    A useful comparison: calling an aikido shodan a “master” would be like calling a college freshman a professional. They’ve earned something real. It’s the doorway, rather than the house. In my experience this is also why aikido people answer the “how long” question with a shrug more often than a number. They know the questioner usually pictures a finish line, and in this art the first black belt is closer to a starting line with a small ceremony attached. Morihei Ueshiba, the founder, kept the ranking frame modest on purpose, considering the dan grades bookkeeping next to actual training. Any biography of Ueshiba makes clear the man graded almost nobody for long stretches of his life, which is part of why early aikido ranks were rare and slow to earn.

    Why does this matter for your timeline? An art that treats first-degree black belt as a foundation-level credential has more material to cover before it hands one out, and no shortcut is built into the definition.

    The Kyu Grades Before the Black Belt

    Between white belt and shodan sits a ladder of kyu grades, numbered in descending order. Most North American schools run sixth kyu down to first kyu, though some fold several together or start new students partway up. At each step the examiners expect a wider slice of the curriculum: a fifth kyu demonstrates five or six techniques competently, while a first kyu demonstrates most of the art’s standing and kneeling techniques plus the weapons syllabus at a level that won’t hurt anyone.

    Our article on how aikido’s belt ranks work walks the whole ladder step by step. The point for your timeline is simpler. Every organization sets minimum time-in-grade between kyu ranks, and those minimums add up. A school requiring roughly six to twelve months per kyu grade, times five or six grades, lands at three to five years before you’re even eligible to test for shodan. That’s just the arithmetic of the ladder, before anything about your personal progress enters the picture.

    Which is where the honest caveat comes in. Minimum time-in-grade is a floor rather than a schedule, and meeting the minimum at every step gets you eligibility, nothing more. Many students spend an extra grading cycle or two at one rank because their instructor wants something cleaner before signing the test form. I’ve watched perfectly dedicated people sit at the same kyu for two years while a quicker peer moved up, and the slower ones usually turned out better aikidoka for it. Ranks in aikido are awarded by people, not by calendars, and that’s a feature even when it frustrates you.

    The calendar gets you eligible. Your movement gets you promoted. The second one is slower, and it should be.

    Why Aikido Takes Longer Than Most Arts

    Compare timelines across martial arts and aikido sits toward the slow end, and the reasons are worth understanding rather than just accepting. None of them are accidents or gatekeeping for their own sake, though it can feel exactly like gatekeeping around your third year, and four of them do most of the work between you and shodan.

    A broad syllabus, tested in full

    Karate schools often grade on a smaller technical core at the early ranks. Judo tests a well-defined set of throws. Aikido, especially in Aikikai-style curricula, asks you to demonstrate a wide spread of technique drawn from grabs, strikes, multiple attackers and kneeling variations, plus paired weapons work, all on the same exam. Breadth costs time. A student can be good at half the syllabus and still need two more years to make the other half presentable. The worldwide umbrella around the Aikikai in Tokyo exists partly because this broad curriculum needed a common frame, so a rank earned in one country means something in another.

    Ukemi as a second skill

    Learning to throw people is one skill. Learning to be thrown, over and over, without injury, with the timing and relaxation that make your partner’s practice possible, is another skill entirely, and aikido grades you on both at once. Building safe falling ability takes most people a year of regular practice before it stops being the thing that limits everything else. Some arts have this too, judo most of all, but in aikido the ukemi standard stays high right through the dan ranks, which stretches every timeline by a season or two and never gets counted in anyone’s math.

    Partner dependence

    You can’t rehearse aikido alone the way you can drill a kata or hit a bag. Every technique exists in the space between two people, and your progress is partly hostage to the partners you draw in a given class. Our guide to how aikido grading exams actually run covers what examiners watch for, and it’s almost all relational. Say you train twice a week. Some nights you get a calm black belt who feeds you exactly the right energy; other nights you get a nervous beginner who grabs like a falling bookshelf. Both nights teach you something, but the second kind slows measurable progress, and no solo workaround fully replaces mat time.

    Culture and conservatism

    Finally, aikido organizations are, as a group, conservative about rank. The Aikikai Foundation, the organization Ueshiba’s family still leads from Tokyo’s Hombu Dojo, sets a tone that trickles down through national bodies like the United States Aikido Federation to your local school. Fast promotions happen, but the system’s center of gravity leans toward “make sure.” Contrast that with commercial karate or taekwondo chains where a black belt in two to three years keeps students enrolled, and you’ll see why aikido numbers skew high. Sometimes that’s wisdom. Occasionally it’s inertia wearing wisdom’s clothes. Mostly it’s the former, I think, but after a decade around dojos I’d be lying if I claimed the two never get confused.

    Realistic Timelines by Training Frequency

    This is the section you scrolled for. These ranges assume an adult beginner starting from zero, training in a typical North American Aikikai or independent dojo, with no relevant background in judo or another grappling art. Treat them as weather forecasts instead of appointments. Requirements vary by dojo and by organization, and any table that forgets to say so is selling something.

    Training frequency Typical path to shodan What the years actually look like
    Once a week 6 to 10 years, sometimes longer. Slow skill consolidation; long gaps mean each class re-warps the body; kyu minimums pile up; easy to stall around 3rd or 2nd kyu for years.
    Twice a week 5 to 7 years The most common rhythm for working adults; steady visible progress; most students land near first kyu around year four.
    Three times a week 4 to 6 years. Fast enough that conditioning stops being the bottleneck; technique detail and weapons work start compounding; the classic “committed hobbyist” arc.
    Four or more times a week, plus seminars 3 to 5 years, where the organization allows it Close to a part-time job in intensity; only feasible for some; minimum time-in-grade rules become the real limit on speed.

    The table says one thing without quite spelling it out. Frequency matters most at the low end. Going from one class a week to two does more for your timeline than going from three to four, because at one class a week you’re spending a third of each session re-teaching your body what it forgot. Going from three to four mostly adds refinement. The returns diminish, which is worth knowing before you reorganize your life around five classes.

    Also, the table assumes you stay healthy and keep showing up, and that’s a bigger assumption than it sounds. Over a six-year span, almost everyone loses months somewhere to a job change, a move, a balky knee, a new baby, or some pandemic-sized curveball nobody scheduled. I said four to six years for the two-to-three-times-a-week student, and I stand by it, but the students who actually arrive in that window usually trained closer to five years of mat time across six or seven calendar years. Mat years and calendar years are not the same thing, and only the mat years count when an examiner decides you’re ready.

    Quick tipIf you can only train once a week but want faster progress, the single best add-on is a second weekly session of whatever your school offers, even a one-hour weapons or fundamentals class. Twenty minutes of solo weapons practice in your garage on off nights helps too. What doesn’t speed things up is collecting video tutorials instead of mat time; aikido is corrected in person or it isn’t corrected at all.

    The Variables Nobody Puts in the Table

    Beyond frequency, five things move your personal number up or down by a year or more each, and at least three of them sit partly outside your control, which is worth accepting early in the journey rather than late. None of them appear in the table above, and all of them will find you eventually.

    • Your organization and its minimums. Aikikai-affiliated schools, USAF schools, independent dojos, plus styles like Tomiki or Yoshinkan, all publish different expectations for time-in-grade. Ask your instructor directly what the minimums are at your school; a good one will answer in one sentence.
    • Prior martial-arts experience. A judo brown belt often tests through the kyu ranks quickly because ukemi and body organization transfer. A dancer’s balance transfers; everything else mostly starts from zero, and that is completely fine.
    • Seminars and intensives. A weekend seminar with a senior teacher from outside your school can expose problems your home dojo has stopped seeing. Many organizations expect seminar attendance before dan grades; almost all reward it. Budget for two or three a year, treat the travel as part of the training, and pick at least one seminar outside your own style.
    • Instructor availability. Some dojos only test when a senior examiner visits, which can mean waiting an extra season for a test you were ready for months earlier, and across a five-year path those waiting seasons add up to real months.
    • Age and body. Adults over fifty routinely earn shodan, and it’s one of the better things about this art, but timelines stretch when the body needs gentler progressions, with no shame in that; aikido’s older dan grades are some of the most instructive people on any mat.

    Stack a couple of the slow versions of those variables on top of a once-a-week schedule and eight years to shodan stops sounding like a worst case. Stack the fast versions under a three-times-a-week schedule and four years becomes realistic, since the same art yields very different arithmetic once those variables stack.

    Faster Paths, and What They Cost

    Since the slow answer drives some people away, let’s deal with the fast ones honestly. Some organizations and some schools do produce shodan in two to three years. When it’s legitimate, the path usually involves daily training or a compressed curriculum, sometimes a style like Tomiki with fewer techniques required on the exam. When it’s dubious, it involves a checkbook, and the wider aikido community treats those ranks the way you’d expect. A rank nobody recognizes outside one building isn’t a shortcut around the timeline; it’s a timeline with nothing in it.

    The cost question is subtler even on the legitimate fast path. A student who reaches shodan in three years on five classes a week has, in calendar terms, the same mat hours as a five-year twice-a-week student, and the mat hours are the real currency. What they sometimes lack is the seasoning that comes from watching their own technique evolve across more years of partners, more injuries survived, more boring Tuesday nights. Some of that transfers, some doesn’t, and honest fast-path black belts will usually tell you the second dan took longer than the first.

    There’s also a motivation trade worth naming. For many students the black belt functions as fuel, and stretching the timeline feels like cruelty. Fair enough. But in aikido specifically, the students who burn out fastest are often the ones who treated shodan as the finish line, because they arrive at it and discover the art has just opened up underneath them. The ones who last are the ones who found a reason to enjoy Thursday class by week six. The belt shows up eventually if that’s true. If it isn’t true, no belt will fix it, and the years between tonight and the test will feel exactly as long as they are.

    What Shodan Actually Tests

    Knowing the destination in detail makes the journey legible, so here’s what a typical first-dan exam looks like in most organizations, drawn from published requirements and from sitting in the audience at more of these than I can count. You’ll be asked to demonstrate a broad set of techniques against standard attacks, show both standing and kneeling forms, handle some randori (free-style movement against more than one attacker), perform the paired sword and staff kata your school teaches, and take ukemi for your own examiners at full speed. There’s often a written or oral component about dojo etiquette and basic history, and sometimes a short essay on the school’s lineage, etiquette vocabulary, and basic history.

    Two things stand out when you look at that list. The first is that none of it is exotic. Everything on a shodan exam is something you’ll have done hundreds of times before the test date; the exam is mostly a test of whether the basics survive pressure and fatigue in front of a watching room of black belts. The second is that the requirements exist on paper, but the pass/fail decision is made by humans applying judgment. That’s why the timeline stays fuzzy no matter how precise the minimums look. Human judgment over years of watching you move is the actual mechanism, and no article can compress it, this one included.

    What to Do While You Wait

    Whether your number is four years or eight, you’re going to spend most of that time as someone without a black belt, so the practical question is how to make those years productive rather than merely endured. A few things I’d pass along from watching a lot of people make this trip:

    • Train consistently, week in and week out. Two classes a week for five uninterrupted years beats four classes a week for six months followed by a nine-month gap. Continuity, not intensity, is the compounding interest of martial arts, and it pays out in ways you only notice around year four.
    • Fall well on purpose. Ukemi practice outside of regular technique work pays back across every other skill, so ask a senior student to spend ten minutes just throwing you and pay attention to the quality of your landings.
    • Write down what you were corrected on. One line per class, in a notebook or a phone note. You’ll be startled, in year three, by the pattern of which corrections keep repeating, and by how few of them were ever new.
    • Go to seminars, especially the ones that scare you a little. Training under unfamiliar senior teachers exposes the gaps your home dojo has gone politely blind to.
    • Help the newest person on the mat. Teaching is the fastest way to discover what you only half-understand, and dojos remember who helped.

    And one mindset note before the close, offered with the humility of someone who badly needed it himself: the wait is the training. The person who earns shodan in five years did not just endure five years. They’re someone whose character was formed by five years of bowing, falling, being corrected, showing up anyway. Shrink the timeline artificially and you’d shrink the person it produces.

    Sources and notes. Timelines reflect common practice in Aikikai-affiliated and independent dojos in the US and Canada; minimum time-in-grade and exam requirements vary by organization, so confirm specifics with your own school. Related reads on this site: aikido belt ranks explained and how aikido grading tests work. External links were checked and working as of October 2026.

  • What Happens at an Aikido Grading Test

    What Happens at an Aikido Grading Test

    Grading & Belt Systems

    From the first bow to the moment your name is read out loud, here’s what actually happens inside an aikido grading exam, what the examiners are scribbling on their clipboards, and why most people pass.

    Updated October 2026 · 13 min read

    Somewhere in the weeks before my first grading, I developed a theory that the exam would be the hard part. Ten years and several ranks later, I can report that the hardest part was the waiting, and the second hardest part was parking. The test itself turned out to be the most familiar hour of my aikido life so far, because I’d spent months rehearsing almost every minute of it without realizing. That’s the secret nobody tells nervous candidates. A grading exam in aikido is less an audition and more a demonstration of what you already do three nights a week, performed in front of people with clipboards. If you’re about to test, this article walks you through the whole thing, from the warm-up you already know to the bow you’ll take at the end.

    One caveat before we start. Aikido has no single world federation that runs every exam. The big umbrella organizations, like the Aikikai Foundation in Tokyo, set broad expectations, and almost everyone shares the kyu-and-dan rank system borrowed from older Japanese arts, but your instructor runs your exam your way, and details vary from dojo to dojo, sometimes from year to year. What follows is the common shape of a grading in a typical North American dojo. If your sensei tells you something different, your sensei wins.

    The Weeks Before the Test

    Nobody springs a grading on you. There’s a ritual to getting permission.

    In most traditional dojos, you don’t just sign up for a test. Your instructor invites you, or you ask formally and they consider it, and that consideration is the first filter. The teacher has watched you train for months, sometimes years, and they’re asking themselves a practical question, roughly: “Can this person demonstrate their rank, safely, in front of a panel, without embarrassing themselves or hurting a partner?” If the answer is yes, you get a yes. If the answer is “almost,” you get a “not yet,” which stings for an evening and then turns out to be the correct call more often than not.

    Once you’re approved, expect the next month or two of classes to change character. Your instructor will quietly steer the whole room toward your syllabus, calling the techniques you’ll be tested on, drilling the ukemi you hate, and correcting the small habits that have survived this long because nobody had a reason to fix them. Partners you barely spoke to last month start giving you unsolicited advice, which is how you know the dojo has decided you’re testing whether you like it or not. I think of this period as the exam arriving early. The actual test date is just the part with an audience.

    Logistics are simple but worth listing, because stress makes people forgetful:

    • Know your syllabus. Write down the techniques for your rank, in the order your dojo teaches them, and drill the list until you can recite it cold. Exams get failed on forgotten syllabus items more often than on bad technique.
    • Gather your gear the night before. A clean gi, your belt, and if your dojo uses name tags, your zekken. Some exams include weapons, so ask whether your bokken and jo should come along.
    • Sort out fees and paperwork early. Rank certificates usually involve a registration fee that flows up through your national organization to the Aikikai, and since groups like the United States Aikido Federation process rank registration for their member dojos, it takes time, which is why certificates often arrive weeks after the test.
    • Sleep, eat, hydrate. Boring advice, but an exam is an hour of continuous movement, and showing up depleted is the one avoidable mistake on this list.

    The Day of the Test

    Show up early. I mean twenty to thirty minutes early, not the breezy five-minute version you get away with on a regular Tuesday. Exams run on a schedule, candidates are often grouped by rank, and the chief examiner will want to confirm who’s testing, in what order, with which partners. Being present and squared away when those decisions get made is the first impression, and it’s made before any bow is called. So use the extra minutes to warm up your ankles and slow down your head, in that order.

    There’s usually a check of your gi, too. A clean, white, reasonably fitted uniform is the unspoken expectation, belt tied properly, no torn sleeves flapping around your elbows. Some examiners have strong opinions about zekken, the white name tag worn on the chest in many traditional dojos, and whether yours is present and legible. It seems fussy until you remember that the panel may include a visiting teacher who has never seen you before and will be identifying you by that tag for the next hour.

    If the schedule lets earlier groups go first, watch them. Not to psych yourself out, but because the mat you’ll test on has a personality. The corners are closer than they look, the floor may be slick near the door, and seeing how the first candidates handle the space settles something in your own movement. Anyway, the waiting room before a grading is one of the friendliest places in the martial arts world. Everyone is nervous, everyone is pretending not to be. And the black belts telling calm stories are all remembering their own shaky first exams.

    Bow In, Then Warm Up

    The exam usually starts the way every class starts, which is deliberate. You’ll line up, the senior student will call the bows, and the room will bow to the front, to the examiners, and to each other. The examiners, by the way, are often senior teachers from other dojos. Bringing in outside eyes is standard practice, because it keeps standards honest and stops any one school from drifting into its own grading habits. The opening bows are the same ones from any class, just performed a little more carefully than usual.

    Then comes the warm-up, and it counts. Most candidates miss that. It won’t be announced. Nobody will say “the exam has begun.” The senior examiner simply calls the first exercise, usually something basic like stretches, footwork, or rolling practice, and the panel starts watching. Your posture during stretches, whether you’re focused or chatting, how cleanly you take your falls, all of it goes in the notes before a single named technique is called.

    Basics at this stage typically mean the things you do every single class. Tai no henko, the blending pivot. Forward and backward ukemi, maybe breakfalls if your rank expects them. Suburi, the basic sword cuts, in schools that fold weapons into warm-up. None of it is exotic. Which is the point. The panel wants to see the floor of your ability, the stuff that should be automatic by now.

    Examiners start grading the moment you step on the mat. There is no “just the warm-up.”

    The Demonstrated Techniques

    After basics, the examiners begin calling techniques, and the format is simple. A name is called, you bow to your partner, and you demonstrate, usually with the partner assigned to you from your own dojo. Depending on the rank, you might do each technique once or several times, from one attack or several, and at some point the panel will swap your roles and watch you take ukemi for the same techniques. Sometimes a technique you did early in the hour comes back near the end, called again without warning, just to see whether the second version improved on the first while you were busy thinking about everything else.

    What are they looking for? Not perfection, mostly. I want to be honest about that, because candidates torture themselves trying to perform the “correct” version of ikkyo. What the panel actually watches is whether the shape of the technique is recognizable and safe: did you get off the line of attack, did you control the partner’s balance before moving them, did you finish with posture instead of leaning, did your partner land somewhere predictable. If you train regularly, those things are already in your hands. If you’re newer to aikido, our walkthrough of ikkyo, the first technique everyone learns, covers the shape examiners expect from the very first rank upward.

    Expect the unexpected to be called. Most panels deliberately throw in a technique you weren’t anticipating, or ask for a variation from the side instead of the front. This isn’t a trap. It’s how they check that you own the material instead of having memorized a sequence, because a sequence breaks the first thing a real attacker does something unscripted. When an odd call comes, pause, bow to your partner, and take your time setting up. A composed three-second setup reads far better on a clipboard than a hurried technique that half-works.

    The examiners may also stop you mid-technique to ask for a correction or a repeat. Don’t argue, don’t apologize, just nod and do the version they asked for. Some of the friendliest examiners correct the most, because they’re engaged enough to bother. A panel that has gone quiet and stopped offering notes is usually a worse sign than a chatty one.

    Partners matter here more than people expect. A good uke for a test is not a passive rag doll and not a tank. They attack honestly at an agreed speed, they give you their balance so the technique has something to work with, and they protect themselves if something goes wrong. In return, you owe them the same when the roles swap. Most candidates test with a partner they’ve trained with for months, which is why those last few pre-test classes matter: you’re really rehearsing the pair of you, not just yourself.

    Ukemi, Randori, and the Higher-Rank Extras

    At every rank, part of the exam is dedicated to ukemi on its own, rolling and falling as a skill rather than a byproduct. For early kyu ranks that might mean a line of forward rolls across the mat and a few backward breakfalls. Higher ranks get thrown harder and faster, sometimes by the examiners themselves. If ukemi is the shaky part of your game, our ukemi basics guide is worth a slow read before test day, because nothing else in the exam reveals nerves quite like a stiff fall.

    From roughly third kyu upward in most schools, expect jiyu waza, free-style defense against a single attacker who can choose their grabs and strikes, and at dan level, randori against multiple attackers. This is the part of the exam that looks chaotic to a beginner watching from the sideline and is actually the most honest part of the whole day. Without a script, the panel sees how you move when nobody tells you what comes next. That’s the real test. Keeping your feet under you, staying aware of the whole mat, and not panicking into muscle are the actual criteria, in my opinion.

    Aikikai-style schools often add weapons kata as well, the thirteen-count bokken and thirty-one-count jo patterns, for the middle and upper kyu ranks. These are demonstrations of solo form, so they show something the partner work can’t: whether your posture, distance, and movement hold up with no one else on the mat to react to. Organizations descended from the founder’s teaching, which you can read about on the Wikipedia overview of aikido, treat these kata as the connective tissue between empty-hand technique and weapons work.

    The extras vary enough that a table is the honest way to show it:

    Rank level What’s typically tested What the panel adds
    Beginner kyu (5th-6th) Basic ukemi, a short list of techniques from set grabs, etiquette throughout Focus and safety; whether the candidate is coachable in the moment
    Middle kyu (3rd-4th) Longer syllabus, multiple attacks, both roles (nage and uke), solo weapons kata Timing, posture under pressure, smooth transitions between techniques
    Advanced kyu (1st-2nd) Full syllabus from any attack, jiyu waza against one attacker Consistent control, spacing, calm when a technique fails and needs redoing
    Dan grades (black belt) Everything above plus randori against multiple attackers, teaching demonstration at some schools Authority on the mat, economy of movement, whether lower ranks could learn from watching this person

    Notice the last column drifting away from technique as the ranks climb. That’s the whole story of aikido gradings in one table, honestly.

    What Examiners Are Actually Scoring

    Candidates obsess over this part, and almost nobody explains it. There are no points. Most aikido exams don’t use a numerical scorecard. The panel holds a mental model of what your rank should look like, watches you for an hour, and then votes. Pass or fail, with a discussion in between.

    That mental model has four buckets, and it helps to know them before you’re inside one:

    What they watch Passing looks like Failing looks like
    Basics Footwork and falls are automatic; stance stays upright even when tired Stumbling through warm-up rolls, posture collapsing halfway through
    Techniques Recognizable shape, off-the-line entry, partner controlled and safe, finishes with balance Arm-wrestling the partner, forcing throws, lost techniques followed by visible panic
    Ukemi Falls are relaxed and quiet, partner trusts you with speed and power Stiff, noisy falls; protecting yourself so hard the technique can’t happen
    Attitude Calm bow in and out, takes correction without argument, keeps going after a mistake Arguing with examiners, sighing at errors, treating partners roughly

    A few things in that table deserve unpacking. Attitude genuinely counts, and it counts from the warm-up, because rank in a traditional art is a statement about character as much as skill. The founder’s framing of aikido as a discipline of the person, not just the body, is old news to anyone who has read a biography of Morihei Ueshiba, and examiners who grew up in that tradition grade what they see of the person.

    Also, mistakes are allowed. A failed technique that you notice, redo calmly, and complete correctly reads better to a panel than a shaky one you rushed through. Examiners watch what happens after the mistake more closely than the mistake itself, so the one skill worth rehearsing above all others is the recovery. I’ve seen nervous candidates melt down over one wobbling ikkyo and calm ones turn the same wobble into their best throw of the day, and the difference was rarely the technique.

    How Passing and Failing Actually Work

    When the last technique is done, you’ll line up and bow out, and the panel will ask you to step off the mat while they talk. This conversation can take two minutes or twenty, depending on the rank and the politics of the panel. Sometimes the decision is obvious to everyone, sometimes a candidate splits the examiners down the middle, and the chief examiner’s opinion carries the weight. Use the break to breathe.

    If you pass, you’ll be called back in, the result is announced, you bow, and everyone claps. Certificates usually come later, because rank has to be registered up the organizational chain, which in Aikikai-affiliated schools runs from your dojo through the national organization to Hombu Dojo in Tokyo. Your new rank is real the moment it’s announced, even if the paper takes two months to arrive in the mail.

    Should you fail, the news arrives kindly and privately, with reasons. Retesting waits some months, often six. Take it from someone who’s watched several friends go through it: failing a kyu exam is a bruise, not a break, and almost everyone who fails once passes the next time, because they’ve now seen exactly what the exam feels like from the inside. The candidate who failed and kept training is, in the long run, indistinguishable from the one who passed on the first try.

    Quick tipOn test day, arrive twenty to thirty minutes early and treat the waiting time as part of the exam. Stretch, stay quiet, watch the candidates ahead of you if the schedule allows it, and skip the hallway huddles where people swap horror stories. The nerves you feel are the same nerves every person on that panel has felt in the same spot on the same mat.

    The Part Nobody Warns You About

    The strangest part of grading day isn’t the exam. It’s the day after. You trained for months toward one morning, the morning is over, and there’s a hollow feeling where the goal used to be. Old-timers have a standard answer for this, which is that the rank you just earned is now the floor of what’s expected from you, and the next rank started the moment you bowed out. It sounds like a motivational poster. It also happens to be true, and most people who stick with aikido long enough end up nodding along with it.

    There’s a lighter side too. Grading days are usually followed by food. Dojos celebrate at a nearby restaurant, the new ranks get toasted, and the people who just tested you turn back into the people you train with every week, sometimes for the first time you can remember. If your first exam is coming up, I’d say go in expecting exactly what you’ve been practicing, give your partners clean attacks and safe falls, and save some appetite for afterward.

    Sources and notes. Practice described here reflects common exam formats in Aikikai-affiliated and independent dojos in the US and Canada; your own dojo’s syllabus and customs always take precedence. If you’re new to aikido altogether, start with what to expect at your first aikido class, then the etiquette and ukemi guides linked above. External links were checked and working as of October 2026.

  • Aikido Belt Colors and Ranks Explained

    Aikido Belt Colors and Ranks Explained

    Grading & Belt Systems

    Six kyu grades, ten dan ranks, and a rainbow of belt colors that changes every time you switch organizations. This article walks the whole ladder, from your first test to the far side of black, and answers honestly what your belt will and won’t tell anyone about you.

    Updated October 2026 · 14 min read

    At my first grading, I was so nervous I tied my belt backwards. Sixth kyu, the lowest rung on the ladder, a test that basically asks “can you fall down and get back up without hurting yourself,” and there I was in front of two examiners with the knot pointing off to one side like a wilted flower. My partner for the test, a quiet accountant named Dennis who outranked me by exactly one belt, whispered “leave it” as we bowed in. He was right. Nobody was grading my laundry skills, and by the end of the morning I’d learned the most useful early lesson this system has to teach: the belt is a marker. The progress itself lives somewhere off the rack.

    That’s a hard lesson to hold onto, because everything about martial arts marketing pushes the other way. A belt feels like a verdict. If you’ve just started aikido, or you’re comparing schools and trying to decode what “we test up to fourth dan” even means, this article walks the whole ladder. The kyu grades beginners climb, the dan ranks on the far side of the black belt, why your white-belt cousin in karate wears a different color than your aikido training partner at the same experience level, and an honest answer to what any of it actually proves.

    The Shape of the Whole System

    Two ladders stitched together at the bottom rung of the tall one.

    Aikido uses the kyu-dan ranking structure shared by most modern Japanese budo, the same bones you’ll find under judo, kendo, and karate. The system has two halves. Kyu grades (級, the word for “class” or “grade”) are the student ranks, and in aikido they typically count down, from 6th kyu at the bottom to 1st kyu at the top. Dan ranks (段, “step” or “stage”) count up from there, 1st dan through 10th, and 1st dan is where the black belt starts. This countdown-then-countup arrangement confuses nearly everyone their first year. You’re six months in, proudly announcing you’re now a “fifth” something, while the person beside you is a “second” something who’s been training three times as long.

    The countdown has logic, though. A lower kyu number means you’re closer to the door of the dan ranks, so kyu numbers shrink as you improve, while dan numbers grow as you keep going. Think of kyu as distance remaining and dan as distance traveled and the whole thing untangles. Judo adopted a version of this structure in the 1880s, and the grading-culture site overview of the kyū system traces how it spread through Japanese martial arts and into nearly every art practiced in the West.

    10th dan, by the way, is mostly historical furniture. A handful of people in the art’s entire history have held it. In most organizations you’ll never meet anyone above eighth, and the practical ceiling for a dedicated lifetime of training sits around fifth or sixth. That’s fine. The ladder isn’t meant to be finished.

    One more oddity that surprises people coming from other arts. Aikido has no official record book, no central registry you can query to see who holds what. The certificates are issued by organizations and signed by senior teachers, and their authenticity rests on the organization’s standing, which is one reason lineage matters so much when people compare credentials. Two framed certificates with identical kanji can carry completely different weight depending on whose signature is at the bottom, a fact that seems scandalous until you remember most martial-arts history was passed down exactly this way long before anyone kept databases.

    The Kyu Grades: Where Everyone Starts

    Unranked beginners walk in the door, and within three to six months most dojos hold their first kyu test. The exact number of kyu grades varies a little by organization, but six is the common North American structure, and the skills tested at each level build in a deliberate order. Roughly speaking:

    • 6th kyu. Falling safely (ukemi), basic footwork, your first technique. The exam proves you can train without hurting yourself or your partner.
    • 5th kyu. A working handful of entries and controls, plus the first time you’re asked to move with a partner rather than at them.
    • 4th kyu. Flow between techniques starts mattering. Examiners want to see you recover when something goes wrong, which it will.
    • 3rd kyu. Timing and posture get graded. This is the first test where a bad day can actually cost you the rank.
    • 2nd kyu. Precision across a wider syllabus, and usually your first weapons requirements in traditional schools.
    • 1st kyu. The capstone student grade. You’re expected to move like someone the 6th kyus instinctively copy.

    Between tests, the wait time is measured in months at the bottom and years at the top. A motivated student might pass a kyu test every four to six months early on, then wait a year or more between 2nd and 1st kyu. The system deliberately slows you down as you climb, and I’d argue that’s the sanest thing about it. Early grades come fast. That keeps you hooked. Later grades force you to stay long enough for the material to actually sink in.

    Stripes deserve a mention, since you’ll see them everywhere. Many North American dojos put tape stripes on belts, one per step between full kyu grades, so a white belt with two stripes is somewhere south of 5th kyu. There’s no standard for what a stripe means across schools, which makes them the loosest currency in the whole system. Inside your own dojo they’re a helpful progress bar. Outside it, they’re decorative.

    Some schools also fold weapons work into the kyu requirements, which surprises students who expected empty-hand technique only. By 2nd or 1st kyu you may be tested on the suburi basic cuts with a wooden sword, or the first jo staff kata, because the founder taught weapons and unarmed practice as one study. Other schools ignore weapons until dan entirely. Ask about this before you join if it matters to you, since it changes what two years of training actually looks like.

    What Color Is That, Exactly?

    The honest answer: ask your dojo, then ask the dojo across town.

    This is where every beginner gets tripped up, and where the “explained” in this article’s title earns its keep. There is no universal aikido belt color chart. None. The Aikikai, the largest organization in the world and the one founded by aikido’s own family tested adults for decades without using colored belts at all, just white belts all the way up to black. Many traditional dojos still run exactly that way. If you’re reading this in a gi you bought last month, you might well train for years in the same white belt you started in.

    Schools that do use colors mostly settled on a loose North American convention, and it goes something like this:

    Kyu grade Common belt colors What it roughly signals
    6th kyu White Brand new. Still learning to fall.
    5th kyu White, sometimes yellow A few months in. First techniques stick.
    4th kyu Yellow or orange About a year. Moves with a partner.
    3rd kyu Green or blue Intermediate. Timing enters the picture.
    2nd kyu Blue or brown Advanced student. Helps lower ranks.
    1st kyu Brown Last stop before the black belt test.

    Treat that table as folklore with a grain of truth rather than as binding law. One dojo’s green is the next dojo’s blue, Tomiki-style schools run their own color sequence because competition needs clearer divisions, and kids’ programs often add a dozen extra colors so young students get rewarded on a shorter leash. I trained at a club in the Midwest where 3rd kyu wore purple, and for years I assumed that was normal everywhere. It was normal nowhere else.

    If you ever transfer between schools, don’t throw your old belts away, but do ask before your first class. Most instructors will simply tell you what the equivalent is, or politely suggest you wear white again for a few months while you absorb the local syllabus. That stings the first time. It’s also a useful reset, since different lineages emphasize different material. The national bodies each publish their own expectations. The United States Aikido Federation runs its own testing requirements for affiliated dojos, the Aikikai Foundation in Tokyo sets the tone for the largest worldwide network of schools, and the long-running magazine Aikido Journal has documented how grading standards play out across organizations for decades. Three sources, three slightly different answers to “what does a 3rd kyu need to know.”

    A belt color tells an outsider almost nothing. It tells the people on your own mat exactly who to watch and who to help.

    The Dan Ranks: Life on the Far Side of Black

    1st dan, shodan, is the rank everyone romanticizes, and it arrives with the least dramatic ceremony you’ll ever imagine. In many traditional dojos you bow, receive a certificate, maybe a handshake, and then go straight back to the class you were already in, where the brown belts keep throwing you. The Japanese phrase people repeat is that shodan means “first step,” and while that sounds like modesty, it’s structurally true. The kyu grades teach you the vocabulary of the art. Nothing more. Dan is where you’re finally expected to compose sentences.

    The ranks above it stretch far longer than most beginners expect. 2nd dan (nidan) usually comes two to three years after shodan and signals solid, dependable technique. 3rd dan (sandan) is the rank of the people actually running warm-ups and correcting beginners in most dojos. Somewhere around 4th dan (yondan) the expectations shift from doing techniques well to understanding them deeply enough to explain why they work, and this is where many dedicated practitioners stall for years, since the test stops being about physical memory long before the body gives out. 5th dan and beyond belong to teachers of teachers, the people whose names appear on the certificates your own instructor frames.

    Minimum time in grade

    Every serious organization publishes minimum training intervals between dan grades, usually a year or two at the low end and many years higher up. These are floors. The averages run much longer. Earning shodan typically takes somewhere between four and seven years of consistent training, give or take, and each dan above it takes proportionally longer. A 6th dan represents thirty years of mat time more often than not. I once did the arithmetic on a seminar instructor I trained under and realized his total hours on the mat probably exceeded my hours awake during the same span. Numbers like that recalibrate what “advanced” means.

    What a Rank Actually Proves

    Less than you hope, more than the cynics say.

    This is the section I wish someone had handed me at my first grading, backwards belt and all. A rank is a local credential. It says this person met this organization’s standard on this day, in front of these examiners. That’s a real achievement, and it’s also a much narrower claim than the martial-arts mystique suggests. I’ve trained with a 4th dan whose rolls were creaky and a 1st kyu who moved like water. Rank correlates with experience, but it never substitutes for watching someone actually move.

    Three things a belt does tell you, honestly. First, consistency. Anyone wearing a brown belt has kept showing up through sore weeks, boring drills, and plateaus that filter out half the people who started beside them. That reliability is worth something in every dojo on earth. Second, safety. A ranked aikidoka has been thrown thousands of times and knows how to receive your technique without getting hurt, which matters more than it sounds. Third, a syllabus. Each rank is a checklist of material, so a rank tells an instructor what you were at least taught, whether it stuck or not.

    And two things it doesn’t. It doesn’t tell you who’s “better” in any absolute sense, because there’s no scoreboard in aikido and never has been. You can see this most clearly in the organizations that keep competition, where Tomiki aikido and the mainstream part ways over whether a match score means anything about the art. It also doesn’t tell you anything about character, which is worth saying plainly because dojo marketing sometimes implies otherwise. I’ve met gracious high ranks and petty ones. The mat filters for persistence, not virtue.

    None of that makes grading pointless. The test itself is the useful part. A grading compresses months of training into twenty minutes of visible pressure, and the week before a test you’ll train harder than you have all year. Which is, if we’re honest, most of the point. The certificate is just the receipt.

    Quick tipDon’t grade-hop. If you’re shopping dojos, ask when students typically test for their first rank and how long a shodan takes. A school that hands out first-grade tests after three weeks, or promises a black belt in two years, is selling you belts. A school where the senior students have been there fifteen years and still train like beginners is, oddly, usually the stronger sign.

    How a Grading Actually Works

    Testing formats vary, but the bones are similar everywhere. Your instructor decides you’re ready, or in some organizations you apply and an examining board from outside your club runs the test, which is the whole idea behind the Aikikai structure: someone with no investment in your dojo watches you move, which keeps standards from drifting entirely local.

    The exam itself is demonstrations rather than sparring. You’ll be called forward, usually paired with a partner of equal or higher rank, and asked to run through a set of techniques. Names get called in Japanese, ikkyo through yonkyo, shihonage, irimi-nage, and you’re expected to produce the right response from an attack the examiner specifies. Attendance beats any single technique. Examiners talk afterward about a candidate’s posture, distance, and whether they looked calm, and two of the three have almost nothing to do with physical skill.

    Fail rates exist but stay low at the kyu level, because a decent instructor doesn’t put you forward until you’d pass on an average day. Dan tests are different. I’ve watched a sandan candidate fail publicly at a seminar, bow, and be re-tested a year later. The failure stung, he said, but the corrective feedback was the most precise coaching he’d ever received. Many schools now record gradings on video for exactly that reason.

    Kids, Ranks, and the Color Carousel

    If your child trains, expect a belt rack that looks nothing like the adult chart. Junior programs in North America commonly award stripes and micro-grades every few months, sometimes ten or twelve color steps before a junior black belt. It’s a sensible adaptation. Kids measure progress in weeks, and waiting two years between visible rewards loses most of them by spring.

    A wrinkle arrives later, when a twelve-year-old with a junior black belt walks into an adult class and discovers the rank doesn’t transfer. Most organizations handle this with a conversion: junior black belt roughly equals adult 1st kyu, and the young practitioner tests for adult shodan somewhere between fifteen and eighteen. Whether that feels like a demotion depends entirely on how the instructors frame it. The good ones frame it as what it is, a change of measuring stick, and the kids I’ve seen take it in stride were usually the ones whose parents never made the belt the point in the first place.

    Which, come to think of it, is decent advice for adults too.

    Where to Put Your Attention Instead

    Ranks will accumulate on their own if you keep training, and they do mark real milestones. But the people who get the most out of aikido, in my observation, are the ones who grade because the test is scheduled and let the belt come along for the ride. They watch the senior students, they ask for the corrections that sting, and they show up on the rainy Tuesdays. Belts take care of themselves.

    If you’re early in this, tie your belt carefully (our guide to tying a belt so the knot stays flat will save you a grading-day wardrobe malfunction), learn what the ranks mean in your specific organization rather than the internet’s generic version, and read what to expect at a first aikido class if you haven’t started yet. For the bigger picture of what the art is building toward, the basics of aikido covers it better than any belt chart can. Dennis, the accountant who saved me from retying my belt mid-test, finally took his shodan last year. Sixteen years after he started. He brought the same quiet competence to the exam that he brought to every Tuesday class, and the certificate he framed is almost beside the point. Almost.

    Notes and sources. Kyu and dan requirements differ between organizations and even between affiliated dojos; always follow your own school’s testing requirements first. Background reading: the dan rank system as used across Japanese budo, plus the organizational pages linked above. External links were checked and working as of October 2026.

  • Kyu and Dan Ranks: Where the Belt System Comes From

    Kyu and Dan Ranks: Where the Belt System Comes From

    Grading & Belt Systems

    Colored belts feel eternal when you’re tying one on three nights a week, but the whole system is younger than the bicycle. This is the story of how a schoolteacher named Jigoro Kano replaced centuries-old teaching licenses with numbered ranks, and why nearly every martial art on earth, aikido included, eventually followed him.

    Updated October 2026 · 14 min read

    My first sensei had a story he told every time a new crop of white belts complained about how far away their black belts looked. He’d hold up his own black belt, which was faded to a gray-green at the edges, and point out that it used to be white. Same piece of cloth the whole time. He’d bought it years ago, worn it through hundreds of classes, and it had simply absorbed everything, sweat most of all. The joke landed differently every year, but the point underneath it never changed. The belt is a label somebody had to invent, and the invention is a lot more recent, and a lot more interesting, than most students assume.

    If you train in aikido today, you almost certainly train under some version of the kyu/dan system. You start at sixth or fifth kyu, work your way up through the colored ranks, and if you stick around long enough, somewhere around three to six years in, you test for shodan, first-degree black belt, and the numbering inverts so the small numbers mean more instead of less. That whole architecture, the colored rungs, the black belt, the dan ranks going up to ten, descends from a decision one man made in Tokyo in the early 1880s. Everything before that looked completely different. And understanding what he replaced is the fastest way to understand what your own rank actually means, and what it was never supposed to mean.

    Before Belts: The Menkyo System

    For most of Japanese martial history, there were no ranks at all. There were licenses.

    For roughly six hundred years, from the medieval battlefield arts through the peaceful Edo period, a Japanese martial-arts student didn’t progress through colored belts because belts weren’t the currency. Scrolls were. The old schools, called koryu, ran on a licensing system called menkyo, and the shape of it tells you everything about what training meant at the time. A student joined a school, often as a live-in disciple, and spent years learning a catalog of techniques. When the teacher decided the student actually knew a portion of that catalog, he’d issue a certificate called a mokuroku, literally a “catalog” or list, which recorded that the named techniques had been transmitted. Deeper into the curriculum came the menkyo proper, a teaching license, and at the top sat menkyo kaiden, the license covering the entire tradition, which made you a successor, more or less, who could pass the art on unchanged.

    The details varied wildly between schools. Some issued multiple graduated mokuroku before any real license, so a student might collect two or three scrolls across a decade. Others kept the whole thing inside one family for generations. The common thread is that certification tracked transmission of a specific body of material from a specific teacher, the way an apprenticeship in any craft guild did, and it said nothing about how good you were relative to strangers in other towns. There was no fifth kyu in 1750, partly because there was no standardized curriculum to measure against, and partly because comparison with other schools was beside the point. You weren’t competing. You were inheriting. A good overview of how these licenses structured the old schools lives in the Wikipedia article on menkyo kaiden, and the whole apparatus is still alive today in the surviving koryu, which issue the same scrolls their predecessors issued four centuries ago.

    This system had real strengths. The certificate meant your teacher had watched you perform every technique on it, sometimes for years, and had staked his own name on your competence. But it had one enormous weakness, and by the late nineteenth century that weakness had become impossible to ignore.

    Nobody else could read it. A menkyo from one jujutsu school told a potential employer or an army recruiter almost nothing, because there was no common scale underneath it, and in a Japan that was industrializing, conscripting an army, and sending students to European universities, that opacity was becoming a genuine problem. Schools, militaries, and employers all wanted to know what a person could do, on a scale that meant the same thing everywhere. The old licenses were beautiful, personal, and useless for that.

    Kano’s Fix: A Scale Anyone Could Read

    A 22-year-old schoolteacher and competitive go player invented the answer.

    Jigoro Kano was born in 1860, the son of a sake-brewing family, and he’s one of those historical figures whose biography reads like a parody of a reformer. Frail as a boy, bullied, he threw himself into jujutsu as a teenager and was good enough to earn teaching credentials in more than one school of it. Then, at twenty-two, in 1882, he opened his own institution in a small Tokyo temple hall, which he called the Kodokan. The art he taught there he named judo, “the gentle way,” and his project was bigger than self-defense. He believed martial training could be a system of physical education that developed a complete person, and he’d eventually spend decades pushing that belief as a school principal, a Ministry of Education official, and Japan’s first member of the International Olympic Committee. The article on the Kodokan gives the founding story in detail, drawing on the institute’s own published histories, and it’s worth reading before you train a single judo class.

    Part of Kano’s genius was that he didn’t invent the kyu/dan idea from nothing. He borrowed it from board games. He was an accomplished go player, and in go, kyu grades mark the rungs below amateur master while dan grades begin at first dan, and the numbers run in opposite directions, small kyu numbers meaning stronger play, large dan numbers meaning higher mastery. Kano saw that a ladder like this could be lifted straight out of the game room and bolted onto physical training, and sometime in his first years at the Kodokan, around 1883, he did exactly that, dividing his students into dan-ranked seniors and kyu-ranked juniors on a single shared scale. He is generally credited with awarding the first two shodan ranks, first-degree black belt, in 1883, to Shiro Saigo and Tsunejiro Tomita. By 1886 the system had acquired its most famous accessory, when Kano introduced a uniform, the judogi, with a belt whose color visibly separated the dan holders, who wore black, from everyone else, who wore white.

    Two colors. That’s the whole original invention. There was no rainbow ladder in 1886, no orange or green or purple, just a binary you could spot across a crowded hall: the black belts, who had crossed some threshold, and the white belts, who hadn’t. Everything else got added later, much later, and mostly outside Japan.

    Kano took a private contract between one student and one teacher and turned it into a scale a stranger could read in two seconds. That single move is the ancestor of every belt system on earth.

    The comparison with what came before is worth spelling out, because the two systems embody opposite ideas about what a rank is for:

    Menkyo licenses (before 1880s) Kyu/dan ranks (from 1880s)
    What it certifies Transmission of specific techniques from a named teacher Overall level on a shared, comparable scale
    Who can read it Members of that school; opaque to outsiders Anyone, in any dojo, in any country
    How it looks Calligraphed scrolls, kept and treasured A belt color and a number
    What it implies Inheritance of a tradition; duty to preserve it Progress; the next rung is always visible
    Still used today by The surviving koryu schools Judo, aikido, karate, kendo, and most modern arts

    Notice what’s missing from the new system: any claim that you’ve inherited something. A dan grade is a measurement, not a bequest, and that distinction is the philosophical hinge the entire modern belt system swings on. It’s also, if you talk to old-school practitioners, the part some of them still mourn in private.

    Why It Spread So Fast

    Kano built the kyu/dan system for a local problem, his own growing school, but the timing was uncanny. Japan was modernizing at breakneck speed, building a school system, an army, and a national sports culture almost simultaneously, and judo was deliberately positioned inside all three. Kano himself pushed judo into the school curriculum, and the Army adopted it for hand-to-hand training. A rank system that an army officer or a school principal could understand at a glance was exactly the artifact the moment called for, and judo spread through Japanese institutions like water finding cracks. The dan/kyu structure spread with it, until by the early twentieth century it had simply become how Japanese martial arts organized themselves. When other arts modernized, and nearly all of them eventually did, they reached for the same template.

    One practical feature did most of the work. The old menkyo system had no intermediate rungs, or rather its rungs were so spaced out that a student might train for a decade between certificates. Kano’s ladder had frequent, reachable steps, and each one gave a student a visible finish line and a visible next one. Whatever you think of colored belts as a measure of skill, and reasonable people argue about this constantly, they are an extraordinarily effective piece of motivational engineering. A beginner who can see the next rank from where she stands trains differently than one staring at a ten-year horizon, and by the 1920s judo schools across Japan had organized whole class structures around that observation.

    The Colored Belt Is a European Invention

    The rainbow arrived decades later, and it arrived in France.

    This is the part that surprises almost everyone. If you train in a Western dojo today, you probably move through something like yellow, orange, green, blue, and brown before black. That ladder did not come from Kano, and it didn’t come from Japan. The credit usually goes to Mikonosuke Kawaishi, a judoka who moved to Paris in the late 1930s and spent years teaching judo across Europe. His European students, the story goes, wanted more frequent and more visible signs of progress than the austere Japanese white-until-you’re-black scheme offered, and Kawaishi obliged, assigning a color to each kyu grade so a student could glance at a lineup and know exactly where everyone stood. The scheme was a hit, European judo federations standardized it, and it flowed back into the global bloodstream so completely that most people now assume it’s traditional.

    Japan noticed the commercial logic and followed suit, especially in the postwar decades, when the martial arts were rebuilding and competing for students. But plenty of Japanese schools kept the old binary well into the twentieth century, and some still do. The point worth holding onto is that the colored kyu ladder, the thing most of us mean when we say “belt system,” is a mid-century layer bolted onto Kano’s framework, younger than radio broadcasting and not much older than television. It spread because it works, mostly. A white belt can see exactly how many rungs are left, and so can the instructor assigning partners.

    Quick tipWhen you visit a new dojo, the colored belts tell you who the regulars are and roughly how long they’ve been training, but they tell you almost nothing about how good any individual is on any given night. I’ve been thrown through the floor by a second-kyu who trained four nights a week, and I’ve flowed pleasantly with a sandan who’d been busy with work for a year. Treat the color as a rough calendar, not a verdict.

    How the System Reached Aikido

    Aikido adopted the framework last, and adapted it the most.

    Morihei Ueshiba, aikido’s founder, was born in 1883, the year Kano awarded his first shodans, and the new rank culture was simply in the air of Japanese martial arts throughout the man’s entire life. Ueshiba himself trained in a classical school of jujutsu and had a brush with judo in his youth, so he grew up fluent in the world Kano had built. But his own teaching career took a strange path through history. In the prewar decades, teaching Daito-ryu and then his own evolving art, which he called aiki-budo for a time, Ueshiba mostly did not run a ranked program of the Kano type. His inner-circle students of that era received things like scrolls and teaching permissions, structures with a distinctly menkyo flavor, and the whole operation was small, rural, and personal.

    Everything changed after 1945. The occupying authorities banned martial-arts training for a few years, and when it became legal again, Ueshiba’s son Kisshomaru, a young man with modern sensibilities, began rebuilding the art as something that could exist in postwar Japanese cities: organized classes, public enrollment, a headquarters dojo. That headquarters, the Aikikai Hombu Dojo, moved to its permanent home in Tokyo’s Shinjuku district in 1967, and the Aikikai Foundation’s official English pages describe how the art is organized today. Adopting the kyu/dan framework was part of that modernization, almost a foregone conclusion, since by the 1950s there was no other credible way to run a Japanese martial art that wanted to be taught in cities and sent abroad. Ranks were simply how Japanese budo communicated.

    Aikido did make the framework its own in a couple of ways, though. Most styles kept Kano’s original restraint about colors, running white belt for all kyu grades in the traditionalist schools and adding colored belts only where the local market expected them. And aikido grading exams, unlike judo’s, are not competitions. There’s no sparring match to win. You’re evaluated on paired technique, usually with a partner attacking in a pre-agreed way, plus some schools add weapon forms and free practice. The International Aikido Federation, the umbrella body that coordinates the art’s national organizations worldwide, was founded in 1976, and the IAF’s site is a good window into how standardized the ranking side has become across dozens of countries. Which is itself a little ironic, and worth pausing on.

    Standardization was the whole original selling point. A judoka’s black belt meant the same thing in Osaka and Oslo, and an aikidoka’s shodan now more or less does too. But visit five aikido dojos and you’ll meet five opinions about what shodan means, running from “solid beginner” to “teaching credential,” and they’re all correct within their own organization. The menkyo system had this same property, of course, with every school’s certificates meaning something slightly different. The kyu/dan ladder gave us a shared scale, and then promptly handed the interpretation of the numbers back to each style. Some problems outlive every solution.

    What Actually Changed

    Step back and look at the full arc. A transmission system built on personal scrolls got replaced by a measurement system built on visible grades, and the replacement conquered the world because it was legible, motivating, and easy to administer. That’s the whole story, and it’s honestly hard to overstate how much it changed. Consider what rank means on the mat now compared to what a menkyo meant in 1750.

    • Ranks are now comparable across schools. A fifth kyu in Seattle and a fifth kyu in Stuttgart share a label, even if the contents of their exams differ. This was exactly the thing the menkyo system couldn’t do, and it made the modern world of martial arts, with international federations, visiting instructors, and open seminars, possible at all.
    • Progress became visible and frequent. Rungs you can see from where you stand are a powerful engine. A student who tested last month has a date, a certificate, and a next test on the calendar, none of which existed in the menkyo era, where you might train for years with no external sign of movement at all.
    • Teaching became separable from ranking. In the old system, the license to teach and the record of what you knew were the same document. Today a first dan can be a fine assistant in one organization and ineligible to run a class in another. The rank measures the person; the permission to teach comes from somewhere else entirely.
    • And some things got thinner. A scroll named a teacher and a curriculum and carried the weight of a lineage stretching back generations. A belt color names a level. All the meaning that used to live inside the certificate, the obligation to preserve, the duty to transmit, got left for the student to supply. Most don’t even know it was ever there.

    I’d argue that last trade is the real legacy of the kyu/dan system, and I say that as someone quite happy to train under it. We gained a universal language for progress and lost, mostly without noticing, the old contract that made rank a responsibility rather than a trophy. If you want the practical side of what each modern rank typically involves, from kyu exams up through the dan grades, our companion guide aikido belt ranks explained walks through the whole ladder as it’s used in North America today.

    What This History Means at Your Dojo

    Knowing all this changes a few practical things for a working student, starting with how to read the black belts. In most aikido organizations, shodan means “first step,” and the word dan itself shares a root with the verb to step or to grade, which the traditionalists will tell you, with some relish, means a first dan is literally a beginning. Kano’s framework was designed so that the dan grades describe a curriculum of deepening principle rather than a pile of new techniques, and aikido inherited that shape. The difference between a shodan and a sandan usually isn’t that the sandan knows different throws. It’s that the sandan’s throws work on people who are trying to stop them, with less muscle and more structure, at a speed that would embarrass the shodan.

    It also explains the weird inversions you’ll encounter as you climb. At kyu level the numbers count down toward one as you improve, sixth kyu being a beginner and first kyu being nearly ready for black belt, and then the dan numbers count up from one, with meaning getting sparser as they rise. An eighth or ninth dan is a person your organization considers to have spent a lifetime on the art, and there are very few of them anywhere. The twin ladders descend from Kano’s go-board borrowing and have never been rationalized since, which occasionally produces the charming situation of a fourth dan explaining to a new student that yes, the numbering flips, no, nobody is entirely sure why we all kept it, and it’s probably best not to think about it too hard.

    Finally, the history hands you a decent yardstick for judging a school. Any organization that treats rank as a pure motivational ladder, testing students on a calendar regardless of readiness, is leaning on the framework as Kawaishi’s European students wanted it. Any that treats rank as a sacred transmission is leaning on the menkyo ghost inside it. Healthy organizations sit in the middle, where the ranks are earned and honest but nobody pretends the belt is the point. You can usually tell within two visits which kind of dojo you’re standing in. Watch what the senior students do when they think nobody’s grading them, because that behavior is the culture, and the culture is the real curriculum.

    The belt system was a modernizing reform, a motivational trick, and a borrowed go-board ladder, all at once. Knowing that doesn’t cheapen your rank. It tells you what to do with it.

    So the next time you retie your belt before class, it might be worth remembering that you’re participating in a solution to a nineteenth-century paperwork problem, refined by European marketing in the 1930s, and adopted by aikido almost as an afterthought. The system is younger than your great-grandparents. Which, honestly, makes it more interesting to be inside of, and gives you better questions to bring to your own grading than the new students in my old dojo ever thought to ask.

    Sources and notes. Historical details throughout follow the published accounts of the Kodokan (for Kano and early judo), the Aikikai Foundation (for postwar aikido organization), and the International Aikido Federation (for the modern federation structure), with the Wikipedia biography of Jigoro Kano as a useful cross-reference. Rank requirements vary between organizations, so always treat your own dojo’s guidelines as authoritative. If you’re newer to the art, what aikido is and how it works is the right starting point, and our guide to bowing and dojo etiquette covers the culture the ranking system floats in. External links were checked and working as of October 2026.

  • Rei: The Meaning and Practice of Bowing in Japanese Martial Arts

    Rei: The Meaning and Practice of Bowing in Japanese Martial Arts

    Dojo Etiquette & Culture

    Why Japanese martial artists bow to a wall, to each other, and to a wooden stick — what the gesture actually means, and how the rules change the moment you switch dojos.

    Updated October 2026 · 13 min read

    I still remember my first bow. I’d driven forty minutes to a dojo I’d found on a flyer, signed a waiver I didn’t fully read, and put on a white judo-style gi that smelled like someone else’s laundry. Then the whole class turned toward the front wall and bowed, and I had about two seconds to decide what to do with my body. I bent at the waist somewhere between a nod and a stretch, kept my eyes up like an idiot, and nearly tipped over. Nobody said anything. That’s the thing about dojo etiquette. The mistakes get absorbed quietly, and you’re expected to pick the correct version up by watching, the way you learned which relatives to hug and which to shake hands with.

    If you’ve just started aikido, judo, karate, or kendo in the US or Canada, the bowing will be the first culture shock and, honestly, the last thing you’ll fully get comfortable with. This article is the guide I wish I’d had. It covers what rei actually means, the different bows you’ll be expected to perform, where the whole custom comes from, and why the rules look different in every dojo you’ll ever visit. That’s the promise, anyway.

    What Rei Actually Means

    It’s not worship, and it’s not the Japanese word for hello.

    Rei (礼) is usually translated as “etiquette” or “courtesy,” and that’s true but a little flat. The character combines the radical for a sacrificial vessel or altar with the part that means “to display,” and scholars of the language connect it to an older idea: showing respect through correct, visible form. In a martial-arts context, rei is the entire system of gestures and procedures that tells everyone on the mat that they are in a shared, serious space. The bow is just the most visible piece of it. You’ll also meet the word in reigi, the term for formal etiquette, at the shrine gate of any traditional dojo. A good overview of how the custom fits into Japanese daily life, far beyond the dojo, is the Wikipedia entry on bowing in Japan.

    The distinction that took me years to notice is a simple one. In the West, respect is mostly a feeling we’re expected to carry around internally, and showing it too formally can seem stiff or even insincere, which is a strange inversion once you notice it. Japanese rei runs the other direction. The form comes first, and the feeling follows it. You bow not because you’ve successfully manufactured reverence on command, but because performing the form, correctly and at the right moment, is itself the respect. Actors know this trick. Smile on stage for long enough and the audience’s mood changes yours. Bow the same way.

    One more layer. Morihei Ueshiba, the founder of aikido, talked about rei constantly, sometimes saying that aikido begins and ends with it. That’s easy to file under platitude until you notice what he paired it with. In his view, a technique done with respect and the same technique done carelessly were not the same technique at all, because the person doing it had changed. Any account of Ueshiba’s life will tell you he kept training long past the age when most people retire, and students describe an old man whose bow somehow conveyed more alertness than most people’s attacks.

    Where the Custom Comes From

    Bowing in Japan didn’t start in martial arts, and it isn’t one single tradition wearing one costume. Three streams fed into it. The oldest is Shinto, the native Japanese religion, where a standing bow and a pair of hand claps at the shrine gate mark the moment you cross from ordinary ground into sacred space. The second is Confucian, imported from China and Korea, which treated correct ritual form as the glue holding a hierarchical society together; the word li (礼) is the same character as Japanese rei, and it covered everything from court ceremony to how a son addressed his father. The third stream is Zen Buddhism, which arrived with serious force during the samurai centuries and turned precise, repeated form into a training method in its own right. Sweep the courtyard the same way every morning for ten years and the sweeping starts doing something to you.

    By the time the samurai class formalized its martial training in the Edo period, roughly 1603 to 1868, the bow was already loaded with all three meanings. The form was ancient. A swordsman bowed to the shrine before practice the way you’d bow at a shrine anywhere, bowed to his teacher as a student acknowledging a debt, and performed endless formal repetitions as Zen-influenced discipline. The dojo itself, as a concept, grew up inside this world; the word’s literal roots mean “place of the way,” borrowed from Buddhist temple terminology, and you can trace the full history in the article on the dojo.

    Modern budo, the “martial ways” like judo and kendo that emerged after Japan opened to the West, deliberately kept the bows when they dropped most of the battlefield content. That was a deliberate choice, and worth remembering as one. The bows stayed. The founders wanted the new arts taught in schools and to ordinary citizens, and the etiquette was the part that made a rough physical practice into something you could hand to a fourteen-year-old. Two men bow to each other on a mat, and for the length of that bow, the stronger one agrees to throttle himself down and the weaker one agrees to attack honestly. Most of what keeps partner training safe is negotiated in that two-second gesture.

    The Main Bows You’ll Learn

    There are really only a handful of bows in any Japanese martial art, and you’ll perform all of them in your first month. The terminology shifts a little between aikido, judo, and karate dojos, but the shapes are universal.

    The Standing Bow (ritsu-rei)

    Ritsu-rei is the workhorse. Feet together, body straight, hinge from the hips, hands sliding down the fronts of your thighs, eyes cast down, and hold for a beat at about thirty degrees before rising. In most dojos the depth encodes the relationship. A casual fifteen degrees says “hello, thanks, we’re starting.” A full thirty degrees or a touch more is reserved for the formal opening and closing bows toward the front of the dojo. The whole thing should take two to three seconds. Bow too fast and it reads as dismissive; hold it too long and you’re making your partner wait on ceremony.

    Two details beginners fumble. The hands slide down the legs rather than clasping at your sides. That keeps the gesture soft instead of military. And the eyes go down, not forward. Staring at your partner while bent over is, weirdly, one of the more aggressive things you can do on a mat, because the shape says submission while the eyes say challenge. Old habit, probably from an era when a bent-over swordsman really did need to watch for a blade.

    The Seated Bow (zarei)

    Zarei is performed from seiza: kneeling on the floor, tops of the feet flat, spine tall. You place both hands on the mat in front of you, fingertips touching or overlapping to form a small triangle, and lower your forehead toward that triangle without lifting your hips. Thirty degrees of forehead travel is plenty; this is not a yoga stretch. The hands sliding forward is the important part. When the founder’s photo is at the front of the room, the forward slide of the hands acknowledges a debt toward the source of the teaching. The same bow between partners trades the gesture more evenly. Kneeling changes the geometry of respect, dropping the whole exchange to floor level where nobody can hide behind height, which is probably half the point of requiring it.

    One practical warning. Seiza itself is the hard part. If your ankles and knees aren’t used to it, a formal opening ceremony can be more physically demanding than the warm-up that follows it. Most American and Canadian dojos won’t force it. Bow from a standing position when you need to. Twenty years of training won’t make everyone’s knees compatible with the floor, and any instructor who pretends otherwise is prioritizing form over function. Your knees get a vote.

    The main bows, side by side:

    Bow Japanese name When you’ll do it Depth
    Standing bow Ritsu-rei Entering the mat, greeting a partner, thanking the instructor. 15-30 degrees, a two-count
    Seated bow Zarei Formal class opening and closing when kneeling Forehead lowered, hands slid forward
    Bow to the front Shomen ni rei Start and end of class, toward the front wall or kamiza. Deepest standing or seated bow of the hour
    Bow to the teacher Sensei ni rei Called by the senior student, after the front bow Same depth, directed at the instructor
    Bow to each other Otagai ni rei Before and after every partner exchange. Quickest and lightest of the day

    Notice the pattern. The deepest bows go toward things that outrank you in time, the tradition first and the teacher right behind it, because both of those were standing on the mat long before you were. The lightest bow is the one you do most, aimed at the person standing right in front of you, about to grab your wrist.

    The Three Bows of Every Class

    Walk into a traditional aikido class anywhere in North America and the opening ceremony takes about ninety seconds. Everyone lines up facing the front of the dojo, usually in rank order; the school and the state of everyone’s knees decide whether that’s kneeling or standing. A senior student calls “shomen ni rei,” and the room bows toward the front, where the founder’s portrait hangs and sometimes a small shrine or a scroll. Then “sensei ni rei,” a bow to the instructor, who returns it. Then the class begins, and a third kind of bow quietly takes over the whole hour.

    Shomen ni rei: bowing to the front

    What exactly is everyone bowing at? It varies. In some dojos it’s the kamiza, the “upper seat,” a small shrine with a Shinto flavor. In others it’s purely the portrait of O-Sensei, aikido’s founder, and the bow is directed at a person rather than a deity. A few secular dojos have just a scroll with the word aikido on it, or nothing visible at all, and the bow addresses the art itself. The headquarters view of what the front of the dojo represents lives on the Aikikai Foundation’s official site, the organization Ueshiba’s family still leads in Tokyo.

    If you have a religious background, this moment can feel loaded. It shouldn’t. I’ve trained in dojos where the front held a shrine, and in dojos where it held a photograph, and the feeling of the bow was identical: gratitude toward whoever made the practice possible and toward everyone who’s ever bowed in that room before you. Bowing to a photograph of a dead teacher is structurally the same gesture as standing at a veteran’s memorial for a war you didn’t fight, an acknowledgment aimed at an absence. Nobody thinks the stone is listening, the bow just gives the feeling somewhere to go.

    Sensei ni rei: bowing to the instructor

    This one translates most easily for Western students, because we already understand the student-teacher bow’s shape: I acknowledge that you know things I don’t, and I’ll take correction from you for the next hour. Watch the exchange closely in any good dojo and you can read the entire culture of the place in those two seconds, right down to how the teacher treats the newest white belt. What surprises people is that the instructor bows back. Every time. Mutual doesn’t mean equal, and the depth of the returned bow is exactly the point. The student bows deeper and holds longer. The teacher’s return bow is slightly shallower and slightly shorter, which acknowledges the relationship and keeps it from becoming servile. Watch the exchange closely in a good dojo and you can read the whole culture in those two seconds.

    Otagai ni rei: bowing to your partner

    The bow that matters most happens dozens of times per class. You find a partner for the next drill. You face each other and bow, saying onegai shimasu, which means something like “please work with me.” You train for ten minutes and trade the roles of attacker and defender. Then you bow again, this time saying arigato gozaimashita to thank your partner for the practice they just gave you. It adds up fast. That pair of exchanges brackets every single partnership on the mat for the whole hour, which is the etiquette doing its most important work.

    Because the bow with a partner isn’t really about courtesy. It’s a safety agreement. Bow, and you’ve just told each other that you’ll attack at an agreed speed, tap when something hurts, stop when the other person taps, and let go the moment either of you asks. Remove the bow and the same physical exchange becomes a fight with unclear rules. The writers at Aikido Journal have returned to this idea for decades, usually pointing out that the bow is where uke’s honest attack and nage’s controlled technique are both negotiated before anyone moves. The AikiWeb forums host the ongoing student debate about how formal that negotiation should be, and it’s never once been settled, which is itself a kind of answer.

    The bow isn’t the class saying goodbye to you. It’s the class saying: we all showed up, and that deserves marking.

    Quick tipIf you only learn three phrases for your first month, make them these. “Onegai shimasu” at the start of a partnership, “arigato gozaimashita” at the end of it, and “hai” — yes, I understood — whenever a teacher gives you correction. Those three, said clearly and at the right moment, cover ninety percent of dojo communication, and senior students notice who’s making the effort.

    How Etiquette Differs Between Dojos

    Everything above is the common core. The actual rules, though, get invented locally, and two dojos in the same city can run completely different etiquette. After a decade of visiting schools across the US and Canada, I’d say the variation falls into a few predictable patterns.

    How traditional is the dojo?

    At the formal end, expect strict rank ordering in every line, zarei at the opening rather than standing bows, plus Japanese counting and a senior student whose whole job is calling the etiquette. Instructors may be addressed as sensei or by surname plus sensei, and questions to the teacher go through the senior student rather than directly. At the relaxed end, common in university clubs and many community dojos, you’ll get a quick standing bow at the start, first names everywhere, and maybe a single Japanese word all evening. Neither is wrong. The formal dojo is keeping a training method intact; the relaxed one is betting that the training survives without the packaging. Both bets win often enough that both styles persist.

    Which lineage and style?

    Lineage matters too. Aikikai-affiliated schools worldwide share a broad baseline, with national organizations like the United States Aikido Federation setting expectations for their member dojos. Iwama-style schools, which trace to the founder’s rural dojo, tend to keep the most conservative etiquette and the most weapons formality. Tomiki or Shodokan aikido includes competition, which changes the bowing rhythm entirely, since some exchanges now end with a judge’s call rather than a mutual reset. Karate and judo dojos bring their own house rules on top. Visit three different arts and you’ll bow with different hands, at different depths, in different orders. The variation is normal. Taking it personally is the only real mistake.

    Weapons classes

    If you ever train with a wooden sword (bokken) or staff (jo), the etiquette multiplies. Weapons are bowed to. You bow to the weapon rack when taking and returning one, some schools bow to the weapon itself before and after partner drills, and the reasons are practical as much as ceremonial. A heavy wooden sword swung carelessly ends careers. So the bow to the weapon doubles as a three-second pause in which you confirm you’re actually ready, grip settled, space clear, attention on your partner. I used to find this fussy. Then I watched a beginner swing a bokken into his own forehead during a rushed warm-up and decided the fuss was cheap insurance.

    How to Bow Well

    Form-wise, a good bow is simpler than it looks. The checklist I’d give a new student in my own dojo:

    • Match the room’s depth and speed by watching the two most senior students and copying them exactly, then matching the instructor’s return bow when it’s aimed at you. Etiquette is calibrated locally.
    • Feet together before you bend. Hinging from a staggered stance looks like you’re dodging something. Set your feet first.
    • Eyes down, briefly. A downward gaze for the length of the bow. It reads as respect in every dojo on earth.
    • Hands slide, they don’t swing. Down the front of the thighs for ritsu-rei; onto the mat, fingertips forming a triangle, for zarei.
    • Don’t talk through a bow. The phrases onegai shimasu and arigato gozaimashita belong on either side of the bend. Bowing and chatting at the same time is the most common beginner tell.
    • Bow back. If anyone bows to you, partner or senior student, return it. An unreturned bow in either direction is the one real etiquette error on this list.

    And that last point deserves its own paragraph, since it’s the one rule with no local variation. Every bow in a dojo is a proposal, and the correct answer is always another bow, which is why a whole room bowing in unison never quite gets old.

    What Bowing Is Not

    Three misconceptions show up in almost every beginner’s head, and it saves everyone time to clear them now. First, the bows are not worship. The shomen bow addresses a tradition, a portrait, or an idea, and practitioners of every religion and none train side by side in North American dojos without conflict. The details differ. The feeling doesn’t. If a specific dojo’s front-of-room practice bothers you, ask the instructor privately. The answer is usually more interesting than you expect, and I’ve never seen the question taken badly.

    Second is subtler. The bows are not a dominance ritual, at least not in any healthy dojo. The instructor’s return bow is the whole system in miniature. When a senior student’s bow goes unreturned, or when bowing starts being demanded rather than modeled, that’s a yellow flag about the school, and it belongs in the same category as a coach who screams. The seniors tell you everything. Watch how the most senior people treat the least senior ones, and the bows will fill in the rest.

    Third, and this one took me years: the bow is not empty. It’s a real action with real effects. Two people who bow to each other before practicing violence, however cooperative, are actively training something. They’re practicing noticing each other and entering a shared agreement before force is involved. Done a few thousand times, that sequence doesn’t stay on the mat. You find yourself pausing before difficult conversations, actually looking at the person you’re about to disagree with. Depending on which of my teachers you ask, that’s either a lovely side effect or the entire point.

    What to Take From All This

    Start simple. Bow when the room bows and match your depth to the senior students. Say the two partnership phrases until they’re automatic. Return every bow that’s offered to you. Then let the form do what it was designed to do, which is to take the question “am I showing enough respect?” off your plate so you can pay attention to the person in front of you instead.

    The rest of the etiquette will accumulate on its own, the same way you learned the unwritten rules of your first job. Nobody sat you down for a seminar on office culture. You watched, you absorbed a correction or two, and within a year you were the one new people were watching. Dojo etiquette works exactly like that, except the stakes are friendlier and everyone is secretly glad you’re making the effort.

    Sources and notes. This guide reflects common practice in Aikikai-affiliated and independent dojos across the US and Canada; exact etiquette varies with the school and the instructor, so always follow your own dojo’s customs first. If you’re brand new, our guides on dojo etiquette for beginners and what to expect at your first aikido class pair well with this one, and the basics of aikido itself gives the technique context the etiquette serves. External links were checked and working as of October 2026.

  • Your First Aikido Class: A Complete What-to-Expect Guide

    Your First Aikido Class: A Complete What-to-Expect Guide

    Dojo Etiquette & Culture

    What to wear, what to bring, how the bowing works, and what actually happens for the hour you’re on the mat, told straight so you can stop worrying and just show up.

    Updated October 2026 · 13 min read

    The scariest part of a first aikido class happens before the class starts. You’re standing at the door of a room you’ve never been in, holding clothes you maybe bought yesterday, about to walk onto a mat where everyone seems to already know the rules. I want to take that part away. A beginner class is one of the friendliest hours in martial arts, and the people inside that room remember their own first night better than you think. If you show up fifteen minutes early with a water bottle and an open mind, you’ve already done most of the hard part. This guide walks you through the rest, in the order it will actually happen.

    What to Wear (And Whether You Need a Uniform Yet)

    Aikido’s traditional training uniform is the keikogi, usually just called a gi: two heavy cotton pieces, a jacket and drawstring pants, plus a belt called the obi that holds the jacket closed. White is the standard color for beginners nearly everywhere in the US and Canada, and a full set costs somewhere in the $60 to $120 range depending on the weight of the cotton. If you want background on how the uniform evolved across Japanese martial arts, the overview of the keikogi is a good ten-minute read.

    And you don’t need to buy any of it before your first class. That’s the part that matters most. Almost every dojo keeps a box of loaner gis in various sizes, and a trial class is exactly what the loaner box exists for. If the dojo has no spare uniform, wear something you can move in. Think sweatpants without zippers and a plain t-shirt. Avoid shorts, because kneeling on mat burn is real; avoid anything with buttons or jewelry that can catch a partner’s sleeve; skip the baggy shirt that rides up the first time someone grabs your wrist.

    Feet stay bare on the mat, always. You’ll take your shoes off at the edge before stepping on, so clean socks or bare feet, and trim your toenails. One of those details nobody mentions until it matters, it always eventually matters.

    Nobody at the dojo will remember what you wore. They’ll remember whether you were willing to fall down and get back up.

    What to Bring vs. What the Dojo Provides

    The short version: bring almost nothing. Aikido dojos are low-gear compared to, say, starting hockey. Most training halls already have everything the practice needs on the walls or in the closet.

    Item You bring The dojo provides
    Uniform (gi) Only after you decide to keep training; ask about loaners first Loaner gis for trial classes at most dojos
    Belt (obi) Comes with the gi, or the dojo lends one Someone will happily show you how it ties (there’s an art to it)
    Water A bottle you can keep at the edge of the mat A drinking fountain at many community dojos
    Mat space Nothing, just be on time The tatami itself, swept before and after every class
    Weapons Nothing on day one Wooden swords (bokken) and staffs (jo) for later classes
    First aid Any tape or supports your body already needs A small kit somewhere near the office, usually

    If there’s one thing I’d add beyond that table, it’s a small towel. An hour of aikido involves more close contact with other people’s sleeves than newcomers expect, and you’ll be glad for it by the halfway point.

    Before you goEmail or call the dojo a day ahead. Ask what a trial class costs (many are free or a few dollars), whether they have a loaner gi in your size, and whether you should arrive early to fill out a waiver. Five minutes of email removes ninety percent of first-night awkwardness.

    Arriving: The Fifteen Minutes That Set the Tone

    Show up about fifteen minutes before the posted start time. This is normal dojo culture, not over-eagerness, since it gives the instructor time to greet you and find a loaner gi in your size before pairing you with a patient senior student. Walk in, take your shoes off at the door or mat edge, and say hello to the first person who makes eye contact. That’s the whole entrance exam.

    Right away, a few things will catch your eye. The mat area, the tatami, is treated as a clean space, so street shoes never touch it and you’ll step on and off at the same spot. At the front of most dojos hangs a framed photograph, usually of Morihei Ueshiba, the founder, and there’s often a small shelf or altar beneath it (some dojos keep flowers or a stick of incense there, some keep nothing at all). You don’t have to do anything about that yet. Bowing toward it, and toward the instructor, is something the regulars do. You’ll pick it up by watching in about four minutes flat.

    Someone will hand you a waiver and probably a loaner uniform, then point you toward a changing area. Waiver first, gi second. If the gi feels stiff and strange, that’s because it is, for everyone, for roughly their first month. Also, leave your phone in your bag. Classes run phone-free on the mat almost everywhere, and the quiet is half the point.

    Bowing In: What the Ritual Actually Means

    Classes in most traditional dojos open with a short formal sequence, and knowing what’s coming makes it feel like a ceremony instead of a pop quiz. Students line up seated, usually in rows with the most senior students at the right end near the instructor. A senior student calls the class to attention with a phrase like “ki o tsuke,” everyone bows toward the front of the dojo together (that’s shomen ni rei), then bows toward the instructor (sensei ni rei), who bows back. Partner practice later begins and ends with a small bow to your own partner, plus a spoken phrase or two.

    The bow itself, in Japanese contexts generally, is called ojigi, and it’s worth understanding that a bow in a Japanese martial art is closer to a handshake than to worship. The entry on ojigi covers how the gesture works in daily Japanese life, where bowing shows up at funerals, job interviews, even convenience stores, and the dojo version sits in that same lineage of mutual respect. You’re acknowledging the space, the teacher, the person about to grab your wrist. Nothing more is being asked of you.

    One reassurance for anyone worried about the quasi-religious look of the front-of-room shrine (the kamiza): practices vary. Some dojos lean traditional, some barely nod to it. Both are common across North America. You bow as a sign of respect to the tradition rather than a statement of belief. In the years I’ve been around dojos, I’ve trained alongside devout members of half a dozen religions and a comfortable number of atheists, and nobody has ever been asked to profess anything.

    Warm-Ups: Rolling Before You’re Ready to Roll

    After the bows, the instructor leads warm-ups, and this is where aikido differs from most martial arts in one important respect. Expect some stretching, wrist and shoulder circles, loosening exercises, and then the surprise. Falling practice. From your very first class you’ll work on ukemi, the art of receiving a technique safely, starting with rocking drills and forward slides, maybe a gentle somersault over one shoulder with a slap of the mat. There’s a reason, and it’s a good one. Falling well is the skill that keeps partner practice safe for decades, so it’s trained from minute one rather than left until you need it.

    Go slowly here, and I mean that as practical advice rather than politeness. The temptation in a first class is to copy the shape of what the advanced students are doing, but a senior student’s forward roll is the product of a few thousand repetitions, and your version on night one should be small, slow, and boring. Knees, then shoulder, then slap. The mat is more forgiving than your pride assumes, but only if you keep your chin tucked.

    By the end of warm-ups, roughly ten or fifteen minutes have passed and the nervousness most beginners arrive with has usually burned off. Which is exactly the design. Something about being busy with your body leaves no room left over for anxiety.

    Partner Practice: The Heart of the Hour

    You’ll spend most of class taking turns throwing and being thrown.

    The middle of class is partner work, and the first thing that will happen is a senior student or the instructor will walk you through the partner bow and the phrase onegai shimasu, which means something like “please train with me.” You’ll say it to your partner at the start of each round and arigato gozaimashita at the end. They sound like a mouthful. By the third time, they aren’t, and I think most people end up liking the ritual more than they’d expect, because it turns every round into a small handshake instead of a contest.

    What nage does

    Your partner will attack in a pre-agreed way, a wrist grab or a slow strike, and you’ll practice the response the instructor just demonstrated, maybe three or four repetitions before switching. The teacher walks the mat correcting details. Your shoulders are up. Your feet are crossed. You’re muscling it. Expect a lot of small, kind corrections. Expect the technique to feel completely impossible for the first half hour, then suddenly click for one repetition out of nowhere. That single click is the feeling people come back for.

    What uke does, and why it’s half the art

    Being the attacker, the uke, is a role, not a loss. Uke gives a real, committed attack at a speed both partners can handle, then follows the technique into a safe fall. Doing that well is a skill with its own years of depth, which is why Aikido Journal has published essay after essay on what makes good ukemi. As a beginner, your job is simpler: attack honestly at a slow pace, fall where you’re guided, tap the mat or your partner the instant anything hurts, then get up smiling if you can manage it. Your partner in that first class was once on the ground in a borrowed gi doing exactly the same thing.

    Something I’d warn you about: the hands-on closeness. Aikido practice involves wrist grabs and elbow contact, with occasional moments where your partner’s sleeve is your only handle on the situation. It can feel intimate for the first few classes if you’re not used to contact sports, and that fades fast. Dojos are good at this. If a grip or a position ever feels wrong, say so, immediately, to your partner and then to the instructor if needed. Every serious dojo treats that as normal communication, and any partner who doesn’t isn’t someone you’ll be paired with twice.

    The Japanese Words You’ll Hear (Don’t Memorize, Just Recognize)

    Nobody hands you a vocabulary sheet. Japanese terms just float around the room, and after a few classes they stop being foreign. Sensei means teacher. Tatami is the mat. Uke and nage, you’ve met. Ma-ai is the distance between partners, the gap that decides whether an attack can even land. Rei is the bow itself. And the headquarters style practiced at most dojos traces back to the Aikikai Foundation in Tokyo, which is why a class in Ohio and a class in Osaka can share the same vocabulary.

    Two phrases earn themselves a little study before class one, though. The opening request is onegai shimasu. The closing thanks is arigato gozaimashita. Write them on your palm if it helps. Nobody will laugh at your pronunciation, because roughly half the room was mumbling them nervously a year ago. I still mumble a little, if I’m being honest.

    The bow and the words do real work. They turn a room of strangers into people who have agreed, out loud, to take care of each other for the next hour.

    The Hour at a Glance

    Every dojo runs its own rhythm, but a beginner class in the US or Canada tends to look something like this:

    • Bow in. Line up, seated bow to the front of the dojo and to the instructor, about two minutes.
    • Warm-ups. Stretching plus wrist and shoulder loosening, then basic falling practice, ten to fifteen minutes.
    • Footwork solo drills. Walking irimi and tenkan steps up and down the mat until the pivot stops feeling like dance choreography, five to ten minutes.
    • Partner techniques. The instructor demonstrates, pairs work a grab or strike response, everyone switches roles each round, thirty minutes or so.
    • Bow out. The line forms again, bows are exchanged, class ends. Senior students stay to sweep and stack the mats.

    Notice what isn’t on that list: sparring, competition, anything resembling a fight for points. Most styles of aikido don’t have matches at all, which is either a feature or a bug depending on what you’re looking for, and for a nervous first-timer it’s almost always a feature. You will never be asked to “win” anything on your first night. Or ever, honestly.

    The Worries Everyone Has (Answered Straight)

    “I’m not in shape for this.” Neither was anyone else on their first night, and aikido is kinder to the unfit than it looks. You can do the whole class at your own pace, sit out any drill by stepping to the edge of the mat, and no one will say a word beyond “feel better.” The conditioning builds on its own schedule, about fifteen classes in, when you realize the warm-up stopped feeling like a workout.

    “Too stiff, too old, too uncoordinated.” The average beginner class in North America skews adult, with plenty of students starting in their thirties and forties, some well past retirement age. Stiffness is close to the norm, and uncoordination is why there are mirrors and patient seniors. I’ve watched a sixty-year-old accountant with two left feet become one of the most reliable ukes in his dojo over about two years, mostly by just showing up Tuesdays and Thursdays.

    “I’ll be the only beginner.” Possibly, and briefly, but it matters less than you’d fear. Dojos assign seniors to newcomers on purpose, because teaching a beginner is considered good training for the teacher, which means your confusion is literally useful to somebody. A little flattery that happens to be true.

    “What if I bow wrong or say something dumb?” You’ll bow slightly off, mispronounce something, and step on the mat with your left foot when the room used the right. Nobody cares. Etiquette in a beginner context is graded on obvious effort, and effort is the one thing fully in your control. I said fifteen minutes earlier that you should arrive early; on reflection I’d say the real rule is just don’t arrive late, because late arrivals walk onto a mat full of seated people mid-bow, which is the one entrance nobody enjoys making.

    “Is it dangerous?” It’s a full-contact martial art with throws and joint locks, so a sprained wrist is a real possibility over the long run, about on par with recreational basketball. Injuries in beginner classes are rare, mostly because beginners move slowly and fall from low heights under close supervision. Tap early. Tap clearly. Speak up. The risk drops a lot after that.

    Training noteTell the instructor before class about any injury, recent surgery, or ongoing condition that affects how you can move or fall. A good teacher will adjust what they ask of you for the entire hour. Hiding a bad knee and limping through ukemi drills helps nobody, least of all your knee.

    After Class: The Part Nobody Tells You About

    Class ends with the bow-out, and then something nice usually happens. People linger. Good sign, usually. The senior student who worked with you will ask how it went, someone will mention when the next beginner class meets, and you’ll probably be handed a schedule and a rate sheet. This is a fine moment to ask the questions you saved up: what a month of classes costs, whether there’s a beginner-only series, what the testing path looks like, and how the AikiWeb community and dojo directories can help if you ever move cities and need a new mat to call home.

    Physically, expect two things the next morning. Muscles you forgot you had, mostly forearms and hips, plus the tops of your feet, and a vague sense that the world moved a little slower yesterday than it usually does. Both pass in a day or two. The part that doesn’t pass is the question you’ll catch yourself asking by Wednesday: whether you could make the Thursday class. If you’re asking it, the answer is yes, and the borrowed gi will be hanging on a hook with your name on it by next week.

    Sources and notes. Class structure and etiquette described here reflect common practice at Aikikai-affiliated and independent dojos across the US and Canada; individual dojos vary, and your instructor’s word beats any article. External links were checked and working as of October 2026. For more on this site, start with what aikido actually is, then the companion guides on dojo etiquette for beginners, tying your belt (obi), and ukemi, the rolling and falling basics you’ll meet in your first warm-up. This is training guidance for a supervised martial-arts class, not medical advice; for any injury or health concern, see a qualified professional.